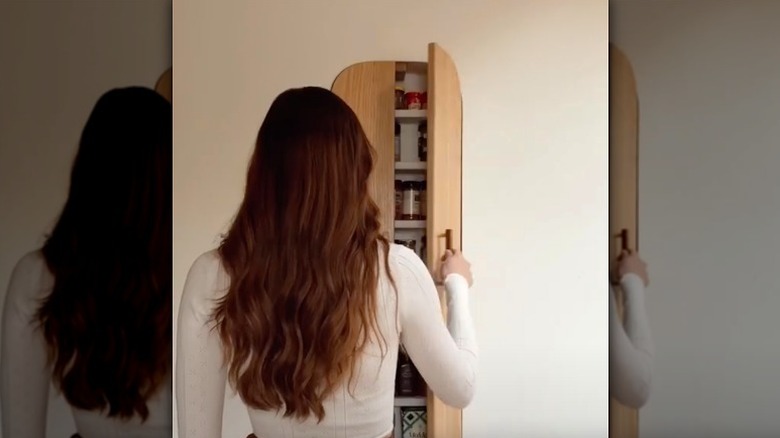
Keep Countertops Clutter-Free With A Custom DIY Built-In Spice Rack Solution

Creating kitchen storage doesn't have to feel like an impossible challenge, even when you think you've filled out every bit of usable space. In some instances, it's the art of subtraction that brings satisfaction. Rather than add another solution that sticks out into the room or install a cabinet spice rack to solve your kitchen storage space problems, this may be the time to consider a built-in DIY spice rack. By recessing a rack in the wall, you'll create all the storage you need and clear up counter space without sacrificing an inch of breathing room.
Spices don't need much shelf depth, so the shallow area between two-by-four studs could be the perfect spot to house them. Measure your spice jars to determine the shelf spacing and the number of shelves needed. You can then cut a hole in the wall to fit them.
Find an interior wall in the kitchen near your prep areas where you would have convenient access to your jars while cooking. Locate the studs using a stud finder, preferably one with built-in wire detection if you're concerned about electrical lines behind the drywall. Then, cut out the drywall between the studs, removing a rectangle equalling the rough measurements of your built-in spice rack design. After that, build a rectangular frame with shelves to fit in the hole. With some trim and few finishing touches, the completed custom construction will be sure to please the eye while keeping your countertops clutter-free.
How to build an easy DIY built-in spice rack
Wall studs are often roughly finished and uneven, making them a poor place to install shelving directly. For clean looks and a sturdier shelf, make a rectangular frame to fit in the hole and then attach to the wall studs. Measure the distance between the wall studs at different points, and size the frame to fit where it is narrowest. You can tighten up any gaps with shims after you put the shelving in place. To complete the rough frame for the insert, you can also add two-by-four spanners between the studs at the top and bottom
Build the shelving insert frame with one-by-four boards based on the opening's measurements, using a square to ensure right angles at every corner. Fix the corners with wood glue and brad nails. Then, measure and mark the shelf placement. Install the shelves with glue and brad nails, using a square and level to keep them straight. If you're using a backing, install it now, using glue and nails to hold it to the frame.
Once complete, set the frame insert in the rough opening. Bring the front edge flush with the drywall. Use shims to fill gaps on the sides between the frame and studs and a level to ensure it stays straight. Nail or screw the frame in place, countersinking the heads to make them easy to fill and conceal. Frame the secured shelving with trim to cover the drywall gap, and caulk the seams for a flawless installation.
Customizing your spice rack to suit your tastes
While it's straightforward enough, the fun of this built-in spice rack project comes in customizing the design at various points. After building the shelves, consider the backing. You can use the existing opening in some cases, which may be nothing more than the back of the opposing wall. If possible, you can try mudding any gaps and sanding them smooth to paint or apply wallpaper. Otherwise, install a backing directly to the shelving insert. Plywood or fiberboard will work fine, especially if it's thinner than the drywall because this will prevent the shelf from sticking past the wall and creating issues with the trim. To save money and add a unique pattern, you could also repurpose leftover floor scraps, fabrics, and other materials to form the back panel.
For the shelves, install guards to keep the spices from falling off. Adding simple wood slats across the frame during construction will work. A run of twine or a gallery rail painted to match your kitchen colors, meanwhile, will add a vibrant accent and splash of personality. To enhance the design further, attach a door to keep everything hidden. Not only will this clean up the random assortment of herbs and spices, but it will also protect them from damaging light and help them retain their flavor. Plus, it's another opportunity to add personal style to a clever functional kitchen addition.