The Genius IKEA Hack That Gives Ugly Pedestal Sinks A Stylish Upgrade

We may receive a commission on purchases made from links.
Ugly pedestal sinks can detract from a bathroom's overall aesthetic, often appearing outdated or mismatched with the room's decor. The minimalist design of a pedestal sink can lack visual appeal and fail to blend well with the room's style. Additionally, the exposed plumbing behind the sink can create an unkempt, unfinished look, making it harder to maintain a cohesive, polished space. When you upgrade to a new shower curtain, rug, and decor, you might find that your pedestal sink holds back your bathroom's new look. Fortunately, there is an IKEA hack that can give your old, pedestal sink a stylish and unique update. For this hack, you just need to head to IKEA and pick up an unexpected item — MAGASIN bread boxes. With two bread boxes, wood, screws, dowel legs, a small tension rod, paint, and some power tools (jigsaw, table saw, and screw driver), you can hide all of that unsightly plumbing while upgrading the look of your bathroom.
Not only does this hack elevate the look of your bathroom, but it's a great storage solution for small spaces, as well. This project provides a stable cover for a pedestal sink that does not need to be attached to the wall or floor. It makes the hack great for renters and those who enjoy switching up the look of their bathroom regularly. There are fun ways to customize this project, as well.
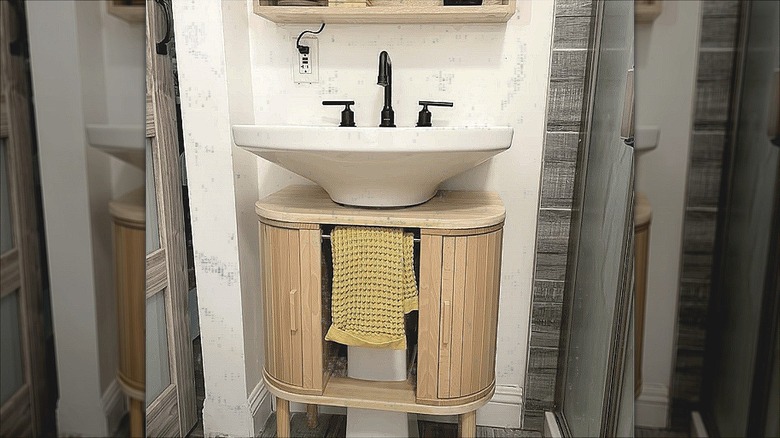
How to make your IKEA breadbox bathroom cabinets
To begin this project from TikTokker Amandadezpat, place one bread box on either side of your pedestal sink (they will sit upright on their sides, curved drawers towards the bathroom, bottoms against the sides of the sink's pedestal). Trace and cut out a cardboard template to cover and connect the top ends (sides) of the bread boxes, extending to the wall on each side. Use the template to cut a top and bottom for the cabinets using a jigsaw. Plywood or spare shelving would work here. For the areas that extend behind the sink, measure and cut the pieces of wood that will cover the space, and flute them with a table saw to match the grooves in the bread boxes. Then, apply wood glue to the edges and insert the extension pieces.
To finish the bread box cabinet unit, turn the unit so the bottom side is facing up. Install a threaded insert where you want each cabinet leg. Do this by drilling a pilot hole and screwing in the inserts. If you chose a soft wood for the cabinet ends, press-in inserts will work. Now, screw in the cabinet legs and paint the unit so all the components match. A waterborne alkyd (oil based) paint is best for a bathroom's humidity. Finally, slide your new bathroom sink cabinet into place and add a tension rod between the two bread boxes to create a clever, space-saving towel holder. That's it — a cover for your ugly pedestal sink that doubles as extra bathroom storage.
Adding custom flare to your new sink cabinets
When it comes to customizing this IKEA hack, there are plenty of options. Instead of fluting wood for the extension panels, you could hang colorful fabric from small tension rods that run from the back of the bread boxes to the wall. This would save work while also giving your cabinet unit a brighter, more unique look. Adding fabric to the bottom of the unit, between each leg, is another riff. Attach the skirt with a staple gun or something like Loctite spray adhesive. Hanging fabric from the bottom of the unit also hides the bottom of the sink's pedestal. Instead of hanging a towel or fabric panel from the tension rod in the center of the unit, you could staple or glue a piece of fabric inside of the unit for more permanent coverage of the pedestal.
There's also no need to reserve this hack just for the bathroom. You can turn an IKEA breadbox into a chic bedroom nightstand, living room end table, microwave cart, or even a television console. A bread box table would make a great addition to a porch or patio, as well. For this, use a weather-resistant treatment in place of regular wood stain or paint.