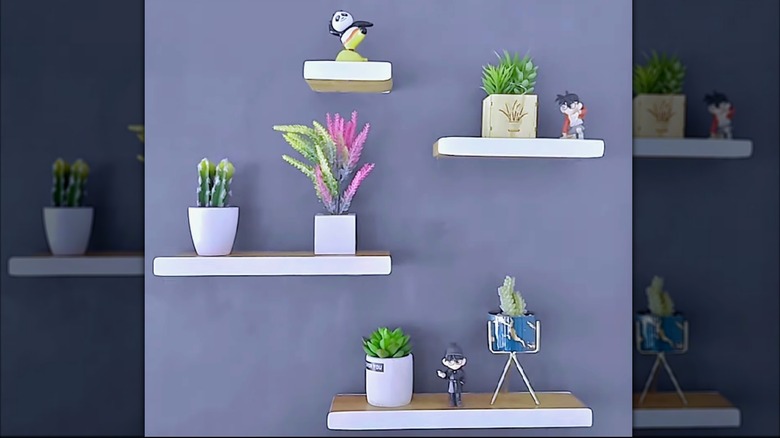
How To DIY A Sturdy Wall Shelf From Leftover Cardboard Pieces
Each time a package arrives at your door, chances are the cardboard it came in either ends up in the recycling bin or gets added to your growing stash of "just in case" boxes. But what if that same cardboard could be transformed into something both functional and stylish, like a sturdy wall shelf? Believe it or not, cardboard has far more potential than just carting around your online orders.
With just six basic materials — cardboard, hot glue, masking tape, three nails (or small Command wire hooks to avoid holes in the walls), a PVC wall sticker, and duplex paper — you can DIY a unique cardboard shelving unit that adds character to your space and, best of all, saves you money in the process. Building your own shelf is incredibly easy, and thanks to the fact that you're using cardboard as your primary material, you won't have to rely on any power tools or heavy-duty equipment. These shelves not only add character to a room, but also give that cardboard a second life. Talk about eco-friendly!
How to DIY your very own stylish cardboard wall shelf
The steps for this cardboard DIY are simple, but the key is taking your time to ensure smoothness. Begin by cutting out four pieces of cardboard in a half-circle shape. You can choose how large or small you want these shapes to be. Glue each piece on top of the other using a hot glue gun to create a layered look. Repeat this process so you have two thick half-circle shapes — one for the back panel accent and one for the underside of the front of the shelf.
Next, cut out four rectangular pieces and layer them together using hot glue. This will form the actual shelf. Make sure the length of these pieces is at least double that of the half circles to accommodate the accents. Then, glue one half circle to the back of the shelf (the part that will lean against the wall) and the other underneath toward the front, allowing it to hang down.
Once this is done, go around the rough edges of your rectangular piece, as well as around the half circles (the areas that show the cardboard layers), and cover them with masking tape for a neat finish. After that, using a PVC wall sticker, begin covering the shelf, starting with the flat rectangular piece. Work with one side at a time, using a crafting knife to carefully cut and lay the PVC flat, cutting the corners for an easy fold. Repeat the process on the other side. Finally, glue the edges of your shelf with duplex paper and trim off any excess for a clean, smooth look.
Alternative wrappings to cover your cardboard wall shelf
A PVC wall sticker is one option for wrapping your DIY cardboard wall shelf, but other materials like craft paper, contact paper, strips of wallpaper, or even good ole' paper mâché could work just as well. If you're unsure about wrapping the coating around the entire shelf once it's assembled, consider wrapping each piece individually before gluing the half circles onto the rectangular shelf piece. For a simpler, more minimalist look, you could skip the accents altogether and just attach a lip to a basic rectangular shelf to prevent objects from sliding off. And if you're feeling bold, why not try a DIY corner shelf for your office?
Once your wall shelf is complete, it's time to showcase your hard work. To hang your shelf, first mark where the nails will go by pressing them into the back of the shelf. Remove the nails, then nail them into the wall at the marked locations. After the nails are securely in place, simply slide the shelf onto them, and you're good to go!