DIY A Decorative And Functional Storage Tray From A Dollar Tree Garden Essential

We may receive a commission on purchases made from links.
Looking for an elegant yet inexpensive way to spruce up the visual appeal of your living space? A neat decorative storage tray might do just the trick. You can customize this kind of accent piece with all sorts of small items, from trinkets and candlesticks to pocket-sized books and potted plants. The arrangement you choose can blend in with your preferred interior design style, or stand out from the crowd to create an eye-catching focal point. Decorative trays can also serve a practical purpose as well. If you're using them in your living room, they can keep magazines and papers organized. If you put one by your door, you could use it for holding everyday items that you need to locate before leaving the house, such as your keys, your wallet, or your sunglasses. To top it all off, DIYing your own storage tray might be easier than you think.
You can DIY a decorative and functional storage tray from a pair of Dollar Tree Garden Collection Foam Kneeling Pads. Use these for the sides of your tray. You should also get a white foam board for the base, a pair of Dollar Tree's Metal Drawer Pulls for the handles, and some white craft paint. All you need for holding everything together is some hot glue. This project might just be one of the most stylish ways to decorate the corners of your home on a budget.
How to make a decorative storage tray with garden kneeling pads
To begin, cut the ends off the shorter sides of your pads with a craft knife, so that the edges are straight. In doing this, you will be removing the handles. Then, cut the pads lengthwise down the center. Now you should have four equal-sized pieces. Two of these will serve as the longer sides of your tray, and one can be cut in half to create the shorter sides. You won't need the final piece, but you might want to save it as a backup. Next up, it's time to paint the four tray sides you just created. A matte white acrylic paint, such as FolkArt Home Décor Chalk Paint, should work perfectly.
When you're done painting, mark where the screws from your drawer pulls are going to go on the shorter side panels. Use your glue gun to melt holes through the foam in these marked positions. Alternatively, you could use a drill with a spiral bit. Then, attach your handles with the provided screws and a screwdriver. Next, use hot glue to link the sides together. Fit the edges of the tray together so that the smaller sides fit within the larger ones. Once you've put these pieces together, measure their combined length and width, and cut a foam board down to these same dimensions. Unlike in the example in the video, try gluing this panel to the bottom of the sides for added stability.
Ideas for styling and upgrading your new decorative storage tray
There are plenty of interesting ways to customize or upgrade your decorative tray to make it better suit your space. For starters, you could opt for a different paint color when you're working on the side panels. Matte black, for example, could look both sleek and elegant. A light blue or green, on the other hand, would give the piece a more refreshing look. If you're feeling artsy, you could even paint patterns or pictures on the sides. And if you feel like your tray looks a bit too tall or boxy, try cutting down the side panels before attaching the bottom. This could make this décor piece work a bit better for things like displaying magazines, or keeping the TV remotes within reach.
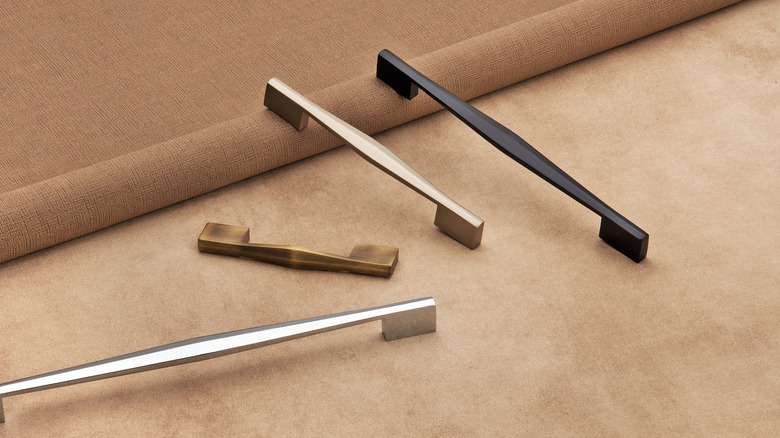
Want to make your tray look a bit more glamorous? There are plenty of shinier types of cabinet hardware you could use in place of the black drawer pulls from the original design. JOY DECOR Gold Cabinet Handles, for example, could be an eye-catching addition to your tray. If you'd like to make the base of your tray stronger, you could try cutting a groove into the inside edges of your side pieces, just a fraction of an inch from the bottom. Then, you could fit your foam board into this groove, in a similar fashion to a drawer box. After this project, you might want to try more décor ideas to upgrade your home on a budget.