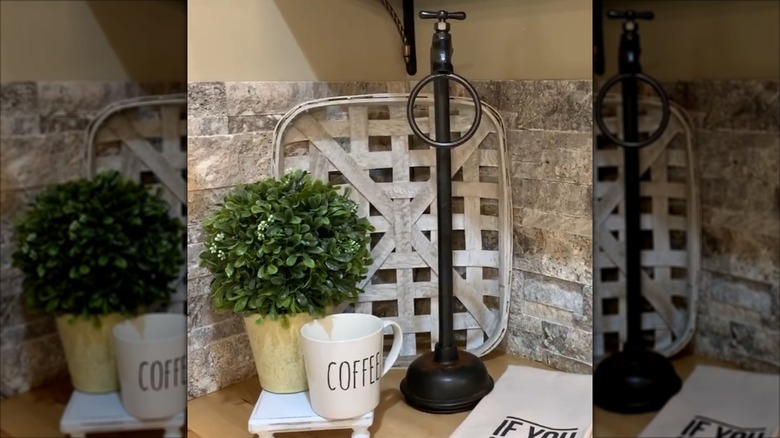
Try An Easy DIY To Create An Adorable Countertop Display For Your Kitchen Towels
We may receive a commission on purchases made from links.
Wayfair's Water Spigot Towel Holder is way cool, and while it's inexpensive enough to purchase — about $50 and some change – you can do yourself proud by making your own version of the towel rack. More importantly, given that you can create this DIY project for about half the price of the Wayfair model, you'll be getting a cute and affordable way to organize your countertop in one go.
As is the case with many of the most clever DIY projects, your supplies list will start with some unconventional raw materials. A toilet plunger, a heavy ceramic bowl, and some garden sand from the Dollar Tree, plus a $2 metal ring from the hardware store, are just the start of the supplies list for this DIY budget-friendly towel rack project. The garden spigot and the plastic PVC elbow pipe are also hardware store items, though you can find both at Walmart for around $5 each. The project requires a small piece of cardboard that can be scrapped from an old box. A few glue sticks and a glue gun bind all the pieces together.
To paint the piece, add some black Rust-Oleum paint and primer to your supplies list. However, if you want to really emphasize the metallic look of the project, it'd be kind of fun to coat it with some silver hammered metal paint by Rust-Oleum Silver Hammered Spray Paint instead. The paint mimics the metallic look of the spigot and lightens up the color a bit. For those of you who don't want black fixtures in your kitchen, this might be a better option.
Assembling the countertop towel holder
Because the metal ring and spigot make this project top-heavy, there needs to be a counterbalance at the bottom of the piece to allow it to stand without falling over. This is where the bowl, the sand, and the cardboard come in. By cutting a circle the exact circumference of the mouth of the bowl, you'll create a "lid" that you'll use to seal off the bowl.
But before you do that, empty the sand into a zip-top bag, pushing all the extra air out of it. If you place it into the ceramic bowl before you glue the cardboard lid on, the sand will be sealed inside the bowl. This creates the counterweight you need to keep the project standing upright. Without sand, you could use a bag of small pebbles or even some of the floral marbles — both from Dollar Tree — to fill the bowl. You just need something heavy enough to weigh the bottom of the towel rack down. Once you have the sand inside, glue the round piece of cardboard onto the bottom of the plunger.
When glued together, the plunger, the PVC pipe, and the spigot will create the main shape of the towel rack. With the help of some hot glue, the PVC pipe connects the water spigot to the handle of the toilet plunger. A little more glue on the bottom side of the bowl keeps the rubber suction cup from the plunger attached to the sand-filled bowl. Once all of that is attached, the ring is glued onto the mouth of the spigot, and the spray paint is applied.
Taking the towel rack to the next level
Although the cardboard piece on the bottom of the towel rack serves its function, there's a possibility that it could slip and slide around. Once the paint is dry, try adding some gripping pads to the bottom of the piece (like you use on the bottom of your furniture legs) to keep it from sliding around on the kitchen counter. You'll need to put a couple on there so that it's not lopsided. A triangular- or square-shaped configuration would do the trick.
Because this is a piece that's going to be sitting by the kitchen sink, it makes sense to add some extra features that make it a little more chore-friendly. There are soap dispensers on the market that pop apart, like the HASKO Accessories Store Suction Soap Dish with Hooks, allowing you to work with the individual pieces of the soap dish. Buy a couple of the soap dishes, pop them apart, and glue the soap dish portion of them to the side of the toilet plunger handle.
If you're concerned about the basket staying in place, you can add a zip tie to it. If you do, be sure to snip off the end of the tie once it's fastened to the plunger's handle to make the piece look neater. This will create a soap dish to hold a bar of solid dish-washing soap. As with the rest of the pieces in this project, the soap dish and the zip tie should be painted the color of your choice so that they match the rest of the towel rack.

