How To Build A Beautiful Garden Cob Wall From Empty Jars
We may receive a commission on purchases made from links.
For millennia, people have made durable homes from whatever is nearby. You're probably familiar with adobe, that smooth brown material that lots of us equate with architecture in the American Southwest. Dwellings made from straw, clay, sand, and other natural materials have existed for centuries, if not millennia, and were found on nearly every continent. Cob walls are like the adobe home's British cousin. Take nearly the same materials but add in a much higher proportion of straw, and you have cob. Though it brings corn cobs to mind, "cob" comes from the Old English word for "lump". It's an amazingly durable and inexpensive building material. Paired with repurposed glass jars and/or bottles to become a wall, it's human ingenuity at its finest. Plus, walls made from cob and glass are stunning. If you want to try your hand at this age-old building method combined with modern resourcefulness, a garden wall is a great place to start.
Cobble together a feature wall that will last with little more than glass and dirt. To do so, save up scores of glass jars and bottles, mix up enough cob material to fill a tarp, and settle into a lovely modern twist on an ancient practice. Gather the aforementioned tarp and jar stash along with lots and lots of dirt, clay, sand, and straw. Set aside at least three 5-gallon buckets, a few rags, a roll of duct or packing tape, a shovel, a drill with a mixing attachment, and enough large (6-10 inch) landscaping stones to form a foundation for your wall.
Decide what kind of cob-wall project to build
This project can feel a bit daunting at first glance, but there are ways to give it a whirl without committing an unending string of weekends to the endeavor. If you already have a brick retaining wall for your garden, you can give a foot or two of cob-bottle topping. Or perhaps you want a bit of an enclosure at the side of your patio; a small wall about 5 feet high and extending the same amount will make a satisfactory privacy barrier for a sitting area. Turn your backyard into the neighborhood's entertainment hub by building a cob-jar bar capped off with a counter perfect for pouring a few for your friends.
Intrepid builders, consider creating garden beds or encircling your vegetable patch with cob-jar walls. Glass and a dirt mixture come together well even for a full retaining wall. Risk-takers who are patient, handy, and have lots of time, why not put together an entire yard enclosure fitted with artistically placed bottles?
No matter the final destination for your cob glass wall, set up all of your building materials close by — water and earth-based materials are heavy. Ideally, it will be near the soil you'll be taking directly from the ground. Yet, there's no need to dig into your terra firma if you don't want to scar your landscaping. There are many sources of free and inexpensive dirt, sand, and clay.
Prepare bricks and a foundation
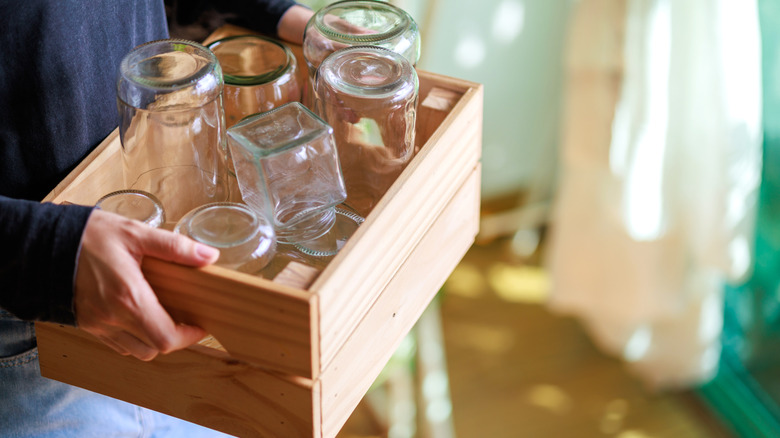
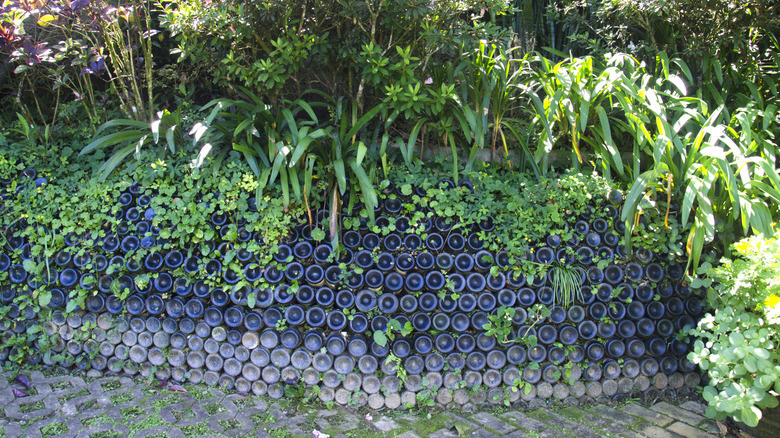
A common practice for building walls with upcycled glass is to cut off the openings or necks of two same-sized containers, and tape the two cut ends together for a closed "brick". Laying so that there are glass bases on each side of the wall will give you a similar smooth look on both sides. However, for some added quirk, leave bottles intact; intermix sizes and colors of jar bricks and whole bottles. Protruding necks on the other side of the wall will give you a touch-worthy texture. Feel free to prepare your containers however you like. You may opt to tape together jars right at their lips to avoid cutting them. Or many builders eke more use out of each container by laying them lengthwise in the cob. This method leaves you with a thinner wall, but more light will pass through.
Before mixing up your first batch of cob, you need to build a foundation for your wall. You can use gravel or recycled scrap concrete rubble as a backfill. (Check online for suppliers in your area.) A row of sturdy stones is a good bet for the foundation. The uneven edges of the stones make the perfect surface for cob to grip onto, and partially burying them about 6 inches into the ground will anchor the wall for a long life. Dry stack the material rather than using mortar and lay your stones into the wall parallel to the length to keep your foundation strong long term. Build up several rows of rocks until you have a foundation at least 18 inches high above grade.
Make the cob from scratch
The general guidelines for making cob are mixing two parts sand to one part clay or clay soil. Those of you with heavy clay soil in your garden won't have to go far to source this ingredient. There's not an exact amount of straw recommended, but once you've mixed your cob, you should see strands of straw running through it. Start with a small amount of straw and sprinkle in more as you go.
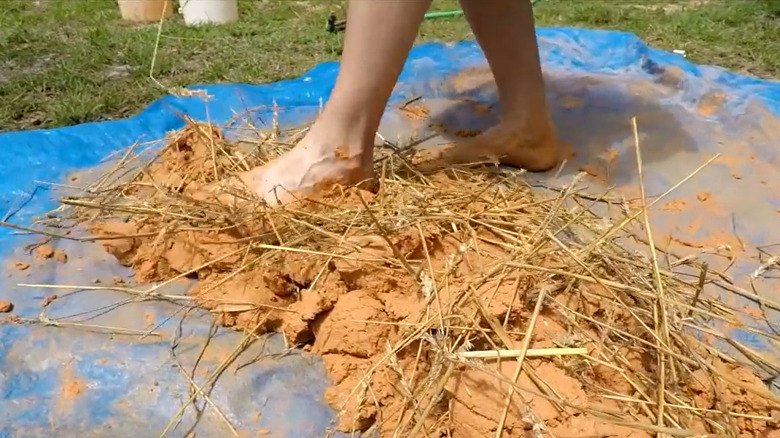
Clay and clay soil need to soak before you use them. Fill up 2.5 to 3 buckets with clay/clay soil and water, and let the clay absorb the water overnight. The next day, shake open your tarp and take your shoes off — because things are gonna get messy! Dump a wheelbarrow load of sand onto the tarp before making an indentation in its center. Pour any excess water from the buckets of clay, and then dump most of their contents into the indent in the sand pile. Save about half a bucketful to use later.
The last step of making cob is to step onto the mixture and work the clay and sand together with your feet. Sprinkle straw in as you stomp until you have a substantial amount distributed through the sand-clay mix. Pour on more water as needed to make the ingredients mix well. Finally, test your cob; if you can form a ball that holds together well and is intermeshed with plenty of straw fibers, it's ready.
Build your sustainable wall
With your cob mixed, grab that bucket half full of watery clay. This will become slip, a solution that bonds the stones to the cob. Mix the water and clay with your drill and mixing attachment until consistent, pouring in more water if you need to. It's ready when the slip is like a slightly runny paste that you can scoop up with your hand. If necessary, mount a piece of hardware cloth to a wooden frame, and pour the slurry through the mesh to sieve your slip.
To get started, smear this paste over the top layer of stone, and begin applying the cob while the slip is still wet. If it dries, dab some water onto the slip before adding cob. Smoosh the cob into a layer 2 to 3 inches thick before laying your first glass "brick". Press it into the cob and apply more cob around it. Arrange more bottles and jars perpendicular to the wall, maintaining the 2- to 3-inch spacing between each container.
As you work, smooth the chunks of cob together well with your hands. Use a wet rag to wipe the exposed ends of the glass containers to keep them clean. Continue this process until you have a wall about 2 feet high; then cover your work with a tarp and let it dry overnight. On the following days, if your cob has dried out, wet the top layer of cob, and soften it with your hands so it will bind with new cob. Repeat this cycle until your wall reaches the height you're aiming for. Then you have a wall!