Stop Tossing Old Color Pencils And Try This Illuminating DIY Instead

We may receive a commission on purchases made from links.
Coloring is often thought of as a kids' activity, but today, adults of all ages can be found eagerly filling in blank pages. Many use coloring as a way to relax, relieve stress, and even practice meditation. If you or someone in your home enjoys drawing or coloring, you probably have a bin full of colored pencils that have been worn down to a nub. Stubby pencils can be less fun to draw with, but it still feels sad to throw them out, especially when your favorite colors get worn down the fastest. While these well-loved drawing tools might no longer serve their primary function, their creative career doesn't have to be over. With a few supplies and a steady hand, you can transform old colored pencils into a DIY lamp so they can continue to brighten your day! This lamp project consists of two main parts: a wood lamp base and a resin dome in which the colored pencil segments seem to float.
To make the pencil dome, you'll need a large wooden craft ball, clear liquid epoxy resin, a resin mold, super glue, and, of course, your old colored pencils. To make the base of the lamp, you'll need a blank woodturning block, such as this 7x2 Kiln Dried Select Maple Woodturning Bowl Blank, and a small lamp bulb kit or a wireless puck light. In terms of equipment, you'll need a saw, chisels, and a woodturning lathe, one of the essential tools worth investing in to start woodworking at home. With all these things checked off your list, you're ready to get to work.
Creating the pencil lamp dome
First, gather your colored pencils and use a saw to cut them into equal lengths of about 1 inch or so. A large craft ball, like the CYS EXCEL 6" Decorative Wood Ball, is an excellent form for your pencil dome to ensure an even spherical shape. The diameter of this wood ball should be roughly 2 inches smaller than the desired size of your finished lamp. Saw the wood ball in half, then mark guidelines around it so it's easy to arrange the pencil segments evenly. Using super glue, start adhering the pencil segments around the sphere so they point outwards.
When all of your pencils are attached to the wood and the glue is dry, place the whole thing upside down in a resin mold. This doesn't necessarily need to be a bowl-shaped mold, although that can make the process easier. The pencil dome will be carved into shape later, so the mold just needs to be large enough to fully submerge everything. Mix up your clear liquid resin and pour it over the pencils, filling the mold. Pour slowly to prevent bubble formation. Epoxy resin can take up to 72 hours to fully cure, so wait a few days before popping the pencil dome out of its mold.
Use a lathe to shape the lamp parts separately
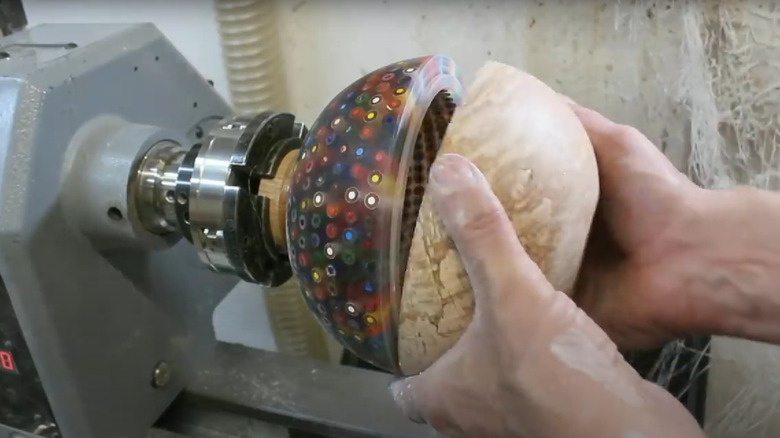
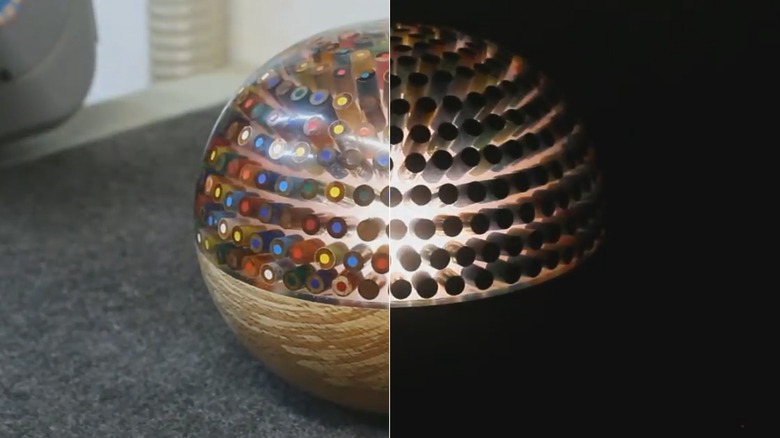
For your safety, always wear gloves, goggles, short sleeves, and a respirator while working at the lathe — inhaling epoxy shavings and sawdust can be harmful. Center the resin-covered pencils on your lathe and begin turning and chiseling. As you carve away the resin, the colored pencils will start to reveal themselves. Continue working away at the resin and pencils until you achieve a smooth, half-sphere shape, then stop the lathe and flip the piece around. Begin carving out the inner wood sphere that you adhered the pencils to earlier. Once you've scraped out the entire inner wood form, you should be left with a clear resin dome of floating, colored pencils!
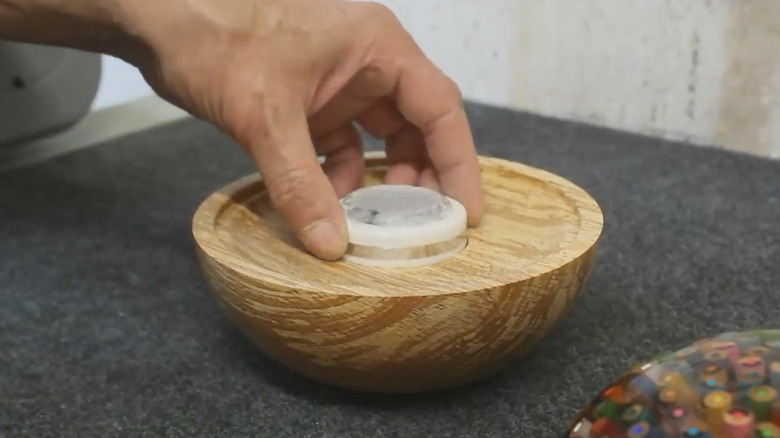
To make the base of the lamp, put your wood bowl blank on the lathe and carve it down to the same size as the resin dome, essentially creating two halves of a sphere. Carve an edge around the circumference of your wood base so that the pencil dome can slide on top like a lid, then drill a hole through the center of the wood base for the light bulb wire to pass through. Alternatively, if you're using a puck light, you can simply carve a divot in the center to keep the light from shifting inside the lamp.
Refine, assemble, and finish the lamp
Put the two halves of your lamp together to ensure a good fit — but we're not ready to leave the lathe just yet. At this stage, your lamp parts are probably looking a little dull and may not line up perfectly where the two halves meet. With both pieces put together, spin the lamp on your lathe once more to chisel carefully at the seam between the two parts, bringing them in line with each other. After shaping the lamp down to your liking, sand it lightly and polish it with abrasive pastes until it's satisfyingly smooth. You can also stain the wood base at this stage, if you so choose.
Take the finished lamp off of the lathe and separate the two halves. For a wireless option, insert a remote controlled puck light, like the BLS Wireless LED Puck Lights. If you hate the idea of constantly changing batteries, opt for a wired light bulb, like the Darice 6' Accessory Cord with One Bulb Light and run the cord out through the bottom of the lamp. You may have to carve a small notch in the base to keep the lamp from rocking on its cord. Finally, place the pencil dome back on top of your lamp, turn on the light, and bask in the glow of your creation. This DIY colored pencil lamp would make a super cool gift for the art-lover in your life, but we also wouldn't blame you for using this must-have decor to update your home arts and crafts studio.
Modifying the design and difficulty
As is the case with many DIY projects, there are countless ways to change the design of this colored pencil lamp. For example, you can forgo the wood base altogether and make the two halves out of solid resin and pencils. The pencils themselves don't need to point outward; they can be stacked horizontally, aligned vertically, or tossed in a random formation. Instead of a sphere, you could opt for a cube or pyramid resin mold. Choose warm red, orange, and yellow pencils to mimic a soothing sunset or create fun gradients or patterns in the lamp. A color-changing LED puck light is an easy way to add another layer of whimsy.
Although it is fun and challenging to make, this DIY project could have a few downsides. At around $80 per gallon for high-quality epoxy resin, the cost of materials can add up, and much of the resin will be carved away and wasted, anyway. Given its size, the light-blocking pencils, and the resin haze, this lamp isn't suitable for providing light to a whole room. Instead, it's better used as a decor piece or accent light to bring a soft glow into your space. Lastly, while there are some creative ways to modify this project to make it more beginner friendly, the original, sphere-shaped craft is better suited for experienced woodturners. At the very least, you'll need to have a woodturning lathe — and know how to use it safely. If you don't have access to a lathe, don't despair; you can still build the cozy modern lamp of your dreams with a few IKEA products.