Creative Ways To Upcycle Thrifted Baskets For Your Plants
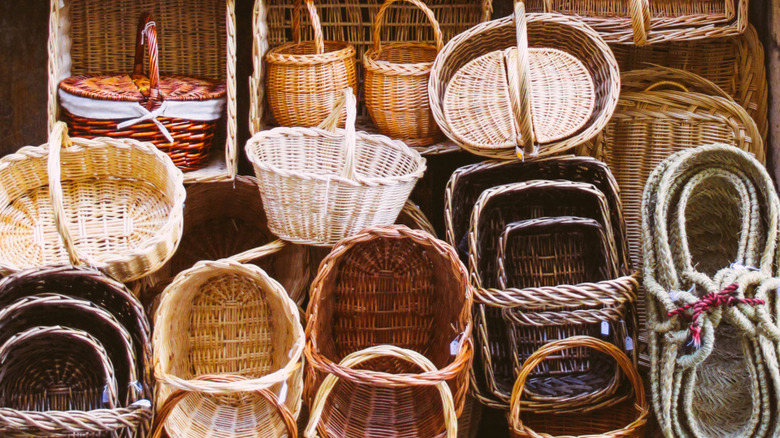
Thrifting baskets is not only fun, it can also be economical. An adorable wicker basket costs just a few dollars at a thrift shop, and it can easily be upcycled into an adorable brand name dupe. Indeed, there are plenty of creative ways to repurpose thrifted baskets around your garden, including as wicker planters that cost a fraction of the $30 or more you'd have to pay for a readymade version on Amazon. You can also personalize your baskets with paint, accessories, legs, and other items before placing your plants inside.
After choosing the sizes and shapes that best suit your vision, remove any broken hardware, unwanted handles, or unnecessary lids. Next, get the thrifted baskets squeaky clean using common kitchen items. Give it a once-over with a dry microfiber cloth, then wipe it a second time using warm water and a couple of drops of dish soap. Just make sure the cloth isn't dripping, as excess water will damage the wicker.
Before placing your plants inside, it's time to get creative. Use spray paint to cover the baskets inside and out with a bold hue or any color that matches your aesthetic. Alternatively, you can create fun multi-colored patterns or eye-catching stripes using painter's tape. If the tape isn't sticking well, really press it down hard and ensure that each strip wraps all the way around the basket, then overlaps onto itself, as this will help it stay in place. If you'd rather work indoors, swap the spray paint for a tube of multi-surface paint and a brush to create the patterns of your dreams.
Take your basket planter DIY to the next level
While painting thrifted baskets is a great way to add personality, you can take things a step further by adding fun accessories to your upcycled planters. As designer and DIYer Sarah Teresinski showed off on Instagram, a hot glue gun is all you need to add a statement-making tasseled trim around the top or a punchy piece of fabric around the middle. What's more, you can easily elevate the baskets by upcycling curtain rod ends into feet. Once decorated and dry, flip the basket upside down and twist four curtain rod finials into the bottom through the tightly wound wicker. Space them out evenly for balance, then flip the basket over and secure them with washers and bolts from the inside of the basket. Make sure to choose finials that are round or have a flat end — nothing pointy — as your planter will need to balance on them.
Another great option is to choose a basket with a handle running across it to create a hanging planter. Choose a plant in a plastic pot to reduce the weight, pop it into the basket, and hang it on a ceiling hook, ensuring the hook is wide enough to accommodate the handle. To eliminate the risk of water seeping through, line the basket with a plastic bag. Finally, depending on how high the plant hangs, you may need to elevate it inside the basket for added visibility. This can be easily achieved by placing the pot on an upturned plastic box or piece of Tupperware.
The right way to plant directly in a thrifted basket
The easiest way to turn thrifted baskets into planters is to fill them with plants that are already growing inside their own respective pots. This is especially handy if you're planning to keep your finished DIY project indoors, as it will prevent water from seeping through the bottom of the basket and onto your furniture or floor.
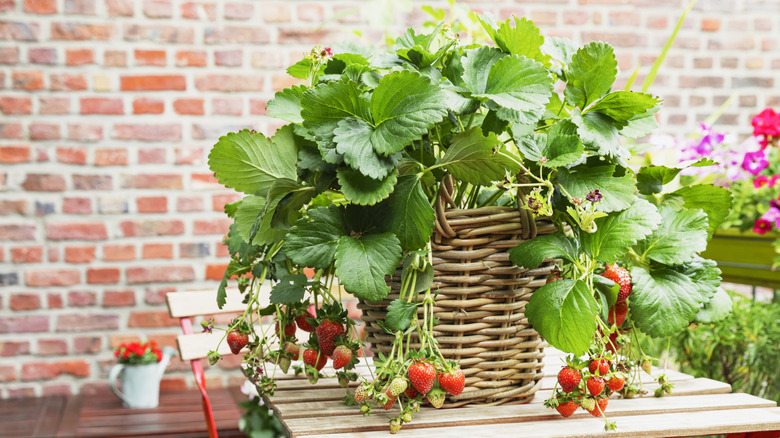
If, on the other hand, you're planning to keep your planters outdoors or you simply have your heart set on planting directly in the baskets, you'll need to follow a few additional steps. First, line the basket with burlap material, ensuring that it covers the bottom and sides completely and hangs over the edge. Next, repeat the process using a sturdy plastic garbage bag and use scissors to poke small drainage holes in the bottom, avoiding the burlap. Fill the basket with potting mix, add your plants, then cut off the excess plastic and burlap, being careful not to nick any of the plants. What's more, be sure to leave a lip that's about 1 inch taller than the soil level, as the material will help prevent water from coming into contact with the basket and damaging it. While it will barely be visible, if you don't want any material peeking through at all, finish off your DIY by covering the burlap and plastic with pretty moss.