Free Up Storage Space With A Wall-Mounted Shoe Shelf That's Easy To DIY

There's so much to love about a diverse shoe collection, the key exception being the space it consumes. As you buy more pairs, you have to get creative with your storage solutions, or you'll be stuck with a jumbled mess of a shoe closet and no room to put anything else. So, how do you tackle the issue? Do you opt for a frills-free solution, like using cardboard for an easy shoe storage hack to organize your closet in a pinch? Or do you put in the extra effort toward a fix that optimizes storage, looks great, and provides limitless versatility? If the latter sounds good to you, a wall-mounted shoe shelf may be just the DIY to try.
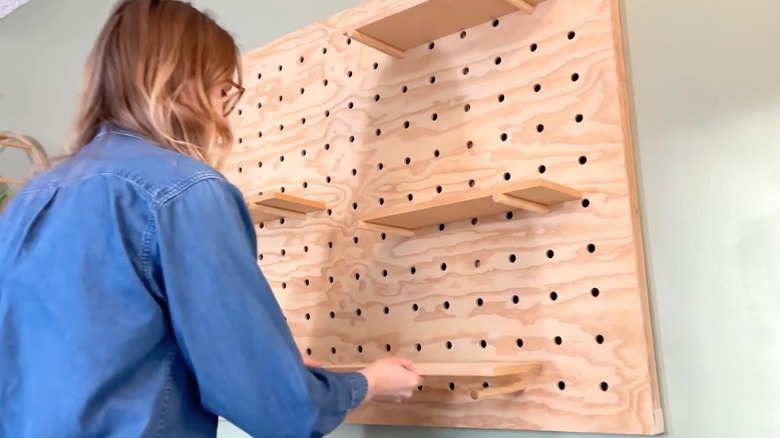
A wall-mounted shoe shelf uses dowels to hold up, sort, and display your shoes vertically against the wall and out of the way. It's like a giant pegboard, creating a sleek, minimalist appearance with all the flexibility to suit your needs. The pegs sit on a hole-filled plywood plane you can size to sit on any free wall area in the room. Glue the pegs in with a standard PVA wood glue or leave them loose. By not adhering the pegs permanently in their holes, you can add, remove, and rearrange them to fit a changing lineup of shoes in varying sizes. With a bit of decoration and a few add-ons, like shelves and baskets, you can even make this do more for your organization's needs throughout the home.
How to assemble your wall-mounted shoe shelf
You can build your wall-mounted peg shelf with thick plywood, MDF, or OSB sheets (e.g., ¾-inch plywood). Get the flattest pieces possible, being careful to choose a good piece of plywood for your project. You can also use several pieces of dimensional lumber, stacking them horizontally to fill your wall from top to bottom.
Create an organized grid of holes equally spaced vertically and horizontally. Consider the length of your shoes, their height, and how you want to store them to plan the most practical spacing. For cleanliness, maintain an even gap from the top, bottom, and side edges. Measure the board's height and divide the length by the desired number of holes. Mark the spacing on both sides of the board, and snap a line between them to line up your rows. Repeat the process with the width for even columns. Then, drill holes where the grid lines intersect.
Using an appropriate drill bit, such as a Forstner bit, drill holes matching the width of your wood dowels for a snug fit. To prevent tear-out in the wood, drill the holes halfway and flip the board over to drill from the other side. If using multiple boards, you can cut the holes in the first board and then lay it over the other boards as a template, avoiding the need to re-measure the spacing for every board. Cut your dowels to a serviceable length (around 6 or 7 inches), and your board is ready to install.
Installing and customizing a more functional shoe shelf
You have all kinds of options when it comes to setting up your wall-mounted shoe shelf, starting with how you attach it to the wall. One easy option is to screw some long construction screws through the board and into studs, which will be crucial to hold the weight. If needed, you can screw into drywall using an anchor. Since anchors generally only hold up to a couple hundred pounds at most, choose the most heavy-duty type possible, and be careful about how much weight you add to your board. Depending on the wood quality, consider sanding and painting the board for an aesthetic upgrade before installing.
The oversized peg arrangement gives you multiple ways to store shoes and other items you need to keep nearby. Stick the pegs into your shoes to let them dangle, or stand the shoes up across two pegs like a store display. For more versatility, you can cut wood boards to rest across pegs as shelves, a great solution for heels. Raise the shelves high up off the floor, and you can store your shoes on the higher pegs while using the bottom row for hanging other items. A pegboard is the coat tree alternative HTGV's Jonathan Scott loves for improving hanging storage, and you can employ it further to hang purses, umbrellas, backpacks, and other essentials near the entryway. Like a standard pegboard, this setup can also manage hanging accessories like baskets and bins with attached hooks to put anywhere on the wall.