15 Clever Ways To Repurpose Dollar Tree Wood Crates For Home Decor And Storage
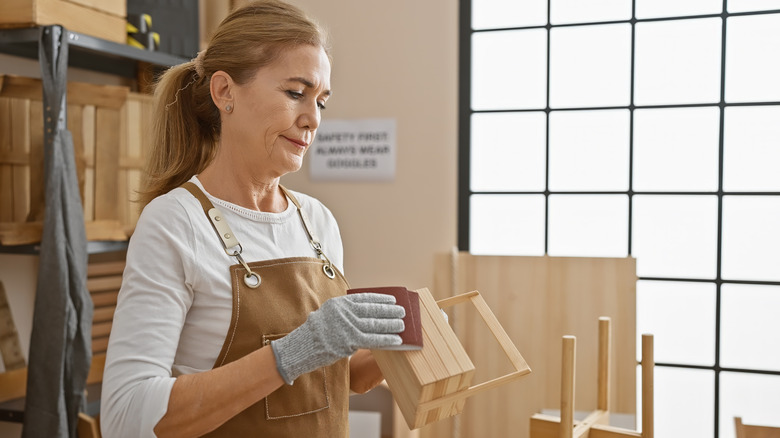
Sometimes a trip to the Dollar Tree is for more than just picking up essentials. It can also be a chance to unlock a world of creative ideas for your home. Two Dollar Tree faves that regularly blow up on TikTok and YouTube are the wooden crates. Whether you use the Crafter's Square Rectangular Wooden Crates or the Wood Slat Crates, there are endless ways to repurpose them into decor and storage. We've created a list of some of ways to use the budget-friendly crates throughout your home, from the bathroom to the craft room. Discover how to create a centerpiece, makeup vanity, and decorative storage shelves.
The Dollar Tree crates' blank, wooden surfaces already offer a rustic touch to your home, but with a few embellishments, it's possible to add even more function and style to these wood boxes. Even though you may need paint, paint sticks, or wood stain for some of these projects, the bargain price of $1.25 a crate means that you can work within any budget to create a unique piece. Some of the supplies required, such as the Glass Tealight Holders, are sold in multipacks; If you don't use them all, you can put the remaining pieces aside for other great Dollar Tree DIY ideas. If you're having trouble organizing a space, want to create a cute accent, or just desire to add some greenery to your home, here are the ways you can use your Dollar Tree mini crates to complete the job.
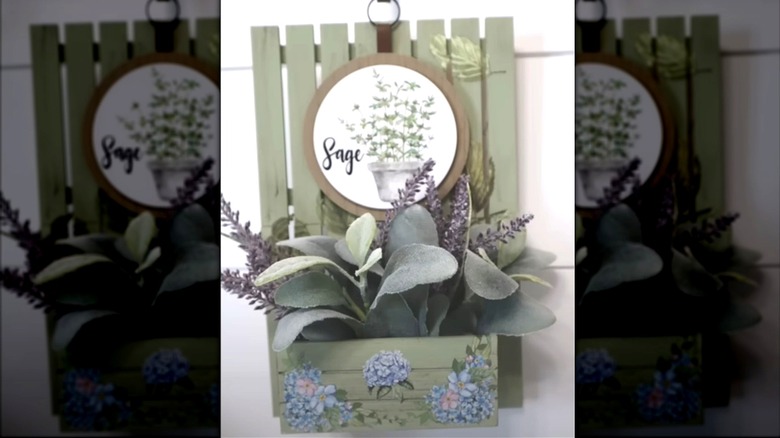
Create a hanging wall planter
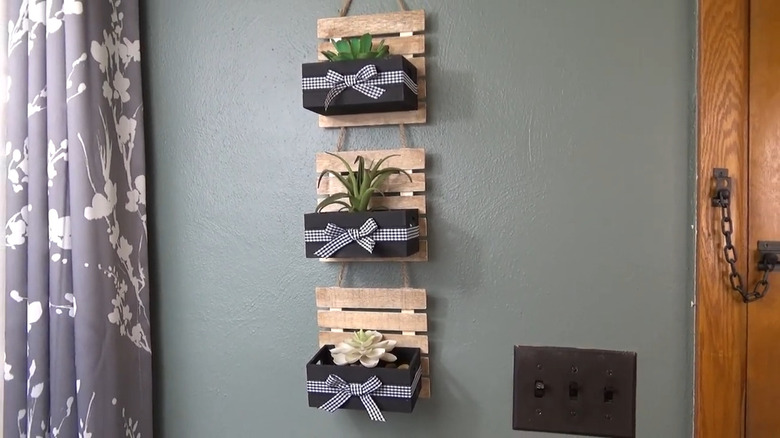
Adding plants elevates your style and makes your home feel more lively. Turn three Dollar Tree wooden crates and three Crafts Hanging Slatted Wooden Signs into this chic DIY planter. Add color via stain or crafting wax, such as Deco Art Americana Creme Wax, to the signs. While they dry, paint the crates and add a ribbon or other accent. Finally, glue the crates to the boards, and attach them together with their jute rope, leaving the top sign's rope uncut to form a hanging loop. Fill the crates with faux or real plants.
Transform into a standing shelf
This clever DIY shelf offers multiple storage cubbies for anything you'd like. It uses 13 wood crates, wood glue, paint sticks, and paint. Glue five crates together on their long sides and repeat. Next, glue the remaining three crates horizontally. Lay the row of three between each row of five and adhere them together. Once attached, paint the shelves a rich white or other neutral. To add more support as well as dimension, paint three trimmed paint sticks cut to size and glue them across each bottom row. Use this shelf for decor or storage.
Build a rustic centerpiece perfect for any season
You can keep this centerpiece around all year long by swapping the seasonal flowers. In addition to four crates, you need a Crafter's Square Wooden Decor Box and five Luminescence White LED Pillar Candles. Discard the box lid, then glue the crates around the box horizontally. Once attached, stain the wood, then sand it for an aged effect. The LED candles will each sit in a corner with the fifth in the middle. Or, eliminate the center candle and fill the space with moss. Add faux flower picks through the crates' handles.
Build a coffee or tea caddy
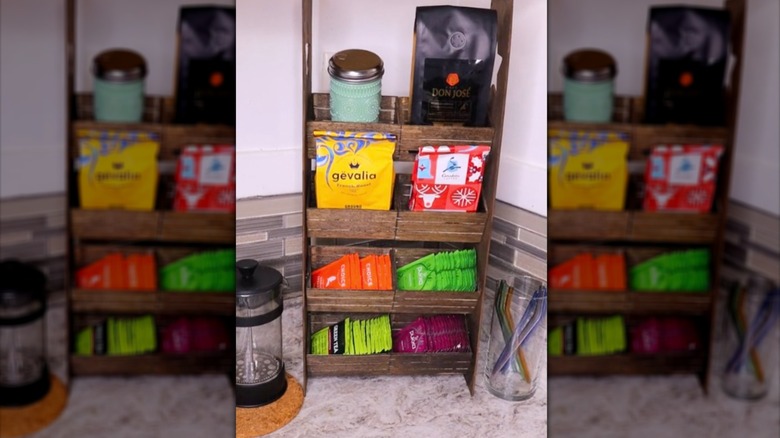
Love a cup of brew first thing in the morning? This combination of eight crates and two Crafter's Square Wood Craft Planks will form a handy countertop organizer for storing coffee and tea. Paint or stain your crates and planks, then glue pairs of crates together with four rows in all. You can decorate the crates, such as with a Stencil Revolution But First Coffee Decal. Once dry, attach a plank on each side to form the caddy's legs, and fill it with your favorite coffee and tea essentials.
Get a dazzling DIY vanity
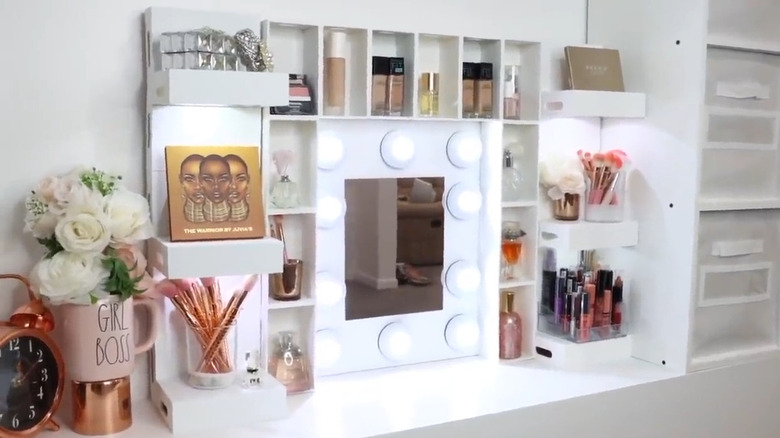
Make sure you're picture-ready with a dazzling vanity made out of only Dollar Tree finds. In addition to the crates, you'll need some foam board, glue, a mirror, and 10 Self-Adhesive LED Push Lights. Decide on the ideal size of your vanity, gluing the crates horizontally and vertically into one big square. Placing your foam board face down, cut it to size, then glue it to form the "back" of the vanity. Finally, you'll add the mirror in the center and arrange your lights around the reflective surface.
Make a kitchen organizer the star of dinner time
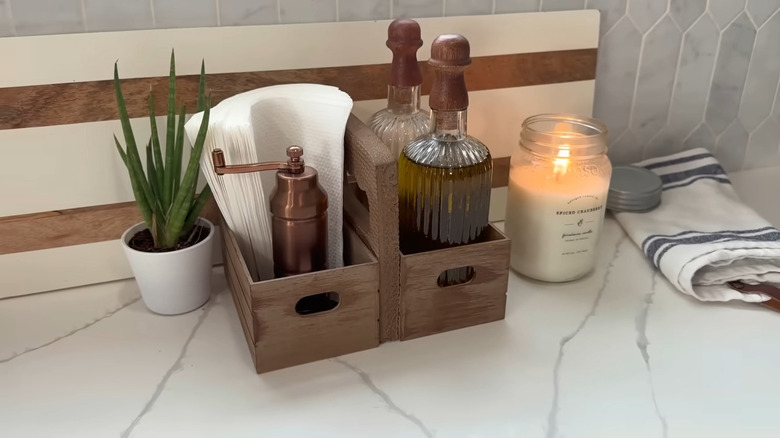
The best way to create order in a kitchen? Make an organizer with two crates and a Garden Collection Foam Kneeling Pad. You'll also need spray paint, glue, and a cutting tool. Starting with the end with the open handle, measure the crate against the foam pad, trimming so it fits neatly between two crates. Attach with your choice of glue, and after it cures, spray the entire piece with your paint. You can then add in bottles of oil, napkins, salt shakers, and other kitchen accessories.
Craft a vibrant wall shelf for toys and action figures
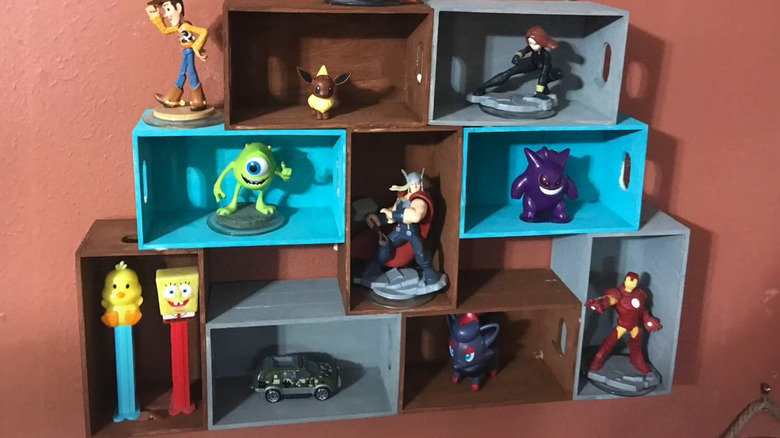
The eyecatching design of this project is great for keeping toys off the floor. Grab nine wooden crates, three brightly-colored paints, and some wood glue. Give each of the crates a new look with your chosen paint, sporadically using the colors throughout the crates for a fun visual effect. After the paint dries, glue the crates together, alternating between horizontal and vertical placements. The result will be a whimsical shelf for displaying your little one's toy cars, action figures, and other small treasures.
Add some style with a cute kitchen box
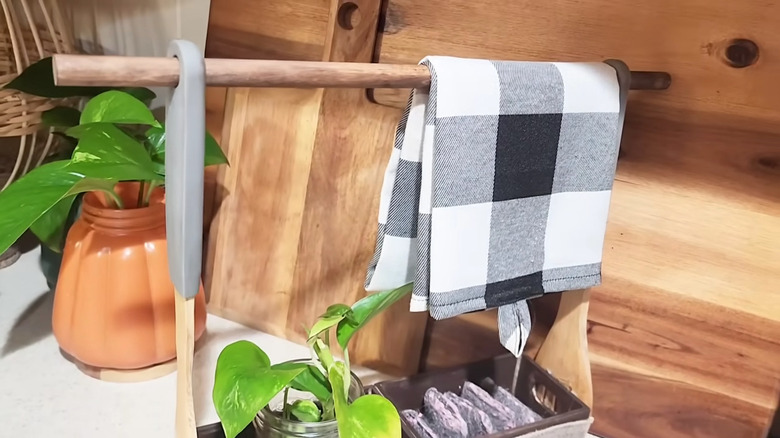
With two Bamboo Cooking Utensils, two wood crates, and a dowel, you can decorate your kitchen with a storage box complete with a towel hanger. Prepare your crates with a stain, and use some sandpaper for a distressed look if desired, then glue them together. With the handle-side up, attach a utensil on each side of the connected crates, then thread the dowel through the handle holes. Trim the front of the crates with a piece of burlap or glue rows of jute and let everything dry.
Mark the spot with a decorative house number hanger
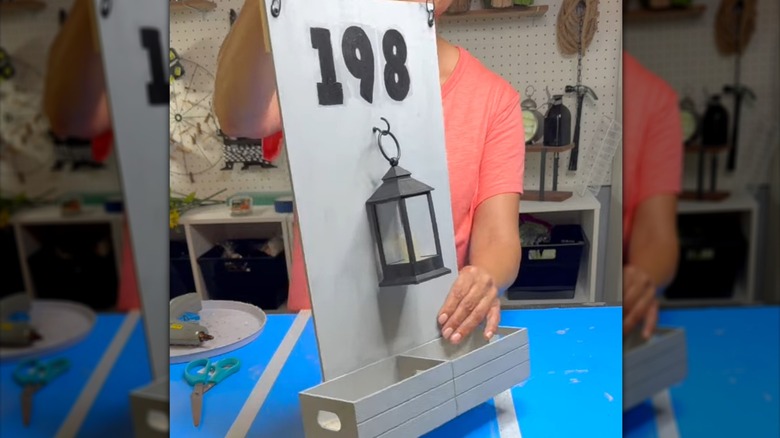
Make your home easier for delivery drivers to find with attractive house number art. Gather two Wood Plank Hangers as well as two crates, paint, and glue. After painting the two crates and the hangers, glue them together horizontally before attaching the crates to the front of the planks. Paint your home numbers or use number decals, then add an optional lantern and fill the crates with your favorite flowers. You can keep the hangers' twine if you like, but a more substantial swap might be a piece of chain.
Add hanging storage to your door
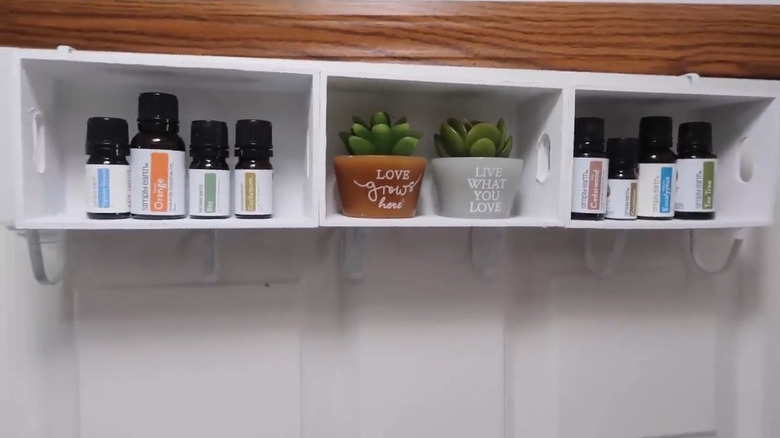
Using vertical space is a great way to squeeze more storage options into your home. Try making a door hanger with several shelves using three mini crates. After you paint or decorate your crates, hot glue them across an Essentials 6-Hook Over the Door Hanger from Dollar Tree; be sure you don't cover the hooks. This setup can be great for storing essential oils, bars of soap, and smaller beauty tools in the bathroom. The hooks help streamline space in a smaller bathroom as they offer possibilities for hanging towels, loofahs, and washcloths.
Keep spices handy with a spice tower
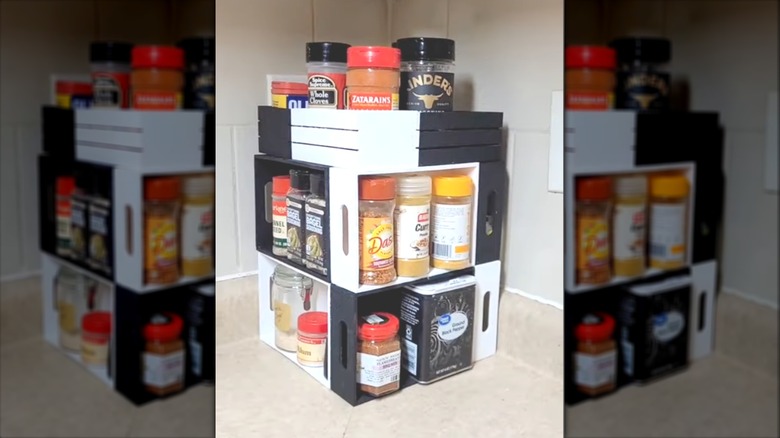
Tired of rummaging in drawers or cabinets for your favorite spices? Simplify your kitchen storage and use a DIY tower to keep your most-used spices accessible on your countertop. This space-saving storage option uses eight Crafter's Square Wooden Trays and four crates. Paint the crates either using one shade or alternating colors for more visual interest. Glue the crates and the trays together into a large square. Now you have your spices at the ready for your next cooking or baking session.
Make a farmhouse bathroom holder for towels and more
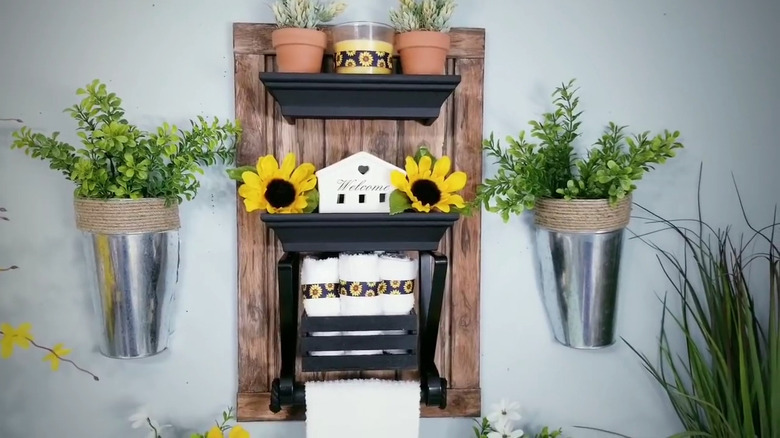
This DIY bathroom towel holder requires two floating shelves, wood hangers, two Garden Collection Plant Hanging Brackets, and a Thermoplastic Toilet Plunger. You'll also need four 5-gallon paint sticks from a hardware store. First, glue the painted planks together and then frame with cut paint sticks. Attach your floating shelves and mount the brackets underneath, securing onto the shelf's bottom. The plunger's handle is then cut and inserted into the brackets' bottoms as a towel bar. You'll set the crate between the brackets to hold lotions or rolled washcloths.
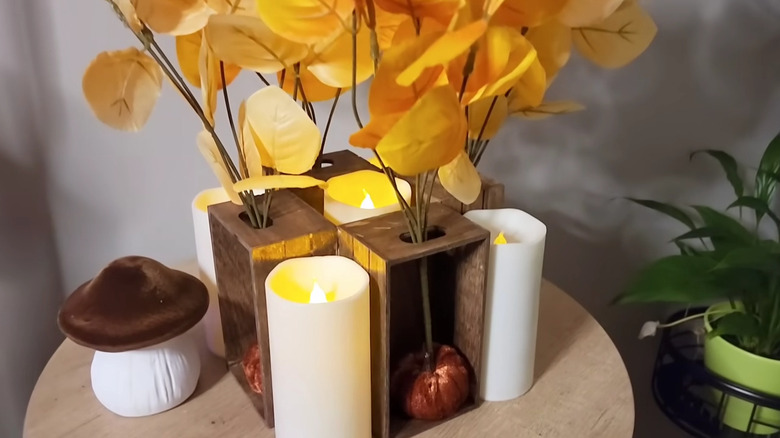
Light up your space with a DIY wooden candle holder
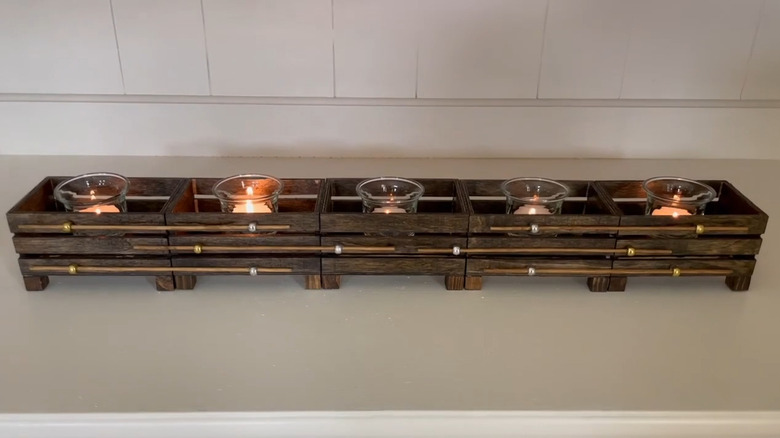
A quick shortcut to warm ambiance is to use candles. Instead of using a single candle holder, make a long, elegant one. You will need five wooden crates, five glass tealight candle holders, Crafter's Square Wood Craft Cubes, wooden skewers, Tumbling Tower Game Blocks, and metallic beads. After staining your crates, glue four cubes on each as "feet," then glue them together in a row. Next, decorate with beads strung on your skewers. Place tower blocks in each crate to make a riser for your tealight votive with a candle.
Display objects with a DIY shadow box
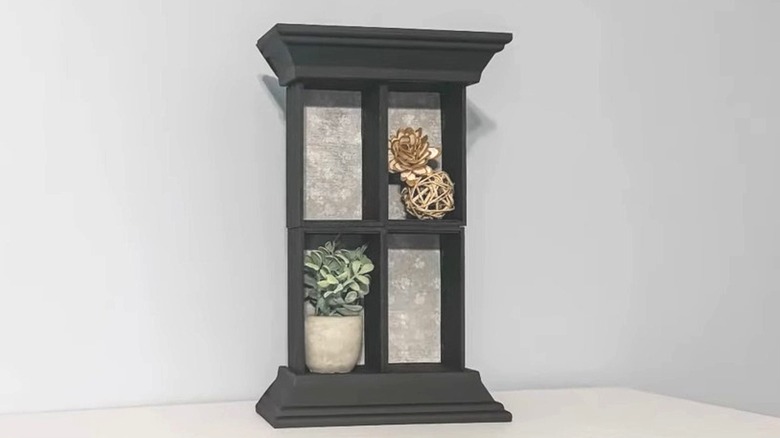
Whether used for small plants or pictures, a shadow box shows off some of your favorite things. Don't buy one, however, because Dollar Tree has almost everything you need to make your own. Pick up two floating shelves, four crates, and paint. You will also need two paint sticks and scrapbook paper. The bottom of each crate features scrapbook paper designs, and the crates are glued together, then sandwiched between the two shelves. A border of paint sticks finishes it off. You could also paint the interiors or use peel-and-stick wallpaper instead.
Whip up a cute kitchen accent for plants or recipe cards
You can store nearly anything you want, from plants to recipe cards, in this charming accent. All you need is glue, four wooden pallets from Dollar Tree, and one mini crate. Unless you like a bare rustic look, you'll also need paint and any decals you'd like to use for decoration. If you want style inspiration, consider using kitchen motifs such as herbs or vegetables to decorate the wood. Follow your decorating by gluing the pallets together, then attach the crate.