Upcycle Old Drawers Into A Unique Tiered Shelving Unit For Extra Home Storage
We may receive a commission on purchases made from links.
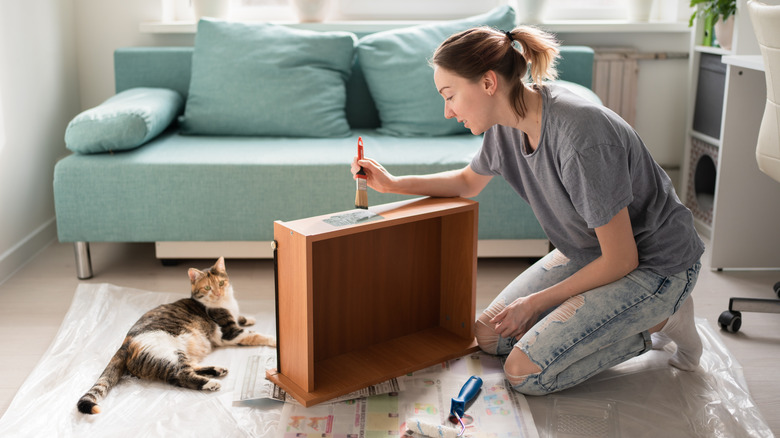
What day is trash day in your area? The night before, prowl around in your vehicle in search of furniture destined for the dump. Dressers, desks, and other pieces with drawers don't need to end their lives in a rubbish pile. Ok, not everyone feels comfortable whisking items away from curbsides, so thrift stores and online venues are also great sources of old furniture. You might even have an old, unused dresser or desk at home.
Salvage the drawers and cobble together a shelving unit with three or four of them. Whether you link several drawers into a standing shelf unit or mount the drawers on a wall, this quirky upcycle saves some bucks along with lots of usable material. Paint and cleverly adorn the interior with a gold painted sun and rays in relief, like TikTok content creator @diywithshantelle did (or customize it your own way).
This unique and functional shelving idea doesn't require many special tools or skills to pull off. Gather some wood glue, sandpaper, paint in your choice of color, and painting supplies. To reinforce the joins between the drawers, you have the option to buy one 8-foot-long 1-inch by 2-inch board and 1-inch wood screws to reinforce the back. If you want to add a sun embellishment, purchase a wooden disk about 6 inches in diameter (Shantelle used a circular sign from a discount store) and a few lengths of wood trim about a ½-inch wide. You'll also need a tape measure, a pencil, a saw, a miter box, and gold paint.
Drawer-to-shelf conversion
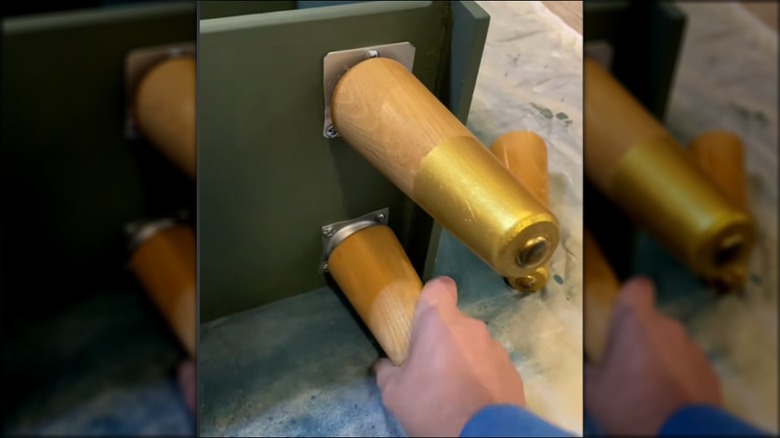
To design repurpose old drawers into this shelving unit, start by purchasing a set of legs, like this four-pack of Yummy Love 6-Inch Solid Hardwood Sofa Legs. You can attach these to the base without screws poking through the shelf surface. However, if the original dresser's frame still has four viable legs, salvage them to use as feet. For abodes with limited floor space, mount the unit on a wall over a sofa, bed, or sideboard with heavy-duty hardware. It's wise to assemble your shelving unit before painting it, so that you don't damage the finish while you finagle all the components.
Stack your shelves in a staggered arrangement, alternating them front to back. If you'd like the drawers to hang slightly over one another, make sure that the amount of overhang is equal for each shelf. Otherwise, you might end up with an imbalanced final product. Add generous amounts of wood glue to one long side of all but one drawer. Stack them up with the glue-less drawer on top. If you want an extra-secure hold, cut two pieces of a 1-by-2-inch board and screw them vertically and parallel to the back of the drawers; make sure that wood screws penetrate both boards to connect to the drawers.
Once the glue has dried, sand the wood and apply several coats of paint to the unit. Spray painting your wood furniture piece could be a major time-saver. Affix the feet only after all the paint has dried. If you're making a sunless version of this shelving unit, consider it ready to hold books, baubles, bits, and pieces.
Let the sun shine on your creation
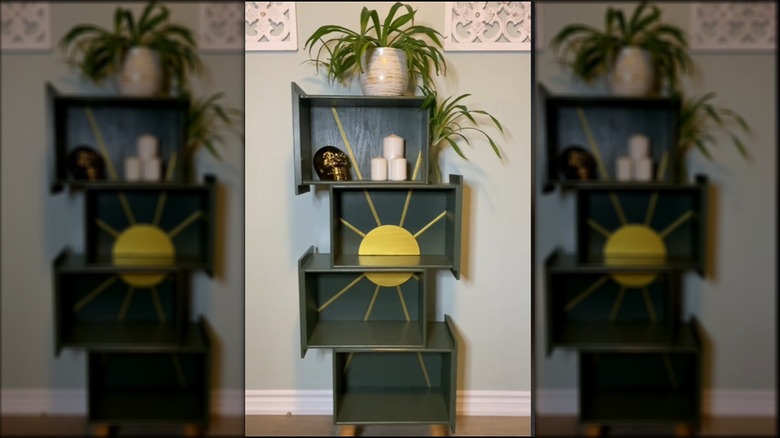
The gilded sun is the cherry on top of this crave-worthy project. With half-circles spanning two shelves and rays to match, this touch is almost too adorable to leave off. However, situated inside the drawers-turned-shelves, the cuteness could go unappreciated if you fill your unit with books or tall tchotchkes. So, whether or not you have a sunrise on your shelving unit would depend on what you're using it for.
To create the sun, saw your disk in half and sand both pieces. To make sure the halves line up perfectly, use a pencil to mark on the two neighboring shelves where you'll be gluing each half circle. Measure and mark 2½-inch increments around the curves of both disk halves; this is where the rays will touch. Hold one disk half near the outside edge of its shelf and place a piece of wood trim so that it radiates out from the first pencil mark on the disk. Mark the length and the angle at which you'll cut the piece. Repeat this for each ray on both sun halves; number the back of the pieces and where you'll be gluing them to help you keep track of what goes where.
Saw the wood trim, making the correct angles with the help of your miter box. Coat them with gold paint, or add a DIY gold leaf finish to your sun components. Once they're dry, glue them in place on what was the inside bases of the drawers. Let the glue dry and cure before standing your shelf vertically.