Keep Kitchen Counters Tidy With A Brilliant Dollar Tree Organization Hack
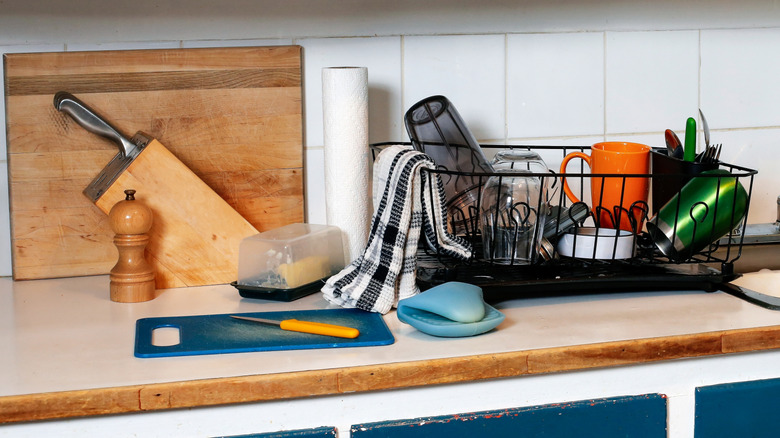
No matter how tight of a ship you run to maintain order in the kitchen, keeping the counters neat and tidy is no small feat. Between drying racks, kitchen appliances, and all the cooking tools you use on a daily basis that have a permanent home on the counter, it's easy for this space to quickly become overrun. While various methods work for keeping kitchen countertops free of clutter, a great place to get started is to gather any tools that need to stay on the kitchen counter and place them in storage baskets. Not only will this make your kitchen counters appear more organized, but it will also be easier to move the items around for cleaning if they're all grouped together in one container. There's no need to purchase any expensive storage baskets either, as you can easily and inexpensively DIY a stylish kitchen counter storage basket using just three items from Dollar Tree: two small wooden crates and a foam kneeboard.
In addition to the Dollar Tree items, you'll only need basic crafting supplies like scissors, glue, and paint. With that said, feel free to swap out the wooden crates for different mini storage baskets instead, or purchase additional crafting supplies to decorate the storage baskets and really make them your own. And, since you won't be attaching anything to your walls or kitchen cabinets, this brilliant Dollar Tree organization hack is also renter friendly.
How to create this portable storage basket
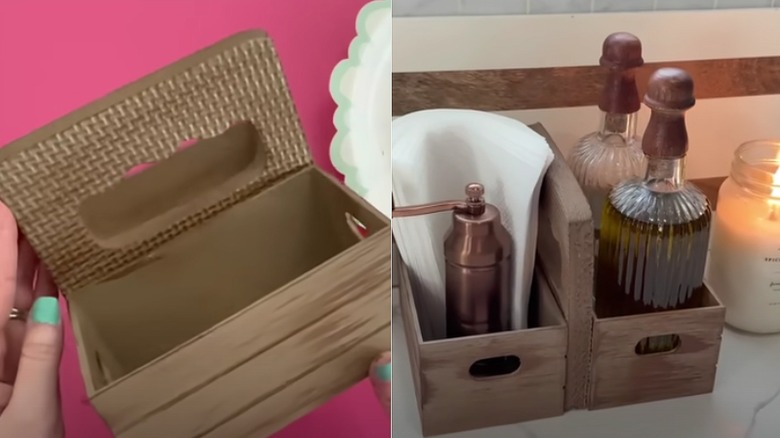
To get started, grab a pen, scissors, crate, and the foam board. Set the foam board down, and place the basket on its side towards the top, near the handle. There should be a few inches of foam above the top of the box but below the handle. Take your pen, trace the outline of the side of the box, and cut it. You should then be left with a piece of foam the same width as the side of the box.
Next, it's time to personalize the boxes and the foam. If you like the rustic look of the wood, you can leave the boxes alone. However, you can also hit the boxes and the foam with some spray paint if you want them to look uniform. Another option is to apply contact paper to the boxes and foam board. After the boxes and foam look how you want them to, go ahead and glue a box to each side of the foam piece, so you're left with a two-sided mini storage unit with a handle in the middle. Then, slip spices, oils, tea, and any other kitchen items into the boxes. This impressive DIY storage basket is also the perfect size for salt and pepper shakers. Plus, since it's so easy to pick up and move around, it's handy to put anything inside it that you frequently transfer from the kitchen counters to the kitchen tables.
Unique spins to put on this Dollar Tree storage basket

While building the two-sided storage box is a fantastic way to organize and free up kitchen counter space, it's not the only way. For a slightly larger twist on the design, you can create a multi-tiered storage basket out of three small wooden crafting crates, two pieces of Dollar Tree crafting wood, glue, and paint. To start, paint the crates and the wood your desired color. Next, line up the three boxes in a vertical line, spaced out exactly how you want them. Then, add glue to the sides of each crate, and attach the wood planks to each side.
If you'd like, personalize these storage baskets further by making cute labels for each by painting wooden craft circles black, and marking over them with chalkboard paint. Crafter's wood and foam kneeboards aren't the only objects you can use for support either — another option is to cut a few plastic hangers from the Dollar Tree into a frame to support a mini storage system with wood crates. Or, if some of these ideas seem a little too bulky for your kitchen counters, simplify things by buying a single wooden crate for kitchen storage. After beautifying it with paint, build a handle for it by tying on ribbon or fabric scraps so it's easy to pick up and move around.