DIY A Wall Mounted Kitchen Storage Solution Using Affordable Dollar Tree Items
We may receive a commission on purchases made from links.
Tired of sorting through a cluttered mess every time you open your kitchen's drawers and cabinets? If so, then it might be time to utilize your kitchen's open wall space to stay organized. Building a simple shelf for small items, such as your dish sponges, spices, or utensils, will make it easier to find what you're looking for when you're cooking or doing the dishes, making your entire space more functional. Alternatively, this kind of fixture could be a great place for you to keep packaged snacks or teas. Storing these consumable products in wall-mounted shelf will allow you to get rid of the bulky boxes and packaging they come in, and make it possible to utilize every inch of cabinet storage space in your home.
Building a kitchen wall shelf doesn't have to be an expensive or time-consuming challenge. In fact, it's a DIY you can complete with the help of some simple Dollar Tree items and a smart design from BargainBethany on YouTube. You'll need to get one Crafter's Square Wood Plank for the back panel of the shelf, plus three Crafter's Square Rectangular Wooden Crates for holding items. You can use wood glue to join all of these pieces together and paint them with acrylic craft paint to give them an interesting color of your choice. Once you've installed your new shelf, you might also want to try out the simplest way to make your kitchen look organized.
How to build a budget-friendly kitchen wall shelf
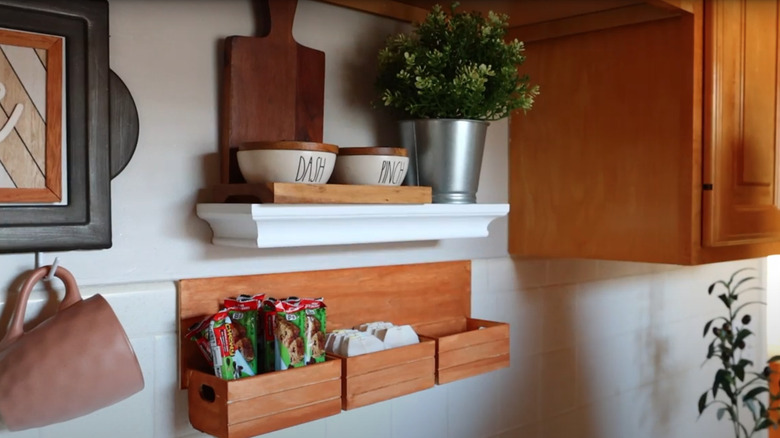
To begin building your shelf, all you need to do is glue your three crates to the longer bottom edge of your main plank, so they're lined up next to each other. Gorilla Ultimate Waterproof Wood Glue is a reliable choice for this initial step that will help your shelf last longer. However, super glue should also provide a strong bond in its absence. You may want to use a ruler and a pencil to measure and mark where you're going to put each crate so they're evenly spaced. The three crates can hang off the bottom of the back panel, but the more surface area they have glued down to the panel, the more weight they're going to be able to hold.
Once your adhesive has dried, use an acrylic craft paint to give your new shelf a unique identity that fits the rest of your kitchen. For example, if your home leans toward rustic or cottagecore design, then you might want to try a chestnut or walnut color. Conversely, a product like Apple Barrel Black Acrylic Paint can give the fixture a sleek matte finish that better matches a modern kitchen design. After the paint has dried you should seal the wood with either mineral oil, pure tung oil, or beeswax to ensure the surface is food-safe. Finally, hang the shelf with a peel-and-stick adhesive product, such as a pack of Command strips.
Alternative ways to assemble your new DIY wall shelf

To build a wall shelf that can hold a bit more weight, you'll need to join your wood pieces with screws instead of gluing them. If you're worried about the crates splintering, you could attach a second plank to the bottom of the back panel with wood screws at a perpendicular angle. Then, simply glue the crates down onto this extra supporting shelf. Once the shelf is built, secure it to wall studs instead of putting it up with adhesive strips. To locate your wall studs, you'll need a stud finder. If you don't already have one of these gadgets, then a Franklin Sensors ProSensor M90 Stud Finder is a great addition to your tool box that will come in handy for all manner of wall-hanging DIYs. You might also want to use a level to ensure that the drill holes for your shelf are at an identical height before you install everything.
If you'd like to set up your new shelf so that it covers a bit more vertical wall space instead, all you need to do is turn the original fixture sideways. Glue your three crates onto the middle of the main panel to match this change in orientation so that they're directly above or below one another. After you've finished this project, you can try making a glass tiered shelf with a simple Dollar Tree DIY as well.