Use A Few Beads Of Hot Glue To Keep A Cut Straight With This Saw Hack

Cutting a straight edge can be the most intimidating step in any at-home woodworking project, especially if you're missing a few high-end tools. But if you don't want to break the bank on a new set of equipment, you may be feeling a bit lost on how to approach it. That's where this trick comes in, giving you a quick fix for those projects that might not require absolute perfection. Using a few beads of hot glue, you can create the perfect guide for your table saw to follow, making those straight lines a breeze without needing to drastically alter your wood.
But how does this trick work exactly? Well, the key is using another piece of wood as a guide that allows your saw to seamlessly cut in a straight line. It minimizes the risk of your saw veering in the wrong direction, instead smoothly following the edge of your second board. The traditional process of cutting a straight line can require several complicated tools that just might not suit the needs of every woodworking project, especially if you're in a pinch. But by using hot glue, you can ensure a straight edge every time, even if it isn't the smoothest finish. It can be the perfect trick for those quick projects, whether you're slicing for a new set of shelves or just trying to keep your DIY woodworking projects from looking cheap! And by using hot glue, you don't need to alter your wood with screws or nails.
Cutting a straight line made simple
Using the leftover scrap wood that's lying around your garage has never been simpler, and can provide the perfect solution to your wood-cutting needs. Grab yourself a piece of wood with a straight edge — anything from a spare 2 by 4 to a scrap of plywood. Apply a few beads of hot glue to the top of your piece of wood and line your straight edge up with the marking that you just created. Press your straight piece of wood down onto the hot glue, holding for a few seconds to allow it to dry completely. Once dried, you are ready to begin cutting.
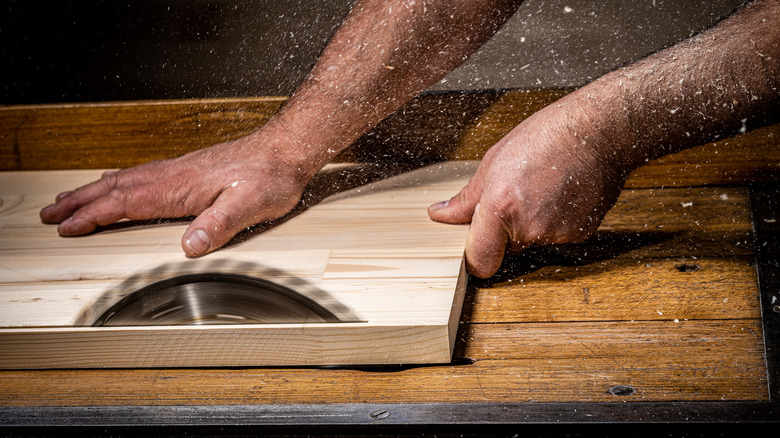
Flip your board over so that the straight edge is closest to your saw. Line the edge up with your blade and begin to cut along the line. As you do, ensure that you are applying consistent pressure to avoid any slipping, and be sure to follow tips to safely use your table saw. Separate the boards from one another. For this, you can leverage a flat tool in between the two pieces — just make sure you aren't jamming tools between them that may damage your wood. Once they're separated, you can move on to your woodworking projects, enjoying that quick, clean straight edge.
If you're using a circular saw over a table saw, you need to be mindful of the blade's placement during each cut. Most circular saws have the blade offset from the edge, meaning you will need to account for this discrepancy when positioning your guide. It might take multiple measurements to get the positioning just right, so continue to reposition as necessary.