DIY A Solar Powered Stone Fountain For Your Yard With A Few Simple Supplies

If you want to refresh your backyard landscaping on a budget, a DIY fountain can be a delightful addition to your yard or garden. Attractive water features don't have to be difficult to make or install; on Instagram, user birdsong.design posted a video showing us an example that needs just a few simple, low-cost supplies. The easy-to-follow method makes building a solar-powered stone fountain a DIY project that can be achieved in a weekend.
You will need two plastic containers of slightly different sizes. One will fit inside the other to form the mold. In the video, both are round planters, but square, rectangular, or oblong ones could also be used. You'll need a submersible solar pump — the Aisitin DIY Solar Water Pump Kit is a great and inexpensive choice for this project. If you want something a little more dramatic with a stronger water flow, the POPOSOAP Solar Bird Bath Fountain Pump offers better performance and is still very affordable. You'll also need some concrete mix and a few feet of copper tube, which you can find at just about any hardware store, as well as paper towels and some cheap cooking oil.
How to easily make a DIY fountain from concrete
First, liberally coat the inside of the large planter and the outside of the small one with oil to help prevent the concrete from sticking to them. Next, add a layer of concrete to the bottom of the larger planter, thick enough that when the smaller one is resting on top of it, the tops of both planters are roughly level. Center the smaller planter inside the larger one, then slowly fill the gap between them with concrete. While this is setting, measure the distance from the outlet of your submersible solar pump when it's sitting in the bottom of the inner planter to a couple of inches above the rim. Cut the tube and fit it to the pump outlet. Common plumbing adapters can be used if it's not a snug fit.
The concrete will probably be hard to the touch in a couple of hours but can take up to 48 hours to fully set. At that point you can remove the planters; even with the oil coating, they may be tough to remove (and may even come out in pieces). Then, simply place your pump inside the stone reservoir, fill it with water, and turn it on. You may want to add some decorative flourishes, like smooth stones or faux greenery, to the bottom. Bear in mind that the power of the solar panel and the strength of the sun will have a big impact on the water flow.
There are lots of possible variations on this DIY fountain
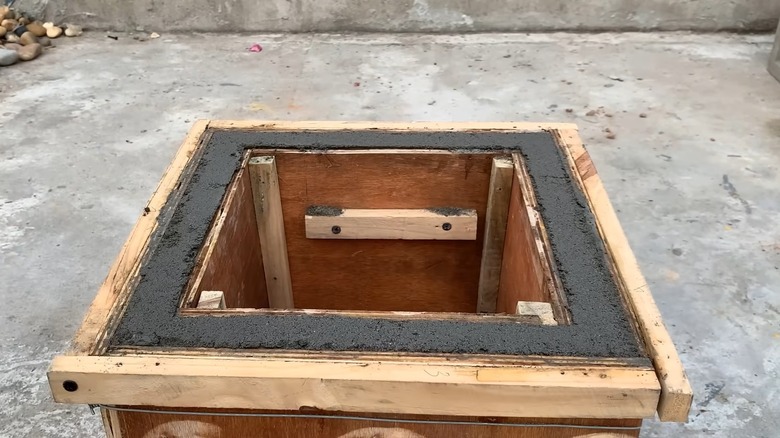
Once you understand the concept, a wide variety of DIY solar fountains can be created. Almost anything that can be removed or broken up once the concrete has set can be used as a mold for the reservoir. If you can't find the right containers at the store or garden center, you could try custom building a mold using plywood and store-bought lumber, which are very affordable.
Concrete can be molded in many different ways to create the reservoir of your choice. It doesn't have to be deep — for example, if you create a shallow bowl and add a pump like this AUTGA Floating Solar Powered Water Fountain Pump, you could make a water fountain suitable for hummingbirds and other feathered visitors. The concrete can be stained or painted to match existing garden features, or you could even use clear construction adhesive to decorate the exterior with pebbles, ceramic or glass tiles, or other items.