DIY A Rustic Two-Tiered Planter With The Help Of A Dollar Tree Hanger

We may receive a commission on purchases made from links.
Elevate your plant display with a no-skill-needed DIY that's a great way to repurpose hangers. The clever crafter behind the YouTube channel We Craft Around created a two-level mini shelf on four legs made from cuts of a plastic clothes hanger that they then used to hold artificial plants beautifully. The final product can go well beyond plant support; it can be used as a cute organization fixture for desktops, bathroom counters, craft rooms, and more. Instead of resorting to unraveling separate strands from a rope like in the video, a roll of jute twine will take out an unnecessary step and give you a smoother fiber to work with. However, if your hanger has indentations on the two angled sides, covering it with unraveled twine that's thicker and more textured may hide those features better than a smoother twine would.
To make this versatile planter, head to Dollar Tree for two Crafter's Square Rectangular Wooden Crates with Handles, a roll of jute twine, and a pack of Essentials Black Plastic Adult-Size Hangers (or grab an unoccupied or broken one from your closet.) You'll also need heavy-duty glue like E6000, a hot glue gun, any paint color, and a pair of miter shears to cut the coat hanger. To give the crates longevity in case of drippy live plants, pick up some water-based polyurethane to top the paint or stain. For more protection against water damage, you can repurpose resealable plastic baggies as discreet liners for each bin or remove the plants each time you water them.
Snip, wrap, and glue
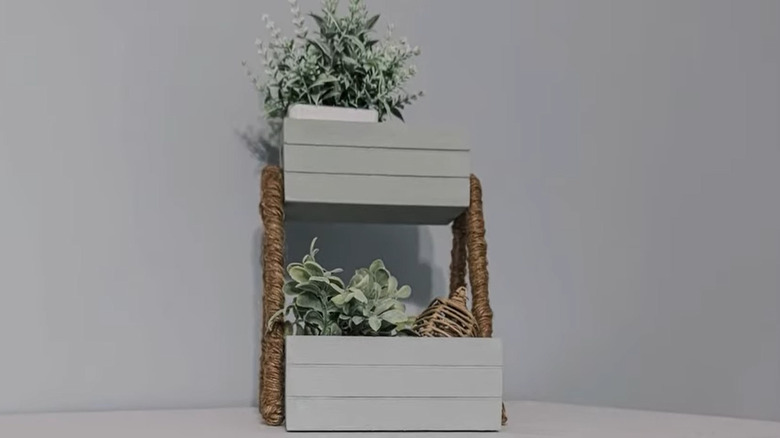
Morph your hanger into plant stand legs with a few snips of your miter shears. Cut off the hook and the point where it's connected to the triangular body. Also, trim off any additional hooks or cross pieces on the hanger. If the top sides of your hanger have indentations with a plastic piece projecting over it for a better hold on clothes, trim away the projection, as well.
Next, separate the remainder of the hanger into two halves. Cut the lower bar in half, and trim both pieces to the same size. Test how they will sit as legs for the planter; once completed, the shorter of the two legs will stand at right angles, with the longer leg extending in front of the planter to hold the lowest crate. Wrap the two hanger pieces in twine, hot gluing as you go. Also, cover the cut ends with twine.
Paint or stain all surfaces of the two crates. You can even tint the wood with coffee, an ingredient you can use to stain wood naturally. Follow up with a coat of polyurethane. Attach the top crate first with E6000 Industrial Strength Adhesive to the corners of the two hanger pieces to the width-ends of the crate. Slide the second crate between the front to legs of the stand; this crate will sit flat on a tabletop. Pull each leg slightly away from the crate's sides to add E6000. Let the glue dry and cure for at least 24 hours before filling the crates. Once the glue sets, your stand is ready to hold a couple of plants, craft supplies, or toiletries.