Transform Your Desk Storage With A Dollar Tree Wood Crate Organizer DIY

We may receive a commission on purchases made from links.
Whether you're balancing the home accounts or putting the finishing touches on a client project, a messy desk can slow you down. Trying to find that roll of stamps, your phone charging cord, or even your computer glasses can make getting into the work zone tricky, if not downright hard. If you're looking for ways to tidy up your desk, try a DIY desk storage organizer. Made with the Dollar Tree's popular wooden crates, you can mix and match this DIY to fit your exact needs.
You'll need Dollar Tree's Crafter's Square Rectangular Wooden Crate with Handles (we suggest picking up at least six to eight) and two Crafter's Square Adhesive Cork Sheets, which totals around $10. You'll also need some adhesive. Hot glue is a popular choice for this project, but due to the permeable makeup of the MDF (medium-density fiberboard) that the crates are made of, a wood glue might be a more durable option. Elmer's Carpenter Wood Glue or Gorilla Wood Glue are adhesives to consider for this project.
How to make a DIY desk storage organizer
Setting up your DIY desk storage organizer comes down to two things: how much storage you need and the items you want to keep handy. Once you answer those questions, you'll be closer to creating a home office you'll definitely want to work in.
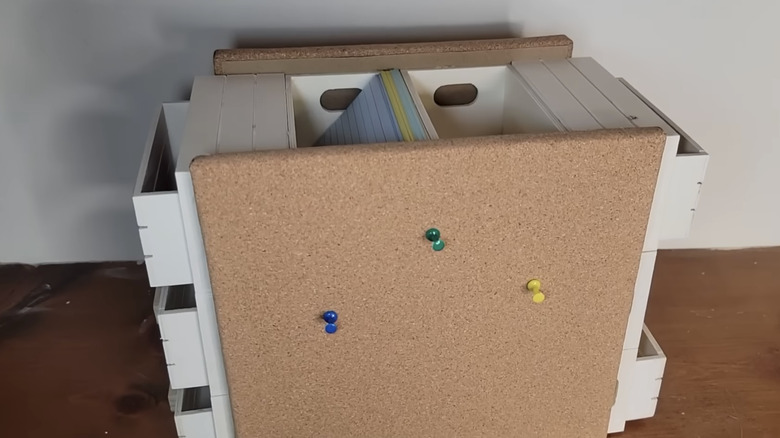
If you need a lot of storage and a space to pin receipts or daily to-do lists, use your adhesive to glue two stacks of three crates together, tops facing out. Glue the sides of two more crates together. Once the glue is dry, turn the taller stacks back to back and glue the two-crate stack open side up between them to connect them. Then, glue the cork sheets to the front and back of the tower and let dry. If you choose, you can also pick up smaller crates that you can insert into the larger crates to create drawers for your organizer.
If you'd like a smaller organizer with hidden storage, glue two columns of three crates together, then glue the two columns together. Use small hinges like Sliverdew Acrylic Self-Adhesive Hinges to attach a cork sheet (cut to size as needed) to the front of the tower. Once everything is dry, this will allow you to easily access the storage unit and keep your top tasks at the front of your mind. If you need just a little more storage, glue the crates together into three sets of two, then attach the columns together to make a long, low storage unit. This is a great configuration to fit neatly under your monitor stand or along the back of your desk.
Inexpensive ways to elevate your DIY desk organizer
Once you've assembled your DIY desk organizer, let's make it fit in with your home office's decor. Grab some paint and paint it your favorite neutral or pop of color — whatever will make you smile when you sit down at your desk. Thanks to its durability, latex paint is a good choice, but you can use whatever paint or stain you have on hand. If you decide to stain the wood, check the label to make sure your glue can withstand sanding and staining.
If you don't need more space to pin notes, swap out the cork sheets for a picture frame or a chalkboard from the Dollar Tree for the same price. Or, use this as a chance to repurpose old picture frames lying around the house. Insert your favorite photos, your annual vision board, or even just a blank sheet of paper and use a dry erase marker to write notes and reminders on the glass.