DIY Adorable Stacked Teacup Bird Nest Decor With Dollar Tree Mugs
A bird's nest brimming with eggs is a hopeful sight. Eggs are a symbol of new life, and a decor piece featuring these harbingers of spring can give a room a spark of warmth while we wait for the last of winter to melt away. Creative YouTuber Heidi Sonboul put together a springtime Dollar Tree DIY with a decor piece made from Dollar Tree mugs. Topped with a faux yet real-looking nest filled with speckled blue equally faux eggs, this charming project is inexpensive and doesn't require a lot of skill.
The cool thing about this DIY is that you'll only use napkins to decoupage the cups. Create your own version of this stacked cup nest with three Dollar Tree Clear Glass Mugs and a few patterned napkins like these Farmhouse Floral Paper Napkins. You'll also need one YEUQWJ Artificial Bird's Nest with attached eggs, floral moss, air-dry clay, and a 2-inch silicone butterfly mold. You can opt for another similar-sized shape like a flower or a bird rather than a butterfly. Also purchase spray paint in a color that complements the napkins as well as white craft paint.
To pull it all together, set aside some Mod Podge, a glue gun, and heavy-duty glue. Grab scissors and a paintbrush, too. Order the bird's nest before purchasing the floral moss; the nest is lined with floral moss, as well, and you'll want to match the color and texture as closely as possible. You can also use other types of paper to cover the cups; tissue paper will work well. Or, overlap cutouts from thicker paper to cover the cup.
Coat your cups
If your napkin is two-ply, remove the interior layer. Paint the exterior of the mug with Mod Podge. Start by placing one corner/side of the napkin parallel and flush with the handle. Leave about a 1-inch margin of napkin at the cup's lip, and smooth the material over the cup's surface until you reach the other side of the handle. Trim away the excess material while leaving enough trim to fold over the cup's base and to cover the gaps around the handle.
From the excess napkin, cut a piece that will cover the handle. Give the handle a coating of Mod Podge, and apply the napkin. Cover the napkin material with Mod Podge. Paint the interior of the decoupaged cups white for a more opaque look that helps the pattern stand out. Follow these steps for two of the three cups.
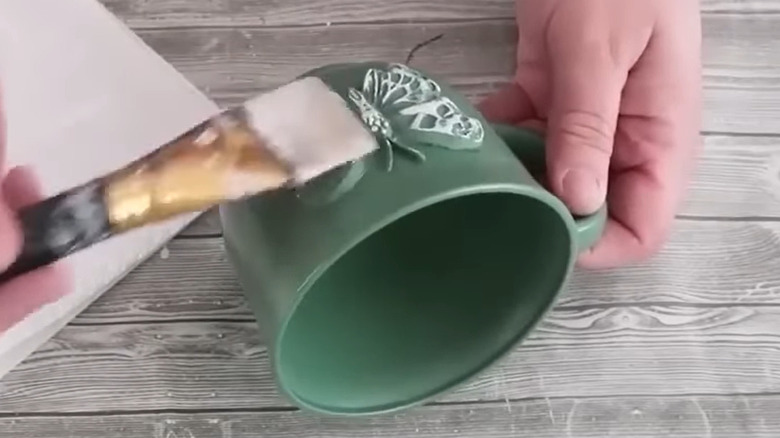
For the remaining cup, you'll be gluing on a shape molded with air-dry clay, covering the entirety in spray paint, and adding detailing by dry-brushing on touches of white paint. Press clay into your mold, and remove it from the form. While it's still pliable, cover the back of the clay piece with heavy-duty glue, and adhere it to the cup's side. Turn the cup on its side while the glue is drying so that the clay piece doesn't slide out of place. Once both the clay and the glue are dry, spray paint the exterior of the cup. Dry brush a light amount of white paint on the clay piece stand out along with a few touches elsewhere on the cup.
Stack 'em up
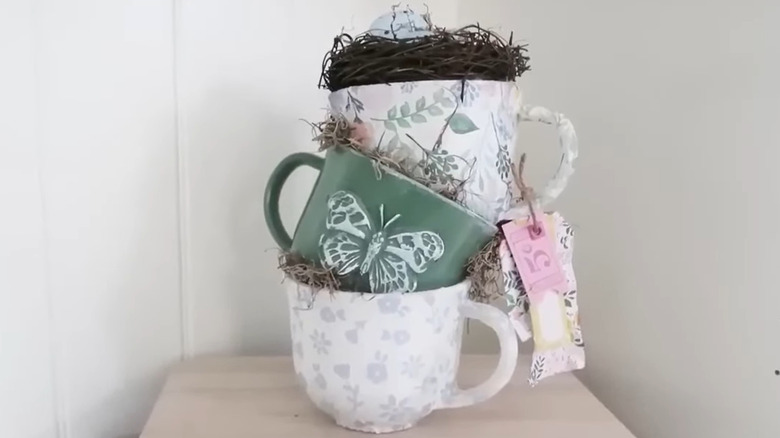
Before heating up the glue gun and uncapping the E6000, mock up how your cups will sit once they're stacked. Situate the cups so that the middle one's handle faces the opposite direction of the other two; the painted cup will sit between the two patterned cups. Place the upper two cups one inside the other at a slight angle so that the handle of the one above touches the lip of the one below. Draw a faint pencil line along the base of the two cups that sit within other cups so that you will know where to apply the glue.
Starting with the base cup, use hot glue to attach a bit of floral moss around the edges before adhering the painted cup with heavy-duty glue. Repeat this with the second cup. On the top cup, affix a bit of floral moss to the lip followed by the bird's nest. If you're concerned that the tower could be top-heavy, you can make an easy addition to your chic and low-cost Dollar Tree DIY. Purchase a small glass plate from Dollar Tree or a thrift store, and either paint it the same color as the middle cup, or apply a creative decoupaged napkin covering. Use heavy-duty glue to attach the lowest cup to the center of the plate for a sturdy and cute base.


