Upcycle Empty Food Boxes Into A Charming Closet Storage Solution
With all the essential day-to-day tasks of cleaning and running a home, clutter can quickly build up in closets and other hidden areas. A clever DIY will help you keep your home organized at a low cost while also reducing your household waste. Just give your empty food boxes a makeover, turning them into a customized upcycled storage solution. Kept together in a larger storage box, this attractive storage idea is fit for any closet or countertop.
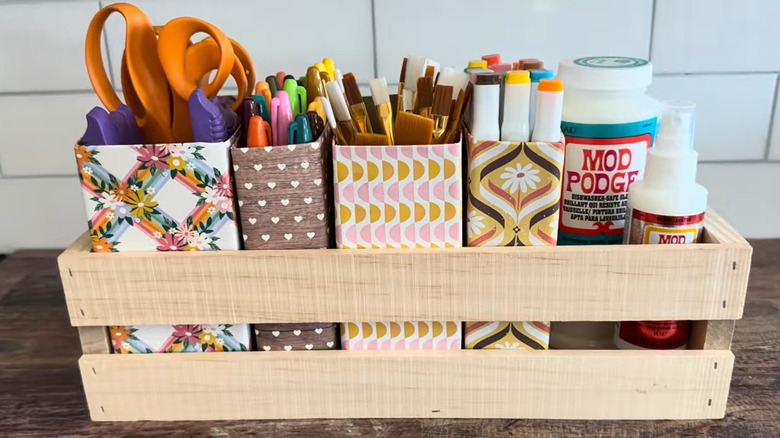
To make your own collection of storage boxes you'll need three to five cereal or other food boxes, decorative paper, Mod Podge, a paintbrush, and a pair of scissors. Consider setting your upcycled boxes inside a larger container to ensure they don't tip over and to visually unify the set. Candidates for this role include wooden crates, straight-sided baskets, or even a larger upcycled box.
As you gather your supplies, you have plenty of wiggle room when choosing your materials. The clever crafter from the YouTube channel Plaid Crafts chose four different yet complementary patterns of scrapbooking paper. You can save a little more money by skipping the scrapbook paper and instead repurposing old magazines to decorate your boxes. As for containers to reuse, either boxboard or corrugated cardboard boxes will work well. You could even repurpose a clean cardboard milk carton or two.
Create and customize your perfect storage solution
To create your stylish storage, begin by deciding the height you want your boxes to be. Measure and cut the sides of each box to the same height, or make them different heights. If you're covering the boxes with 12-inch by 12-inch scrapbooking paper or smaller, you will probably need more than one sheet to cover each box. Leave about a 1 ½-inch margin of paper at both the top and the bottom of the box; you'll be folding flaps over the cut edges and the base for a clean look.
Mock up how you'll be attaching the paper by making light creases where the boxes' corners hit. If you're using wrapping paper, pre-cut and lightly fold the piece, so you won't have to trim excess after gluing. Arrange the folds so that the seams in the paper will be on the boxes' wall-facing sides. Paint the backside of the sheets of paper with Mod Podge, smooth the papers carefully onto each box, and let them dry for about 20 minutes. Cover the papered exteriors of the boxes with an even layer of Mod Podge, and let them dry fully before sliding them into the crate.
If you aren't able to find a crate or basket that will fit the width of your combined collection of boxes, you can simply glue the sides of the boxes together into one unit, or use ribbon or twine to secure them. This could be an ideal way to store hats and mittens in coat closets or to organize toiletries in your bathroom cabinet.

