That DIY Ribbon Roll Organizer That's Perfect For Craft Rooms & Enthusiasts
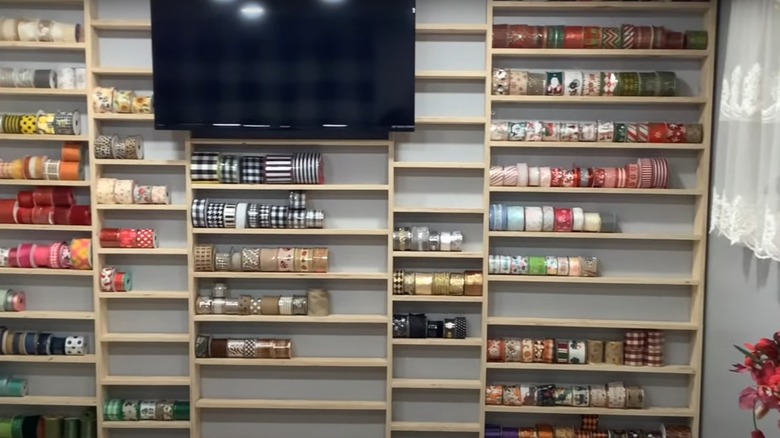
Craft room organization hacks can make working in your creative space much more functional and enjoyable, particularly if they allow you to readily see and access your supplies. Many materials, like ribbons or spools of yarn, thread, or twine can be messy and create a cluttered look if they become unwound or tangled in whatever container you have stored them in or when left loose on surfaces. YouTube's MY DIY, however, shows off a beautiful way of storing a large collection of ribbon spools using inexpensive 3/4 inch plywood and L-brackets to create a huge shelving unit that is attached to the wall with ample space for storage.
This ingenious project that you will want in your own home accommodates spools of various sizes allowing you to readily see what you have and what may need to be restocked. It also can store them upright, stacked, and facing forward so you can easily see the design. You can easily customize this project to any space available in your craft room or studio. The DIY shows a whole wall of shelves, but you can customize the shelves to any sized space, even a slender strip between doorways or in a corner. These shelves will work for organizing any kind of supply to keep your craft room spick and span, including small jars of paint, skeins of yarn, spools of thread, and more.
Creating DIY shelves for storing ribbon
Begin by cutting the sheets of plywood into individual shelves. You can choose the length of the cuts to accommodate the space you are working with for the unit, using a mix of longer and shorter columns for larger wall spans. The depth of the shelves will depend on the size of the spools you will be storing there. The tutorial recommends 4 inches to fit both smaller spools and larger ones. Use several L-brackets on the wall to fasten your vertical supports at either end of each section, using drywall brackets if necessary to anchor the shelves (especially important if what you will be storing is heavier than ribbons).
To affix the shelves, place the bottommost one along the baseboard and work upward, using a pre-cut spacer to easily space each shelf. To create an angle toward the back that will help keep spools from rolling off, cut your spacer at a 15-degree angle, so that when you slide in your shelf, it rests slightly slanted upward as you fasten it to the side supports with brad nails and screws. If you decide to build the shelves flat, you can also put a small bit of molding or wooden dowel to create a lip.
You can finish and paint these multifunctional shelves as you like with stain or paint, or leave them unfinished for a more basic look. You can even add wooden dowels or a repurposed broom stick in some spots attached to the vertical supports to store ribbon that you can easily unroll without having to remove the roll from the shelf.

