DIY An Office Supply Desk Caddy With Dollar Tree Candy Jars
We may receive a commission on purchases made from links.
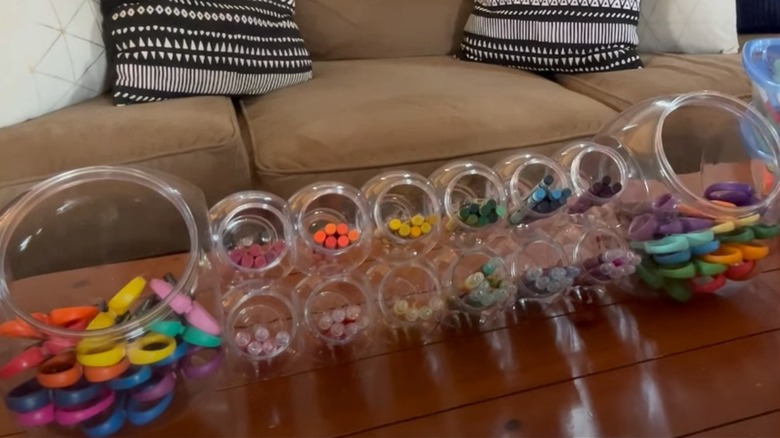
One of the best ways to tidy up your office desk is by using an effective organization system. While there are plenty of options you could purchase, making your own out of affordable supplies is a bit more budget-friendly — and you can personalize it exactly to your liking. All you need is a few of the two-packs of Mini Candy Jars and two of the Caterers Corner Candy Jars from Dollar Tree. Simply glue the smaller jars to one another side by side, and then stack another row on top. The two larger jars will be glued to each end of the organizer. When you're done, you will have a homemade office supply desk caddy that can hold plenty of supplies and will keep everything easily accessible.
Once you've created the organizer, fill the mini jars with small supplies. Think paper clips, pens, pencils, rubber bands, erasers, staples, or mini sticky notes. Larger items like scissors or notepads can be stored in the big jars on either end. All in all, this project will cost you about $10 (or less, depending on how many jars you use), which is likely cheaper than many store-bought desk organizers. For example, Target sells a Brightroom Acrylic Desk Organizer for $25. Not only is this item more expensive than the DIY, but it also holds less supplies. It's clear that creating your own office supply caddy with Dollar Tree candy jars is the way to go if you are in need of an affordable item you can use to organize your desk.
How to create a desk caddy using Dollar Tree candy jars
Before creating this DIY cute and creative office organizer using Dollar Tree candy jars, start out by deciding how much storage space you require. Although the image above from Thrifted Living on YouTube shows two rows of six jars, you could use more or less depending on your specific needs. Just ensure that you use the same number of jars in each row. Start by removing all of the lids, as you won't need them for this project. Then, create your first row of small jars by attaching them to one another using a glue gun so that the flat sides are facing each other. Attach the two large candy jars on either side. Finally, glue your second layer on top using the same method as the bottom row. Angle these slightly downwards so you can attach them in multiple spots.
You can either stop there, or you could upgrade this DIY by customizing it further. Consider adding labels for each item you plan to store. To keep things affordable, simply make your labels using a permanent marker and tape. Another customization tip worth considering is spray painting the jars and letting them dry before assembling the caddy. This way, you can make the DIY organizer whatever color best matches your desk and office space. You could even use stencils to add patterns to the open sides of the large jars.

