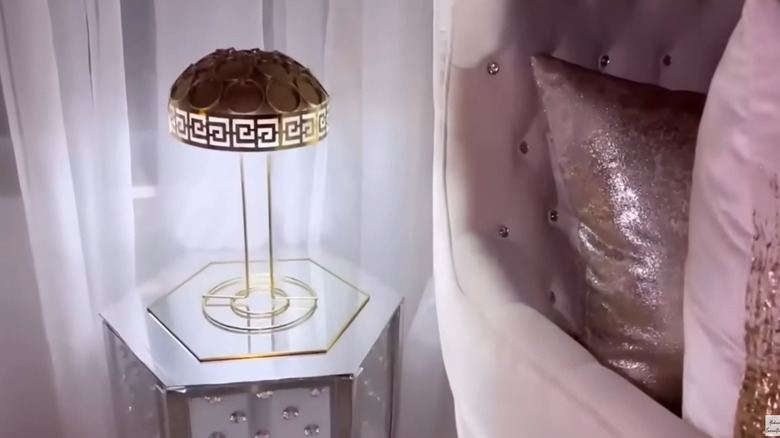
Redefine Your Lighting With A Stunning Dollar Tree Gold Lamp DIY
We may receive a commission on purchases made from links.
What comes to mind when you read "portable lighting"? Camping lanterns? Those hangable bulbs people use in car repair? Instead of utilitarian lights, picture instead an ornate gilded table lamp that can go anywhere with you. Make one of your own for a small price tag with a Dollar Tree paper towel holder and a clear plastic bowl. With a few other supplies and tools, you can put together your own wire-free golden lamp in a couple of hours. It's a renter-friendly way to bring more light to your living spaces, both indoors and out. Our inspiration for this project is a go-to source of elegant budget DIYs, YouTuber Yoduvh Essentials. Their embossed gold-trimmed remote control lamp is both functional and fabulous.
To make your own, round up some supplies from Dollar Tree. You'll need a Floral Garden Round Plastic Terrarium Dish, a Cooking Concepts Wire Paper Towel Holder, a pack or two of the Jot Metal Book Rings (You may need two different sizes.), a sheet of foam board, and a set of three remote-operated self-adhesive puck lights. They also trimmed their lampshade with three Aedida Gold Napkin Rings from Amazon. You can save $1.25 and some recycling by swapping the foam board for a piece cut from repurposed cardboard boxes after a move or the holidays. Also, have on hand a glue gun and/or tube of heavy-duty craft glue, a can of gold spray paint, a pencil, a roll of 2-inch painter's tape, and a utility knife.
Piece together your lamp
The first step is to trace the lip of your bowl onto the foam or cardboard and cut it out. This will sit just inside the edge of your bowl as a base for both the lights and the lamp's stand. Cut up a collection of smaller pieces of board, and glue them to the bottom of the bowl in layers until they reach the level where the circular cut will sit. Glue the circle to the layers of the board and along its edges.
Then, paint your towel holder. Once it's dry, find the center of your circular board. Place the very top of the towel holder vertically against the center spot, trace it, and cut out the small hole. Slide the top of the towel holder inside the hole as far as it will go, and secure it with glue inside the opening.
With the base of your lamp completed, you can begin decorating and adding your lights. Apply a ring of painter's tape around the outside edge of the bowl; this is where you'll be adding the trim later. Attach the book rings to the bowl in rows with glue, starting with the tape edge and working up. If you have a space remaining that's too small for the rings you used on the rest of the lamp, fill the gap with a few smaller rings. Spray paint the bowl. Once it's dry, remove the tape and glue on the open napkin rings in a continuous circle around the edges of the bowl. Adhere the puck lights to the circular board inside the bowl, turn them on, and check out your lamp's shine.
Make it more your style
While this lamp has a very distinctive look, it's easily customizable for other tastes. If gold isn't really your thing, simply paint the shade and stand a color that's a better fit for your space. Neutrals like white, tan, or slate will work in nearly any space. With a project this inexpensive, why not go for bold and try bright red, neon yellow, or apple green? Maybe you do like using gold finish in your home decor, but you aren't keen on the embellishments Yoduvh added to the lampshade. Forgo the rings and the trim, and give the entire exterior of the bowl a few coats of gold paint instead.
Dollar Tree's other clear plastic bowls get the creative juices flowing as well. Swap out the terrarium bowl-lampshade for one of these Clear Plastic Fluted Serving Bowls or this conical Caterer's Corner Clear Plastic Container in a quintessential lampshade form.
Take the towel holder base in another direction by sliding a cut of a pool noodle over the vertical piece. Since the sides of the pool noodle are a bit uneven, textured spray paint can unify the surfaces of the whole lamp. With a stone finish, observers will never guess the components of your DIY lamp.


