DIY A Craft Room Ribbon Organizer With A Few Dollar Tree Items
We may receive a commission on purchases made from links.
Gift giving season has arrived. Sure, you could toss toys into decorative gift bags stuffed with tissue paper and call it a day, and since a lot of wrapping paper isn't recyclable, there are practical reasons to switch to eco-friendly options to have a more sustainable holiday. But whether your family tears into presents simultaneously or it's a more orderly affair where each person has a turn, nothing beats untying a beautiful ribbon from a carefully wrapped package. If you dread the process of wrapping, commandeering your craft room or dining table only to quickly pile it full of giant paper rolls, tape, scissors, and tangled ribbon all over the place, make the process so much easier by quickly DIYing a ribbon organizer with a few items from Dollar Tree.
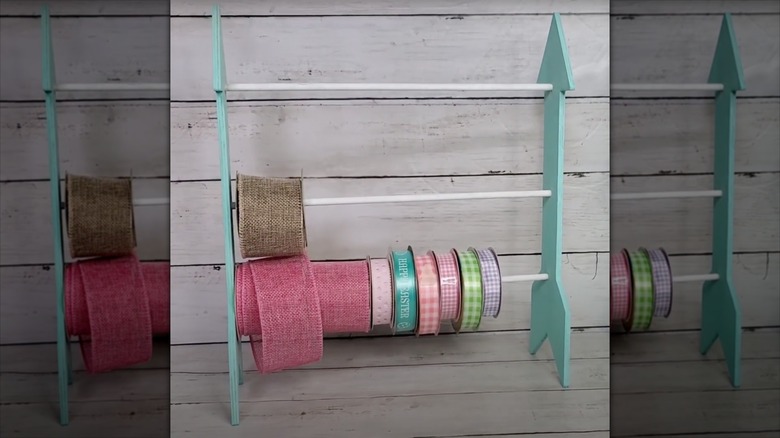
The star of this show is the humble wooden dowel. Dollar Tree sells a four-pack of 12-inch dowels for $1.25. You'll also need to purchase a pack of the highly rated crafter's square wooden arrows, which are the key to making this ribbon organizer freestanding. You can substitute the crafter's square standing crosses or any of the retailer's other wooden craft shapes with a firm base.
Along with those supplies, you also need a few basic crafting tools on hand. A KAFENDA heavy-duty staple remover, a 3/8 inch drill bit, a sanding block like the BOSHCRAFT sanding sponge, masking tape, and your trusty glue gun will help you achieve the best outcome.
Making your quick and easy freestanding DIY ribbon organizer
Begin by removing the twine hanging cords, staples, and any pricing stickers from your wooden arrows. Then, lightly sand them on all sides to get rid of any rough edges or potential splinters. Once they're completely smooth, temporarily tape the arrows together using masking tape, making sure to line up the wood forms exactly. Next, drill three holes through the shaft of both arrows, at approximately two-inch intervals. Make sure your dowels fit snugly in the holes before removing the masking tape. If you know you'll only need to store jumbo-sized rolls of ribbon, you only need to drill two holes.
The natural color of the arrows and dowels looks nice, but we suggest adding a personal touch by using Apple Barrel acrylic craft paint to completely cover the wood. Feel free to paint any design you like. Once your painted pieces are completely dry, fill each hole on one arrow with a small amount of hot glue before inserting the dowels. Hold them in place until set. Then, thread your rolls of ribbon onto the dowels before putting the other end of the dowels through the holes you drilled through the second arrow.
Finally, set your ribbon organizer upright and start wrapping! Having your trim all in one place will make the process so simple, you may even have time to use leftover wrapping paper to create a work of art for your wall.
Another Dollar Tree DIY ribbon storage hack to try
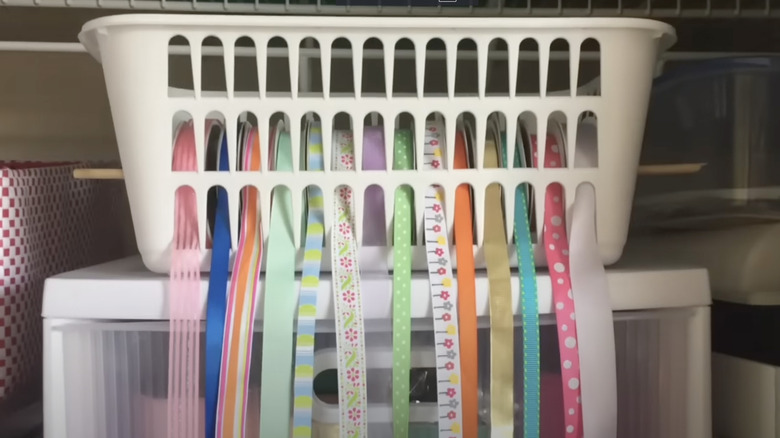
If you have lots of skinny ribbon that easily tangles or prefer to hang your ribbon organizer on the wall, grab a few of Dollar Tree's assorted rectangular slotted plastic baskets along with your wooden dowels. Make sure the ones you pick are shorter than 12" on at least two sides. Although they come in a variety of colors, you can use Krylon COLORmaxx spray paint to customize your baskets. Once they're completely dry, the assembly process for another ribbon hack couldn't be easier.
Stick your dowel through a hole on the shorter side of your basket before threading your spools of ribbon on it. Then, simply push the dowel through the corresponding hole on the other side of the basket. Make sure the ends of the dowel extend past the end of the basket on both sides. Next, take the loose end of each roll of ribbon and thread it through the holes on the long side of your basket. Leave enough so it's easy for you to pull and cut the length you need to wrap your gifts or bring Christmas into your kitchen with a DIY cabinet decoration.
If you want to hang your ribbon organizer, put several squares of foam mounting tape like the bestselling Tatuo double-sided soft sponge adhesive on the back of the basket before securing it in place on your wall.


