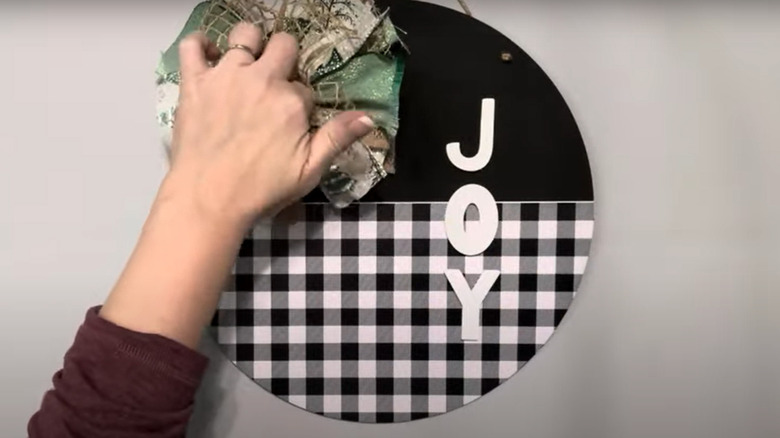
DIY Cute Christmas Joy Door Decor To Welcome Guests With Holiday Cheer
We may receive a commission on purchases made from links.
Joy to the world! Although we associate this phrase with Christmas, it's a lovely sentiment to keep around all year long. Announce to all that this is a priority in your home by crafting a joy-themed door sign with a message worthy of any season.
Beth from the YouTube channel We Craft Around assembled a door hanging with a handful of supplies, mainly from Dollar Tree. You can recreate or customize your own in no time. Fill your shopping cart with a circular Crafter's Square Plywood DIY Hanging Sign, a roll of Crafter's Square Black and White Permanent Vinyl Paper, and four rolls of wire ribbon, each in a different design. Also, get yourself some letters from Amazon; Cregugua 2-inch Wooden Letters are a great match to the ones our DIYer used. Also pick up some holographic glitter, a roll of twine, and paint in black and white; Beth opted for chalk paint, but any type of craft paint will do. As for tools, gather up a utility knife, scissors, a paintbrush, and a glue gun or craft glue.
There's nothing stopping you from tweaking this project to fit another festive time; change the colors and wording to create a sign for your front door for Thanksgiving, Halloween, to herald the spring, or to bring summer fun to your front porch. Leave off the wooden lettering to make it a multi-purpose wall or door hanging; use black chalkboard paint to add handwritten messages that suit your whims. If black-and-white plaid isn't your cup of tea, try an adhesive vinyl featuring glitter or a pattern that is more your style.
Do up your door hanging
Remove the hanging cord from the sign, divide the circle in half horizontally with painters' tape, and paint the surface and edges of the upper half black. Give your choice of letters a coating of white paint, and layer on some holographic glitter. Once everything is dry, remove the painters' tape and line up the edge of your vinyl paper along the painted edge. Carefully peel away the backing, and smooth away bubbles from the vinyl as you cover the remaining half of the sign. Trim the excess from the edges of the sign with a utility knife. Attach the letters with glue on the face of the sign; spell your word of choice out vertically, horizontally, diagonally, or in a purposefully sloppy arrangement.
Create your bow by trimming 7-inch sections of wire-edged ribbon, snipping four pieces of each pattern. If you have any left over, try this brilliant ribbon hack to add drama to your Christmas tree. Place two pieces of the first pattern, one on top of the other, in an X shape, and cinch the center with your fingers. Repeat this with each of the other patterned ribbons, and continue until you've used all of the ribbon by repeating the series of patterns again. Tie the bundle with twine, and glue it to the edge of the painted part of your sign. If you want to change the bow's style with the seasons, hold it on with hook and loop tabs instead of glue. Reattach the hanging cord to the sign, hang it up, and let it greet the world.

