DIY A Stunning Wooden Spiral Christmas Tree In Just One Day
We may receive a commission on purchases made from links.
Few items bring as much festive cheer to a home as a Christmas tree, but you don't just have to stick to the classics. If you're tight on space, for example, there are plenty of DIY tree alternatives that can complement a small living room. Similarly, if you're on a budget, you can decorate your tree with low-cost homemade ornaments. And if you're in the mood for something totally different, why not build your very own tree out of natural wood?
This project requires about a dozen wood boards cut to a width of 3/4 inches by 2 1/2 inches, as well as a circular or drop saw. If you're planning to leave the end result natural, select a wood with a color you love, such as a rich mahogany or warm chestnut. Alternatively, if you'd prefer to paint the DIY tree at the end, simply opt for the cheapest wood available at your local hardware store.
It's important to note that this project is simple but quite time-consuming as there will be a lot of cutting and sanding involved, but it can still be completed in a day. Here's how to get it done.
Preparing the pieces for your DIY tree
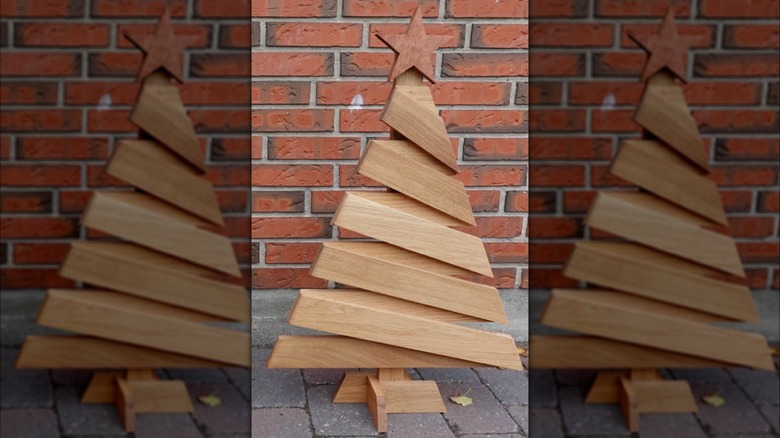
To DIY your own stunning Christmas tree, you'll need to start by measuring and cutting all of your wood boards to size. The tree itself is made up of 10 wooden slats (five horizontal and five diagonal) that will run from longest at the bottom to shortest at the top to create the pointy Christmas tree effect. This project also requires four smaller wood pieces cut to 6 inches each to serve as the feet of the tree, as well as one long board measuring 29 1/16 inches, which will run vertically behind the tree and support all of the slats.
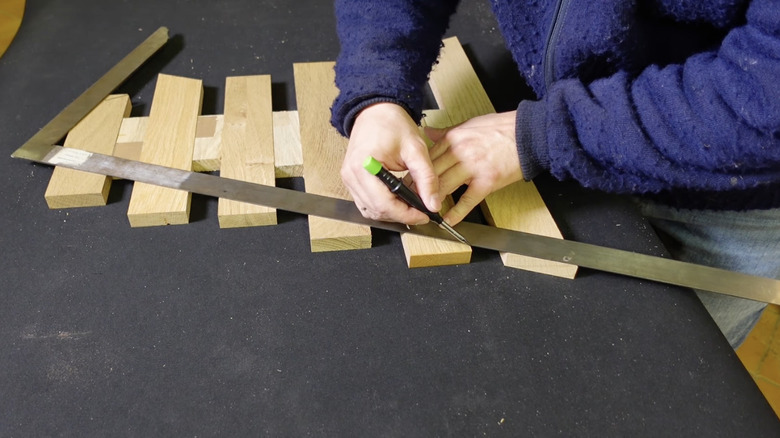
In order to minimize measuring, DIYer Erik Hovedskou recommends starting with the bottom board, which will also be the longest. Cut it to 20.5 inches and angle each end to 22.5 degrees using your saw. Place it on a flat surface, then lay down four slats above it. You can use spacers in between each to ensure they're evenly spaced out. The slats will need to be cut into increasingly shorter pieces while maintaining the same 22.5-degree angle on each edge. In order to determine how much to cut from each slat, align a square ruler with the angle of the bottom board, then trace along the length of the ruler across the other slats. Repeat on the other side and cut along the lines. Now, it's time to start assembling.
Assembling your wooden spiral Christmas tree
Once all five base pieces are cut, realign them on a flat surface, using spacers if needed. Place the vertical backboard so that it runs down the middle and attach it using wood glue, then a nail gun.
To achieve the twisted effect, five slats will need to be applied at an angle on top of the horizontal ones. Start by aligning the first one with the bottom right-hand corner of the lowest slat and the top left-hand corner of the slat above it. Repeat all the way up, then mark and cut off the edges that fall beyond the horizontal slats, again sticking with a 22.5-degree angle. Attach them using wood glue, then flip the tree over and use the nail gun from the back to keep the nails hidden from view.
Finally, using glue and the nail gun, attach the star (cut from a square piece of wood) to the top and the four 6-inch pieces to the exposed vertical base (two horizontal to the tree and two perpendicular) to create the stand. Sand the whole thing down and finish with wood oil to bring out its natural beauty or coat it with clear Rust-Oleum lacquer spray for a high-gloss look. Alternatively, get creative by painting the tree, choosing a different hue for the front and back panels to make the spiral effect really pop. And once you've mastered this DIY, you can repeat the same steps with bigger measurements to create a huge six-foot-tall version.


