Illuminate Your Space By Transforming Dollar Tree Shelves Into A Floating Wall Light
We may receive a commission on purchases made from links.
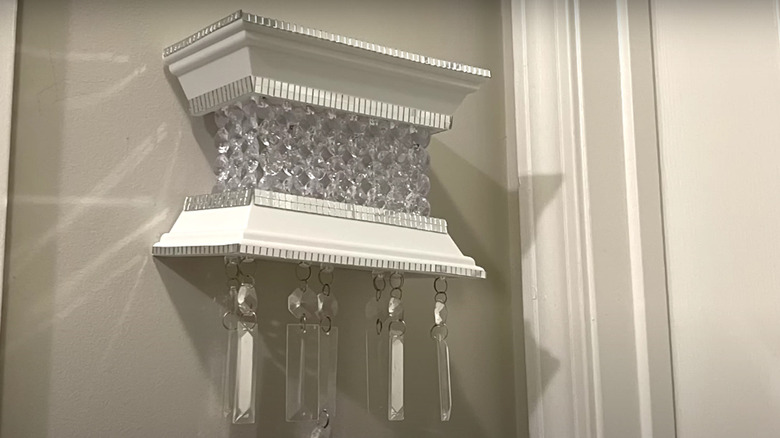
Lighting can make or break a room, but it doesn't have to break the bank. It's easy, cheap, and fun to improve your home by creating unique Dollar Tree DIY lighting features. For around $5, you can make a truly luxe wall sconce that belies its tiny price tag. Made of two bejeweled floating shelves connected with diamond-studded panels that glow from within, this elegant and affordable light will enhance the ambiance of any space in your home.
To make your own glitzy wall sconce, head to Dollar Tree for two plastic floating shelves, a set of micro LED string lights, some silver adhesive diamond wrap, and a bag of 1-inch clear plastic "gems." If you can't find all of your supplies at Dollar Tree, hit up Amazon for a pack of XHKDSYMC clear acrylic diamonds. You'll also need heavy craft glue like E6000, a ruler, a sheet of paper, high-viscosity UV resin, and a UV flashlight.
If you'd rather take your DIY light in a different direction, you can complement your home's coastal decor by subbing the plastic diamonds for decorative sea glass, and covering the shelves' faces with rows of glued-on driftwood or twigs. Alternatively, you can glue small toys like figurines or model cars along the molding to match your kids' room themes; this is great for both the young, and the young-at-heart. If something more understated is up your alley, this DIY can still fit in with your aesthetic. Diamonds aren't everyone's best friend, and, if you prefer, you can swap them out for these clear glass accent gems to make your translucent panels. Use plastic-friendly spray paint in a muted color to upgrade the white plastic shelves, and let simplicity be the focal point.
Bring some light into the world with your DIY floating wall light
Even if you're swapping out some of the products, the basic steps to make this wall sconce are the same. Cut the adhesive diamond wrap, or other trim, into thin strips, and adhere them around the molded sides of both shelves. On the paper, arrange eight plastic diamonds or stones in a row along the edge of the ruler. Make sure all the diamonds are touching their neighboring gems. Add UV resin between two of the diamonds, and cure the resin with the UV flashlight. Repeat this process for all eight diamonds. You'll need to make six rows of fused diamonds, all connected with resin, for the front panel of your sconce. To make the side pieces, you'll fuse six rows of three diamonds for each side, following the same method you used for the larger panel.
Using heavy craft glue, attach the long diamond panel to the underside of one of the shelves, flush with the lip. Glue on the side pieces, and let the glue set. Turn that shelf upside down, and attach the string lights in a coil or in zigzagged rows to the underside of the shelf with glue. Then, glue the bottom shelf of the sconce onto the jeweled front and side panels, and set the battery pack inside the light on the bottom shelf. If it ends up showing through the translucent panels too much, set the pack on the top shelf of the light, and hang the piece high enough that it won't be visible. Hang up your light, and bask in the glow.

