Top Tips For Sharpening Dull Drill Bits So They're Good As New
We may receive a commission on purchases made from links.
The shape of a drill bit is what makes it work. But it's strangely difficult to visualize this cutting tool and get a handle on what needs to be done to sharpen it. It's a simple thing that's difficult to grasp intuitively, so let's try to break it down into a few basic tips that make the process easy to understand and easy to do.
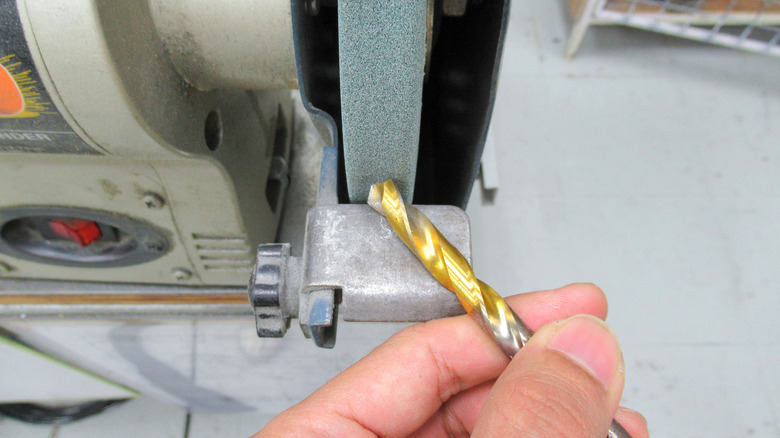
There are many obscure types of drill bits you might use on your next project, but we're going to focus on the typical two-flute design (see above — the flutes are the grooves). Sharpening is a matter of taking material off two of the three surfaces — called the flanks — that make up the top of the drill bit. Not the very tip — this is the web, the third surface that joins the two flanks, which are the angled surfaces that run up to the top of the tool. Each flank has a cutting edge on the opposite side of the bit's center axis. The leading edge that makes contact with the workpiece first is the cutting edge, and one of our key goals is to make it straight and sharp. The other objective is to make sure the original angle of the flank is preserved. This is called the relief angle, and the material removed to create (or maintain) it is called the relief area — the back surface of the flank, which shouldn't make contact with any workpiece you're cutting. "Relief" here refers to creating space to reduce friction. Don't worry: We'll explain all that in a bit.
Use a grinding wheel
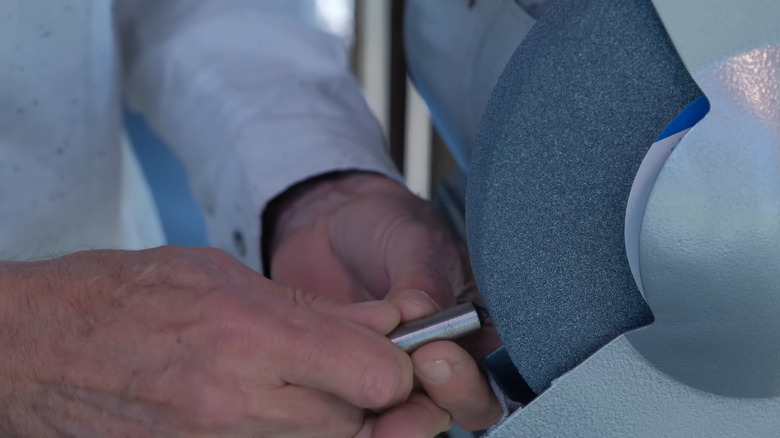
Using the wheel on a benchtop grinder is the best way to sharpen drill bits. It's fast, easy, and accurate. At a minimum, you want to restore your bit to its original condition, and one way to accomplish this is to compare a sharp bit to your dull one, and grind the dull one to match. But you don't really need the keen model bit — just a good process for getting the blunted one spiffed up. Two ways to do this on a benchtop grinding wheel both start with the bit held against the disk's curved edge, with the bit's cutting edge perfectly horizontal. One method, via Matthias Wandel's Woodworking for Engineers website, is to rotate the bit around its point — with its flank against the wheel — in a single motion from cutting edge to the back edge of the flank. Paul Brodie, a YouTuber who specializes in hand-made bicycle frames, has a simpler approach, as seen above. He uses the same basic motion as Wandel, but he rocks the bit up and down against the bench grinder — cutting edge to relief edge, then from relief back to cutting edge.
A few tips make these strategies easier to succeed with. Use a fine-grit grinding wheel, or start with a coarse wheel for roughing in your shape then finish with a fine wheel. If your bench grinder has a rest, mark several lines on it at 60 degrees to help ensure that you preserve the correct angle on the bit. And note the pattern of the sparks you produce — they can tell you exactly where material is being ground away.
Use the relief area to keep the cutting edge forward

As we mentioned, if you look at your bit carefully, you'll notice that the relief edges at the back of the drill bit's flanks (above) are at a slightly different angle to the axis of rotation. The back edge is closer to the center of the bit, and extra material is removed from this area. This ensures that the cutting edge is the foremost part of the bit as it is applied to your workpiece. Otherwise, you'd get a lot of friction and not a lot of cutting power. In fact, if a bit has been poorly sharpened in the past and the back edge of the flank leads ahead of the cutting edge, the bit will not cut at all.
You'll usually want to maintain the plane of the original relief area, which means preserving the initial shape of the bit's flank faces. Since you're removing material, this means using a bit of extra force against the wheel at the relief end of your motion. So, to use Paul Brodie's approach, start with relatively light pressure on the cutting edge, and gradually increase pressure as you tilt the bit back to grind the relief area. Then reverse everything, starting with greater pressure on the relief edge and moving to the cutting edge while gradually reducing pressure. As you approach the back relief area of the flank, take care not to nick the cutting edge against the grinder. The outcome should be a relief area that doesn't come into contact with your workpiece when the bit is cutting, thus reducing friction.
Keep the point centered
A drill bit spinning around a tip that's not centered is going to make a mess and a racket to boot. In addition to ensuring that the cutting edge is the most forward part of the drill bit, Matthias Wandel says the other two key goals when sharpening one are to keep the point centered and keep the cutting edges symmetrical. When the two flanks that make a drill's point are cut at the same angle, these goals amount to the same thing. You can use a drill guide to ensure the correct angle of the bit tip, about 118 degrees.
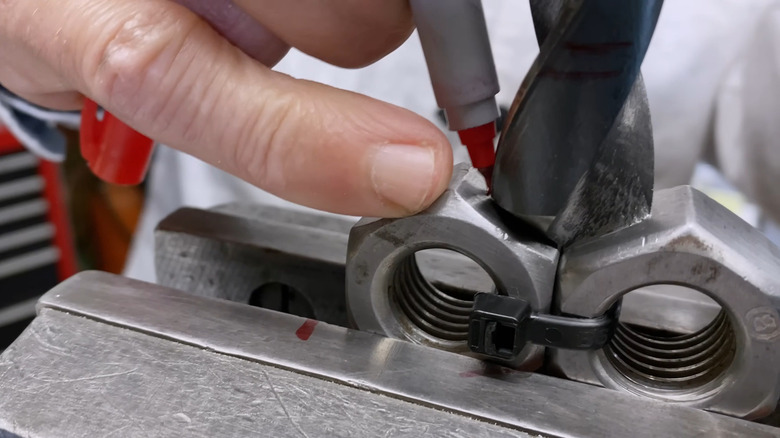
The WeldingStop drill bit gage has a scale for measuring along the cutting edge to make sure the tip is centered. If you don't have such a gage, you can cable-tie two large hex nuts together to give you a 120-degree angle without the need to buy a guide. To use this homemade tool to check for a centered point, just mark the length of one cutting edge on one of the nuts, then compare the other one.
Sharpen your grinding wheel, too
It might (but probably won't) surprise you to learn that grinding wheels arrive from the factory out of round and wobbling left and right as they spin. Truing a grinding wheel — reshaping it to restore its accuracy — is a necessary first step when using a new model, and a smart step before you do any precision work on it, like sharpening a drill bit. This is one reason jigs and sharpeners that use a bench grinder can be unreliable: When the wheel changes shape over time, it becomes impossible for them to be consistently accurate.
Truing a grinding wheel is often called sharpening the wheel, and there are a number of ways to get the work done. One is a device called a Huntington dresser, and while the Forney dresser offered by Amazon has good reviews, Paul Brodie isn't a fan. He prefers a single-point diamond wheel dresser. You can purchase Uxcell's Diamond Grinding Wheel Dresser for about a third the price of the Huntington dresser. Another tool for sharpening grinding wheels is a diamond-encrusted stone or box dresser — Powertec's 3.5-inch-wide dresser is just $10.99 and has a 4.5-star average across over 2,100 Amazon ratings.
With a single-point diamond dresser, you simply move the tip across the spinning wheel, either using a jig or by hand. Don't just flatten the curved surface you'll use for grinding drill bits — also hone the part of the circular faces nearest the grinding edge. This edge can be important if you're notching the web — the center area of a bit's tip — so that cuts will start more easily.
Use a manual file

Of course, not everyone has a benchtop grinder, and even if you do, you might not be crazy about the idea of trying to do delicate work with one. With a little care, you can sharpen drill bits without a heavy-duty tool — all that's really needed to do a reasonably good job is a diamond file. And if you're cutting into carbide or hard high-speed steel (HSS) bits, the diamond crust is necessary — these materials are difficult or impossible to sharpen any other way.
Clamp the bit to be sharpened in a vise vertically with the point up. (You certainly can sharpen it horizontally as well, so if that position is more comfortable for you, go for it!) In strokes that mimic the motion of either Matthias Wandel's or Paul Brodie's grinding wheel bit-sharpening method, stroke the file against the bit's flanks, starting flush against the cutting edge and moving back toward the relief area. Again, be sure to use a little more pressure in the relief area in order to ensure that more material is removed there — this makes it possible for the leading cutting edge to do its work.