The Faux Crown Molding Paint Trick That Saves You From A Costly Installation
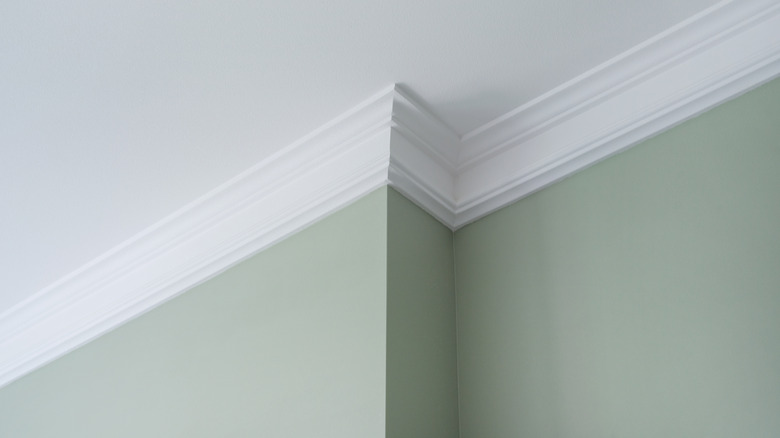
If you're looking for a way to instantly elevate the look of a room, a great way to do this is with crown molding. This decorative finish can be found in many traditional homes to add a little interest and make ceilings look taller by creating a higher focal point in the room. Just one problem: Crown molding is pretty expensive and difficult to install. But, not to worry, because there is an easy way to save money and achieve the look of thick, expensive crown molding using a little optical trick (and some paint) by leaving a small gap between two pieces of thin trim.
If you already have some thin trim where the wall meets the ceiling, you're practically halfway there, since you will only need another thin piece of trim to place slightly below it. However, a lot of modern homes have no crown molding at all. If this is the case for you, you will need two sizes of trim, one thicker than the other. You'll also need a tape measure, painter's tape, a nail gun or glue, a saw or miter shears, semi-gloss paint (many people opt for white), 80- to 120-grit sandpaper, and spackling or caulk to hide joints and nail holes. You also have the option to use a level or a spare piece of wood to make sure the gap between your trims is straight.
How to DIY faux crown molding
First, measure your walls to make sure you purchase enough trim to line every edge. There are many calculators online that can help you determine how much trim you need, but always make sure you're purchasing more than you think you'll use to account for waste. There are lots of trim options out there, such as wood, plastic, or even light condensed foam, so choose a material that works for the tools you're using to cut it. Thicker material will require something like a miter saw to cut properly. Prepare your pieces by cutting 45-degree angles on each edge so they fit into corners.
If you don't have any trim already installed, first nail down the top trim and then the bottom strip of trim slightly below it, leaving a gap of whatever thickness you wish. Thicker crown molding looks more expensive and works best for higher ceilings, especially those above 8 feet. Cover any nail holes and gaps from in the joining pieces with caulk or spackling and then sand smooth. Skipping this step is a common DIY crown molding installation mistake homeowners make and will affect the finished look. Prime the wall gap and new trim if needed and then paint them with a semi-gloss paint so it looks all like one piece, achieving the optical illusion of expensive, thick crown molding. Now you can sit back and enjoy the new look or elevate it even more by adding a touch of hidden DIY lighting to your molding to make the room even more luxe.