DIY A Simple Privacy Screen For An Outdoor Patio Or Balcony

One of the top features most homeowners and renters look for has got to be a patio or balcony. These bonus outdoor living spaces can be wonderful for al fresco dining, backyard movie nights, or just enjoying some fresh air. But one downside of obtaining the treasured balcony or patio in apartment complexes, townhouses, and houses with small backyards is that your neighbors might have one too. On its face, this isn't a big deal, until it feels like your neighbor can see everything you get up to in your private outdoor living space, and vice versa.
There are some privacy screens and borders that you can purchase, often made from bamboo sticks or faux leaves and flowers, but these aren't always the most attractive options. To give yourself some much-needed privacy without harshing the aesthetics of your space, consider building and installing a privacy screen. It's easier than you might think, looks great, and can even be renter friendly.
This simple DIY is only suitable to outdoor areas with an existing fence or rail. For supplies, you'll need two wooden boards that are measured about one to two feet higher than the height of your existing railing — these will be the frame you attach all the other boards to, which must be cut to the length of the railing section you want coverage on. Other supplies include a saw, sander or sanding paper, wood glue, nail gun, paint or wood stain, and cable ties.
Assemble your cut and sanded planks
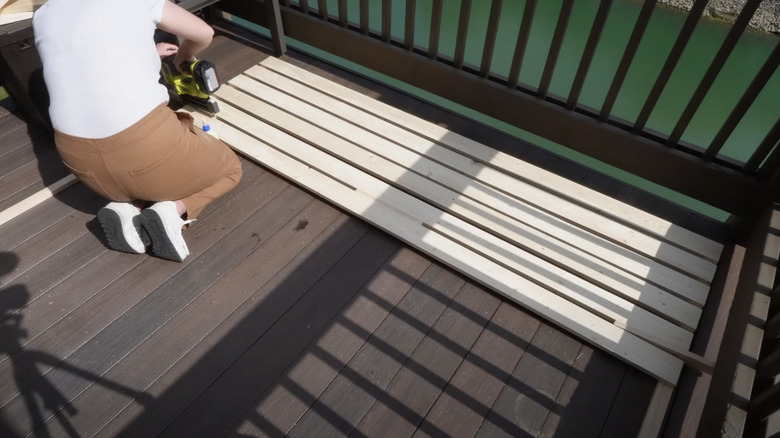
To start, either buy or cut and sand your wood boards to the necessary lengths, then lay out your two frame boards the same distance apart as the length of your railing, lying vertically. You will be attaching either end of your horizontal boards to these frames. Because this screen will enclose your outdoor space somewhat, you want to make sure it looks well-made, so to ensure even spacing between the horizontal boards, use a piece of scrap wood as a spacer.
On the vertical frame, coat the spot you're going to place the end of the horizontal board with wood glue, and once it's secure and positioned correctly, secure it with your nail gun. Then, repeat this process on the other end, using scrap wood to measure gaps between the boards. Repeat this process until all of the horizontal boards are attached. You want to give the wood glue plenty of time to fully cure, so let it dry overnight. From here, you can customize your screen (read on for more tips) with paint and other accessories, but we recommend coating both sides in a weatherproofing solution at the very least. This ensures that your screen lasts a long time and stays looking great.
Once this process is done, you can secure it to your existing railing with a handful of cable ties. These super-strong fasteners will keep the screen from falling and can just be cut away when you're ready to move, making this a renter-friendly DIY decor trick.
Customizing your privacy screen and other considerations

Part of what makes this DIY so great is that you can really customize it to your own personal style. You can treat it with a wood stain and bring out the wood's natural grain, or give it a coat of exterior paint. For a seamless look, paint it in a color similar to the exterior of your home, or make it a statement piece with a complementary shade. You can even try your hand at designing the perfect wall mural on your fence.
It's also very easy to hang things directly from this privacy screen. Hanging potted plants can do well here, as the screen will block a significant amount of wind, and they'll get plenty of sunshine and rain outdoors. Just look for potted plants with over-the-rail hooks. If you don't have much of a green thumb, realistic-looking faux plants will look just as stunning from here. Some other hangable patio and balcony decor include string lights, antique gardening tools, lanterns, and more.
There is a way to hack this privacy screen by using wood pallets. This will have a similar look to the DIY described above, but save you from the labor-intensive sawing and nailing. Save wood pallets the next time you have a furniture delivery, or ask your hardware store if they have any you can load up for free.