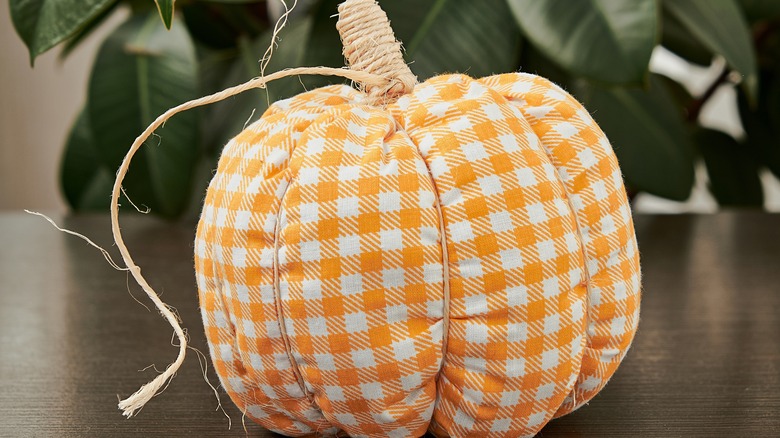
The Must-Try DIY Sherpa Pumpkin Pillow That Brings Fall Vibes Into Your Home
Just the words "no sew" send many aspiring crafters out gathering material to make a project. Along with virtually no needed tools and just a handful of supplies, the temptation to whip up this DIY sherpa pumpkin pillow is enough to make creatives swoon, especially since pumpkins are the one fall decor element that people can't live without. Morgan Winton's Tiktok tutorial for an oversized cuddly cucurbit reveals a project accessible enough for even the non-crafty (via TikTok).
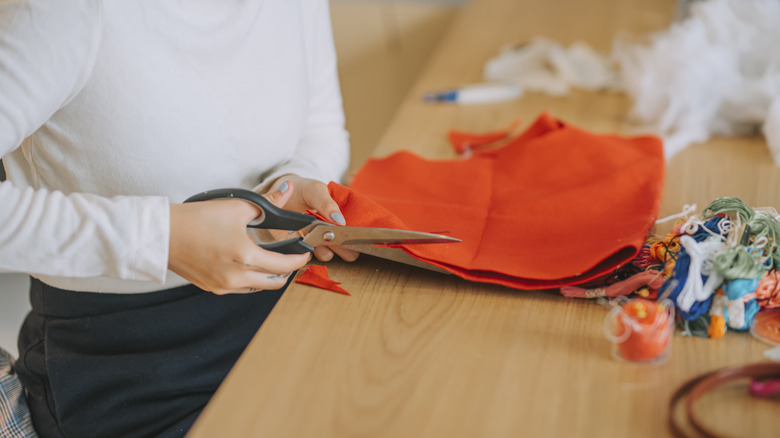
A yard or so of fabric, some polyester stuffing, a stick and some twine, yarn that's close to the color of the fabric, and some craft glue is all it takes. The stick you choose will act as the stem of the pumpkin, and it doesn't need to be particularly thick, since you'll be wrapping it in twine. A wooden chopstick or repurposed pen casing can stand in perfectly. In less than an hour, you'll have a squeeze-worthy plush pumpkin to add fall spirit to your home.
Just stuff and wrap
To make this pumpkin a la TikTok, purchase 1 yard of fleece in either off-white or another fall color like the several available at Joann. If your fabric is wider than 1 yard, trim the piece so that its sides are equal lengths. Grab a generous handful or two of the stuffing, and set it in the center of your fabric square. Gather the corners and sides of the fabric around the stuffing.
Bundle and tie the corners and edges of the fabric together and add the end of the stick to the opening. Tie the opening closed around the stick with the yarn, but keep the yarn attached to the ball. Wrap the yarn around the bottom of the pumpkin's body tightly enough to create a deep indentation in the fabric. Bring the yarn back up toward the stem, and wrap it the same way 90 degrees across the indentation you already made. You should have four indentations. Continue wrapping the yarn two more times, dividing the four sections between indentations in half for a total of eight indentations. Tie the yarn off on the stem, and cut it. To finish the stem, glue one end of the twine to the base of the stem, and wrap the twine around the gathered fabric tightly enough to cover it. Continue wrapping up the stem, laying the next rotation of twine as close to the stick as possible. Cut the twine and attach with glue.
Twists on the original
Pumpkins don't have to be orange, and they don't have to be oversized. Branch out with some unexpected colors to use in your fall decor. The GNSN Faux Sheekskin Sherpa Fleece Fabric from Amazon come in a variety of soft colors you wouldn't immediately associate with fall. You can also opt for fabrics other than sherpa, like calicos, t-shirt material, polar fleece, or even denim can work.
If you had to trim your yard of fabric to create a square before making your large pumpkin, use the remnants to make several small pumpkins. You may want to use a thinner string than yarn when making mini pumpkins; heavy thread or embroidery floss that matches the fabric will be easier to "hide" in the indentation. Repurpose fabric from old clothes; a square cut from a worn-out pair of jeans or a flannel shirt can yield you a miniature version. Old socks in catchy patterns can stand in for fabric squares by turning them inside out, cutting the foot off, and tying the cut end closed. Turn it right-side-out and fill with stuffing. Use the same techniques for making a large pumpkin to finish your tiny design. With minimal work and a chance to reuse potential trash, you can concoct an eclectic collection of pumpkins to cozy up your living room for fall.