Keep Homework Organized With A DIY Portable Workstation Kids Will Love
We may receive a commission on purchases made from links.
If your child often complains that they can't find their pencils, the dog ate their homework, or if their desk is usually strewn with all manner of school supplies, it may be time to invest in a homework station. An organizer designed to hold pens, pencils, rulers, binder, and folders is a surefire way to combat chaos in your little learner's room. What's more, having the right school supplies in the classroom and at home can motivate kids to study. Creating a homework workstation together with your child could give them a much-needed boost of enthusiasm for completing their assignments at home. Building one that's portable gives your child the freedom to move their supplies outside the designated study area if they want to engage in a more fun, creative project like drawing.
Building a DIY portable workstation is much easier than it sounds. There are many different design options to pursue, but your basic wooden tote is both portable, durable, and makes for an excellent beginner woodworking project. With a suitable plank of wood, some basic home woodworking tools, and a bit of creativity, you can make a homework station your kids will love relatively quickly. Below, we'll explain how to choose the right wood, fashion it into a tote, and walk you through options for organizing and decorating the station.
How to build the wooden tote
First, choose a suitable material for the workstation. Ideally, use a light wood — this will make it easy for your kids to carry the workstation around. Redwood, cedar, and Douglas fir are all excellent candidates, because they weigh relatively little compared to other species. You'll need a single, 5 ½-inch by 6-foot board for this project.
Start by cutting out the narrow side panels, since they are the trickiest. On the board, measure off 5½ inches from the edge. This will mark the height of the tote's long sides. From this line, draw a trapezoid, with the narrow edge terminating another 5 inches from the first line you drew. Now, you've outlined the narrow side panel, complete with the part that holds the tote's handle; it should look like a trapezoid adjoining a rectangle. Cut this shape out, use it as a stencil on the board, and cut once again — now you've got both the narrow sides.
Now, cut two 16-inch pieces from the same plank. These will be the long side panels. Then cut a 14½ -inch piece to serve as the bottom. You can now use glue and nails to fasten the pieces together. Next, mortise holes at the top of the two narrow panels, and insert a 16-inch dowel that fits the holes (this is your handle). Finally, work the tote over with a sanding pad, being sure to sand all its hard-to-reach places.
Adding compartments and decorating your kids' new portable workstation
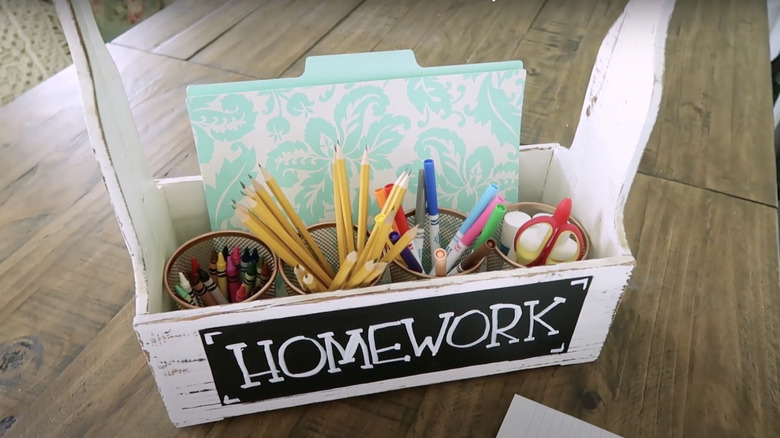
Now, it's time to make the tote into a homework station. This is a great time to involve the kids. They'll have fun customizing the station, and hopefully the project will help boost their engagement and interest in schoolwork. Together with the children, decide how you want to split the tote into compartments and brainstorm decorating tips.
At the very least, you want a dedicated space for pens, pencils, and crayons. Your child may want to keep the writing utensils separate the way they want, but to keep the homework station neat, at least give them the option of organizing these items. Simple mesh pencil holders like these ones for $9.22 on Amazon are a great budget option. Or, for greater utility, you can spend a bit more and get a five-compartment, rotating organizer, like this one that Amazon also sells ($20). If your child finds these boring, this dinosaur egg pencil organizer from Walmart (around $3) may just do the trick. Also, consider investing in a file organizer to keep your child's folders, textbooks, and notebooks in one place inside the tote.
The final step is to finish the tote. Of course, your child may want to make it their own, but you should give them a hand so they don't ruin the wood. If you used redwood to make the tote light, you'll want to apply a coat of alkyd primer first. Otherwise, you can finish it with linseed or beeswax, then let your child decorate it with stickers and decals.