This DIY Wall Sconce Gives Your Home A Gorgeous Vintage Look On A Budget
We may receive a commission on purchases made from links.
Beautiful lighting features never go out of fashion, and the classic gold wall sconce is timeless. Of course, wiring your home to insert extra electric lights is a hassle not all homeowners want to deal with, and if you're renting, forget about it. Fortunately, there's a way to capture this vintage look without wires. The answer is to DIY a stunning wall sconce on a budget. You can create your own illuminating wall fixtures with the right materials and a little elbow grease. The key is upcycling common items to reflect the lavish finishes of centuries gone by.
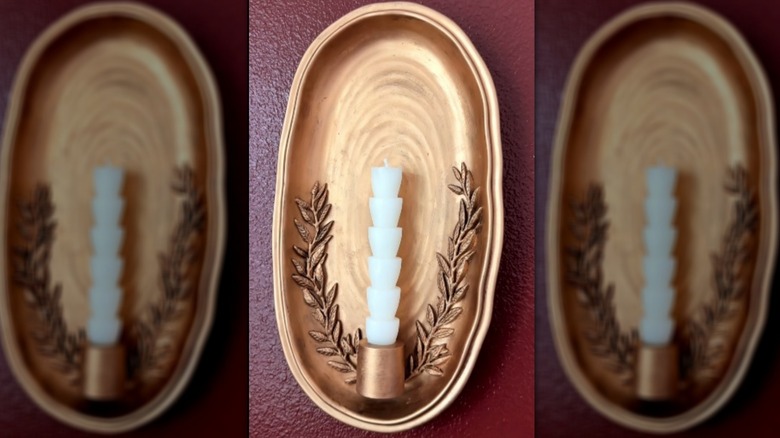
The wall sconce first appeared on the interior décor scene in Classical antiquity (more than 2,500 years ago). Since then, it has evolved from candles in simple wooden or metal brackets to elaborate mirrored backdrops with gaslights, and now modern electric bulbs. This DIY task returns things to the romantic ages of candlelight with a vintage-esque distressed gold foundation. The best part of the undertaking is giving an old serving platter a glow-up.
The original creator of the DIY, upcycling expert and blogger Jaharn Quinn, used a thrifted metal platter and a regular candle holder. Instagram crafter and YouTuber, Tina LeMac took inspiration from this idea, but put her own spin on things by adding some polymer clay detailing and using a ceramic platter. You can follow her project precisely (we've listed the exact materials she used below), or adapt the DIY to what you have on hand. Let's gather supplies and get crafting.
Sourcing materials for your DIY light fixture without breaking the bank
Before you learn how to decorate with sconces, you've got to get the materials to build them. For the base, use any oval plate you have on hand, or grab one at a local thrift store for cheap. Tina LeMac found a beautiful serving platter in the clearance bin of her local HomeGoods store. If you want to mimic her DIY, look for a platter that's irregularly shaped. To modify the color, buy a can of Rust-Oleum Painter's Touch 2X black spray paint for $6.48 at Home Depot, and Rub 'n Buff in Antique Gold from Michaels for around $6.99. Now that the background is out of the way, let's get to the light component.
The best choice of illumination for this DIY project is a long narrow candle. Pick up a pair of 10-inch white tapered candlesticks from Dollar Tree for $1.25. Add a candleholder to mount the light. Select one that can be glued flush to the plate (Amazon sells a style similar to LeMac's holder for $16.99 per pack). Lastly, you need something to hang the sconce. Tina LeMac uses a 5½-inch disc adhesive plate hanger. These are available through Sounding Stone for about $7.99. Pick up a pack of polymer clay for $2.99 at Michaels as an optional touch, and choose a silicone mold. LeMac used a fondant mold featuring fern leaves from Michaels for $14.99, but any design works. Now, let's get crafting.
Assembling the perfect budget vintage wall sconce
Installing wall sconces is the perfect room refresh, and here's how to put your DIY light feature together. Begin by molding any clay details. Most ¼-inch thick polymer molds need to bake at 270 degrees Fahrenheit for 15 minutes to half an hour, but check the product's instructions to be sure. Apply the finished decorations to the sides and the candle holder to the bottom with super glue. Once dry, coat the entire platter in black spray paint. It's best to do this outside or in a well-ventilated space. The Rust-Oleum Painter's Touch 2X is great because it's a primer and paint in one. After 20 to 30 minutes of dry time, use your fingers or a soft cloth to apply the gold Rub n' Buff wax coat. This polishes to a high shine, offering a seamless metallic finish. Finally, it's time to mount.
The adhesive hanger is the final step and is very easy to apply. Wipe the back of the plate with rubbing alcohol to ensure it is clean and wet the disc with water using your fingertip. After a moment the adhesive should become tacky to the touch. Press it to the plate with the hook pointing up, and leave it to dry for 24 hours. Now, it's ready to hang on the wall. This DIY project is an affordable way to enhance any space with a touch of vintage gold glam. Swap out candles in varying colors to fit your décor motif as your style changes.