Use These IKEA Products To Turn Dead Kitchen Space Into Storage On A Budget
We may receive a commission on purchases made from links.
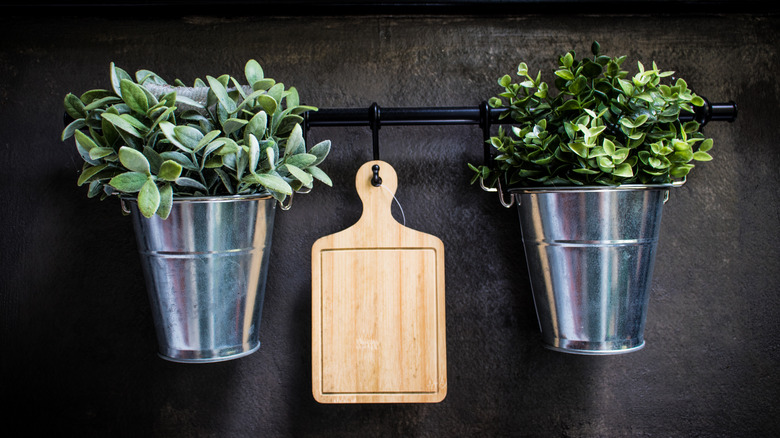
Negative space throughout your home is a good thing, but do you ever find areas that feel too empty? Too much dead space can make a room look unbalanced, and when this happens in your kitchen, it feels like a waste. Even the "Fixer to Fabulous" stars agree you should never let dead space go to waste. That's why utilizing dead space with an IKEA hack that creates more storage is the perfect functional and stylish way to fill it. By adding two curtain brackets and an adjustable rod, you can build a place to hang baskets that hold excess food, cooking items, or any other products that are taking up space in your cooking area and need a home!
With plenty of clever kitchen hacks to add storage, including Command hooks and Dollar Tree baskets, there's no shortage of ideas, but this IKEA DIY adds style and functionality. While you could use hundreds of curtain bracket and rod combinations, one of the simplest selections is the IKEA NEREBY set. It is low maintenance but easy to upgrade with paint, so this option is great for this DIY. Because you can customize it, it might even work better than a fancier set, and the $6 price tag is an added bonus. Once you've purchased your rod, it's time to DIY.
Use IKEA rods to create hanging storage
If you already have a dead space in your kitchen that needs filling, head there with your supplies in hand. If you like the idea of this hack but are not sure where to implement it, take stock of your cooking area and consider each wall, under-cabinet space, and pantry. If there is anywhere that offers several feet of blank space and won't create clutter with the rod and hanging baskets, this is where you want to get to work.
First, install your brackets with a drill. Measure the distance between the brackets for your rod–in the NEREBY's case, 23 ½ inches–and ensure you line everything up properly. If you're using a product with an extendable rod, like the IKEA BEKRÄFTA ($24.99), you have a little more length to play around with.
Remember that your baskets will hang down several inches or up to several feet, so keep this in mind when installing your rod above anything. Once you've secured this portion, you can add some removable S-hooks. These are where you can add baskets, like these woven TOLKNING options from IKEA for $20, by the handle so the opening is easily accessible. These can be used for anything from apples and other produce that doesn't need to be refrigerated to bags of chips and snacks that are secure in packaging.
Get creative with the rods to match your aesthetic
To customize your IKEA NEREBY rod, consider painting it gold to elevate the finished product and add a slight rustic element. Because the rod is solid birch covered in polyurethane/acrylic lacquer, you'll need to sand it down first so your paint will stick properly. Use sandpaper to remove the lacquer, then spray paint the entire piece of wood, including the brackets, if you like. Allow it to dry before attaching it to your wall.
If you prefer a more natural aesthetic but the birch is too light, you can sand it down and stain it a darker shade so the wood is still visible but fits with farmhouse or shabby-chic decor. For the brackets, a matte black would look good with the darker wood coloring, so use a metal-friendly option, like the Flat Black General Purpose Spray Paint from Home Depot for $7. If you want to keep the brackets light, a beige or cream stain would also work for this.