Create A Beautiful DIY Wooden Window Sill To Highlight The View

We may receive a commission on purchases made from links.
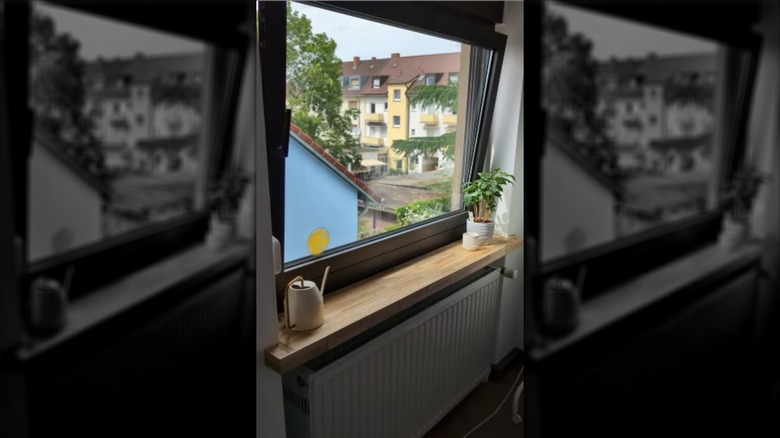
Does your window have a fabulous view that's being ruined by its old, dull, or ugly window sill? Maybe you also want to avoid a major window renovation. In that case, you better start rolling up your sleeves and activate your DIY mode because this clever hack could just be the solution you have been waiting for. Demonstrated by personal blogger Mar Colombani in an Instagram video, the do-it-yourself project primarily uses short wood strips conjoined together in a half-offset pattern. The wooden pieces form a panel that serves as a top cover for the window sill.
There will be some sawing involved to cut a few wood strips into needed lengths. For the most part, however, constructing this window sill does not require nailing, screwing, or any power tools, making it perfect for beginners or those with limited equipment. And with nothing but wood, glue, and a plastic sheet as building materials, it proves to be one of the many ways you can decorate your home on a budget. It is simple, affordable, and, most obviously, beautiful. Read on to learn how to recreate it.
Materials needed for your DIY window sill
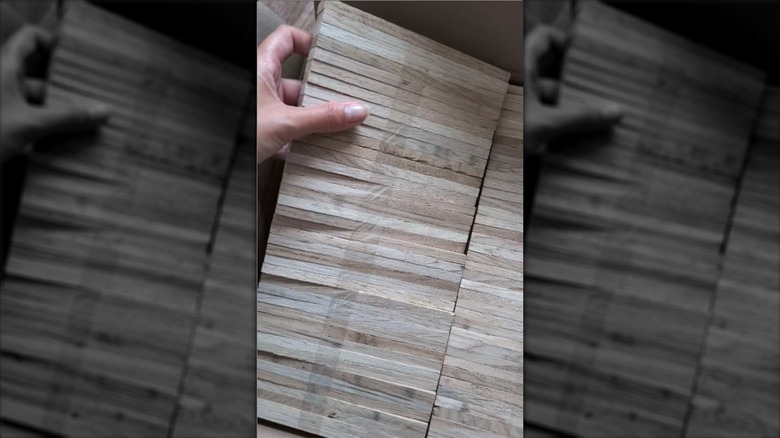
While the construction method is fairly simple, it is important to prepare things ahead. Firstly, you need to source your wood strips, which are the main material for this project. If you want to achieve the exact surface appearance from Mar Colombani's Instagram video, the same oak wood craft blocks that she used might be available to you via international shipping on Amazon, depending on where you live. However, you can also opt for local wood products as long as they have the same dimensions or are close to them. Ideally, look for wood strips with a natural wood finish that are approximately ¼ inch thick, ¾ inch wide, and 6 inches long. Make sure that you have enough supply to cover your window sill with extra pieces for the trim.
To adhere the wood strips together, you will need a strong adhesive such as construction wood glue. Since its location is partially exposed to the outdoors, it is advisable to use a type that is waterproof. There are numerous options that you can purchase online or at your local hardware store. Be ready as well with a wood saw and, lastly, a sheet of plastic wrap film wide enough to cover the surface of the window sill.
How to build your DIY wooden window sill
Before anything else, wipe your window sill clean and remove any debris or rubble. This is important to ensure an even surface. Next, you need a cover for the sill to protect it from the wet glue and to keep the wood from sticking to it. This is a clever way of repurposing plastic wrap in your house. Set the film on the sill, and begin lining up your wood strips on top in a longitudinal orientation starting from the inner corners. Apply glue to each adjacent side of the block, joining them together piece by piece.
To give stability as well as character to your new window sill, lay the wood strips on a half-offset or a staggered brick pattern. This means that each row is offset by half the length of one wood block from the parallel rows, just like subway tiles. Note that you will need to cut some of the end pieces in half to align the side ends.
Once the entire top area is covered, stick an additional row or two onto the edge of the panel to create an angular trim. Wait until the glue is dry, and your new wooden window sill will be ready to complement your lovely outdoor view. If you want, you can do your own twist to the design such as trying a different tiling pattern.