Cover The Unfinished Underside Of Upper Cabinets With This Brilliant Design Trick
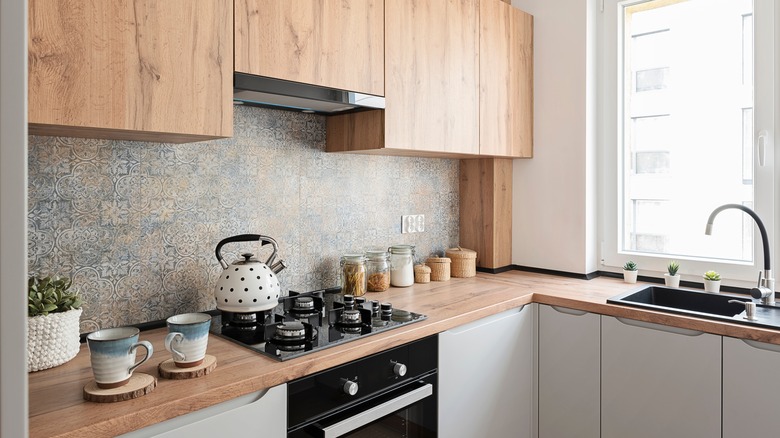
Remember the "Seinfeld" episode where Jerry buys an amazing jacket lined with an unexpected patterned fabric? In Seinfeld's case, the pink-and-white stripes were worth hiding. However, if you choose a pattern you love, drawing interest to a lesser-seen spot can bring a bit of delight to your day. The undersides of kitchen cabinets are not on everyone's must-decorate list, but for lovers of trendy, whimsical home accents, these spaces are blank slates for personal expression. A little paint and some sheets of wallpaper or another adhesive adornment will turn this raw, underused space into an eye-pleasing surprise.
For this DIY, you'll need some paint and a brush, and either wallpaper, adhesive tiles, or decals — plus just a few hours of your time. Depending on your type of wallpaper, you may also need wallpaper paste. Also have a pair of scissors or a utility knife on hand for trimming materials. Make it classy or quirky, busy or refined. Zhuzh up this unlikely spot, and you'll be seeking out even more nooks and crannies that need some flair around the home.
Wallpaper becomes cabinet paper
In practically every color and more patterns than you knew existed, wallpaper is an easy way to add loads of style to your cabinets' undersides. There are peel-and-stick varieties or more traditional ones involving glue. So, how do you choose the right wallpaper for your space? If you're a first-time wallpaperer who's fallen in love with a design that requires separate glue, don't let that discourage you. Both types of wallpaper have their challenges and advantages even with the extra step of painting on glue.
Begin by giving the cabinet undersides a good scrubbing to help your paint or paper stick. Follow up by painting the edges that extend past the cabinets' underside. Once the paint is no longer tacky, measure the cabinets' undersides. Even if each cabinet underside appears to be the same size, measure them individually to account for small differences that are common. Mark and cut the paper sheets to match each underside, and either peel away the backing from the paper or apply glue. For either the peel-and-stick or glue-on paper, smooth the paper on from one end to the other, taking care to press out any air bubbles. Let the adhesive cure or dry, and enjoy the results!
Stick-on style with wall decals
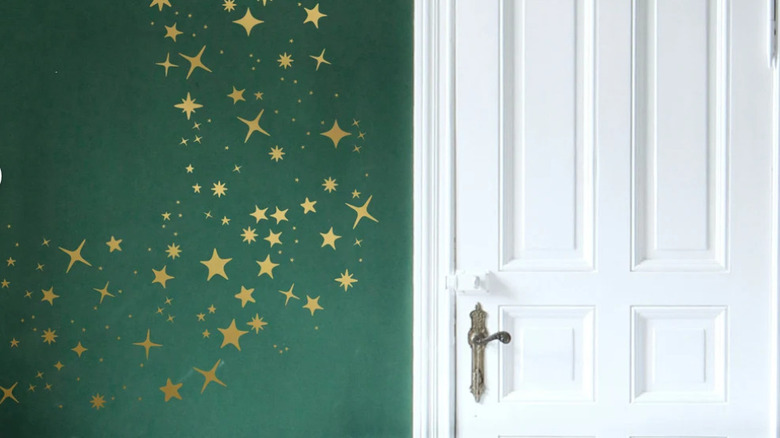
Wall decals have moved way beyond tired fonts reminding you to breathe or declaring your love of family. Etsy is brimming with smile-inducing decals, from gold stars and funky stripes to abstract shapes and sketches of flowers. Adhesive tiles have also come a long way. Dollar Tree's faux tin self-adhesive tiles are affordable and charming. These tiles are made of plastic, and you can cut them to fit spaces with either a fine-toothed saw or a utility knife, depending on the thickness of the plastic. To use decals on your cabinet undersides, pre-paint the cabinet bottom before attaching the decor, since the background will show through the design.
Starting with squeaky-clean cabinet undersides, coat the edges or the whole surfaces with paint, depending on your design choice. Allow it to dry until it's no longer tacky. Decide how you'd like to place them before peeling away the backing. A squeegee can help you install wallpaper as well as decals. Use it to smooth out air bubbles as you press on each sheet. For stick-on tiles, measure and cut them before adhering them to the cabinet. Apply the tiles, holding each one in place for several seconds to bond. Step back, and admire your improved space!