Brilliant Ways To Use Old Jars To Attract More Birds To Your Yard
We may receive a commission on purchases made from links.
Old jars are great for repurposing because they're cheap and everywhere: thrift stores, your cabinet, in your fridge holding that last dollop of jelly, you name it. Mason jars, in particular, are a staple of DIY crafting thanks to their versatility, durability, and wide spectrum of available colors and sizes. You've most likely seen awesome ways to use them for things like craft supply storage, as a rustic vase for wildflowers, or even as a Mason jar tissue holder DIY. But there's yet another brilliant way to use them: attracting birds!
If you want to create your own outdoor menagerie on a budget, old empty jars can be repurposed into a variety of bird features, such as feeders, water bowls, and even baths. We sourced some of the most genius ideas on the internet that turn old Mason jars into outdoor accessories that are guaranteed to thrill your feathery friends just as much as those store-bought versions would, but without the retail markups. So grab a clean Mason jar, your favorite hot glue gun, and let's dive in.
Turn two Mason jar lid bands into a birdseed treat holder
To make this bird feeder, you'll need at least two Mason jar lid bands, birdseed, something to bind the birdseed (peanut butter, coconut oil, vegetable fat, or shortening works), wax paper, twine, a mixing bowl, and a spatula. Start by combining the birdseed and binder in the mixing bowl so that it forms a sticky paste. Lay the Mason lid bands on the wax paper and divvy out the birdseed paste into the bands. Then, join two bands with twine and hang them on a tree.
Do you always feel like you have extra canning lids and no canning jars? Where do all of those jars go, and are they with our missing socks, too? Unfortunately, we don't have all the answers (sorry). Luckily, thanks to DIYs like this, you can repurpose those extra canning rings and Mason jar lids with bands into feeders that will attract native birds that are looking for a tasty treat. This works great because it's an easy craft that DIYers of any age can do and costs a fraction of what similar retail-ready feeders would.
Or use some lid bands to create a squirrel-free feeder instead
To create this you'll need Mason jar lid bands, two cookie sheets, hot glue, twine, and birdseed. Start by hot gluing a row of lid bands around one of the cookie sheet's perimeters to create a base for the feeder. From there, build up each row of Mason lid bands until the feeder is as tall as you want. Pour birdseed into the tray and then hot glue the other cookie sheet on top as a lid. Tie twine around the entire feeder the way you'd wrap ribbon around a gift box. This will support the weight of the feeder, seeds, and birds. Let the glue dry and then hang your new feeder from a tree.
This bigger feeder is awesome if you want a heavy-duty seed holder that gives birds a secure feeder that's squirrel-free. A solution like this is one of the most effective ways to keep squirrels from eating your birdseed. The secret lies in the lid bands which are big enough for smaller birds to enter but too small for the average chunky squirrel. However, smaller squirrels might still be able to get through. If you're worried about pint-sized critters squeezing in, you can swap the lid bands for something with a narrower diameter like small plastic jars cut into rings. If you go this route, you will most likely need to sand the cut edges of the rings. The video above also shows a method that involves creating everything from scratch using steel pipe to create the rings. But if you're not confident working with steel, you can adjust this to use these repurposed, lighter-weight materials.
Create a cute bird feeder with Mason jars and hanging lids
To make this, you'll need a Mason jar, a hanging lid that comes with a chain, a bag of small stones, cable ties, and birdseed. First, wash the stones to ensure dirt and grime from the store or warehouses don't end up in the bird's food. Remove the labels from the jar and unscrew the top. You won't need this top, but don't throw it away; you can repurpose the jar lid into a plant label for your garden! Add the stones into the jar, then birdseed. Screw the hanging lid onto the jar and hang it up.
This bird feeder is similar to one of the more popular designs you'll see at stores because of its look and ability to hold enough birdseed that you won't need to refill it much unless you've got a lot of new bird neighbors. But you can save yourself the retail price and give this DIY a go instead since it will only set you back a few dollars. This project does require specialty lids, which these YouTubers got from Dollar Tree, and which are also available on Amazon. However, you can easily make them yourself if you've got extra chains lying around. Just drill a hole on either side of your lid band and insert small screws. Then cut a chain to your desired length and attach to each screw.
Create a gravity bird feeder with Mason jars and old teacup saucers
You'll need a Mason jar with its lid and band, twine, a teacup saucer, and birdseed. Drill a hole in the middle of the lid that's large enough for the seed to spill out. Cut four pieces of twine that are approximately 3 feet long each. String each piece halfway through the lid band and re-add the lid to secure it into place. Next, fill the jar with seed. Once you've got it filled, screw the lid onto the jar and then sit the plate on top. Knot the twine two inches from the plate bottom; there's supposed to be a gap there, so don't worry if it's not sitting directly on the dish. Flip over and wrap the twine around the jar like you would wrap ribbon around a gift box. Hang by placing the bow loops on a branch.
This style of bird feeder is known as a "gravity feeder," which works by doling out enough seed to feed birds without needing to be constantly refilled. While you could buy one at a store, this cute project lets you customize your feeder to any aesthetic thanks to the versatile patterns teacup saucers offer. The biggest trick you may face with this project is finding the right size hole for the lid. You want to make sure the hole is big enough that seed is easily moved down the jar but not so big that it just spills out, wasting precious birdseed. That said, if you don't want to mess with the math of birdseed flow rate, this video shows an option of repurposing a salt container's lid and using its pour spout instead.
Hang a large jar on its side to create a small walk-in bird feeder
You'll need a large Mason jar, dowel rod, twine, hot glue, and birdseed. Start by removing any lid or band so that the neck's opening is as large as possible. Secure the dowel rod in place with hot glue. Then, wrap the entire jar with twine and leave a loop for hanging. Add a small layer of birdseed less than the height of the neck so that the seed won't spill out. Once your glue is dry, hang your new bird feeder on a tree branch or hook it onto your fence.
This is a simple DIY that doesn't require many tools and is great if you want to create a bird feeder quickly. The neck of the jar also serves as a nice perch for the birds, but the added dowel rod works even better. One tip, though: be mindful of the size of your jar as you'll want to ensure it's big enough for a bird to move around in comfortably without the concern of it getting stuck. You'll want to use at least a ½-gallon jar or larger.
Create a birdhouse with larger Mason jars
To create this, you'll need a larger Mason jar, paint, twine or ribbon, a tablespoon, and super glue. Make sure the ribbon or twine is wide enough to support the weight of the jar, bird, and bird's nest materials without tipping. Paint the Mason jar an opaque color to protect your new avian family from the sun and predators. Next, glue the spoon along the side of the Mason jar to create a perch, then glue the ribbon or wrap twine around the middle of the jar and hang it near a tree or other area where you've noticed birds like to nest.
This DIY is a great alternative to the usual birdhouse that's available for purchase. Even the typical birdhouse project kits usually involve some type of woodworking, which can be tough for people who don't want to use or have access to saws and cutting tools. Plus, wood is often treated with chemicals, some of which may be harmful to birds. This project is a simple alternative that can be done by anyone of any skill level and will give birds a reason to check out your yard as a potential safe place to house their babies.
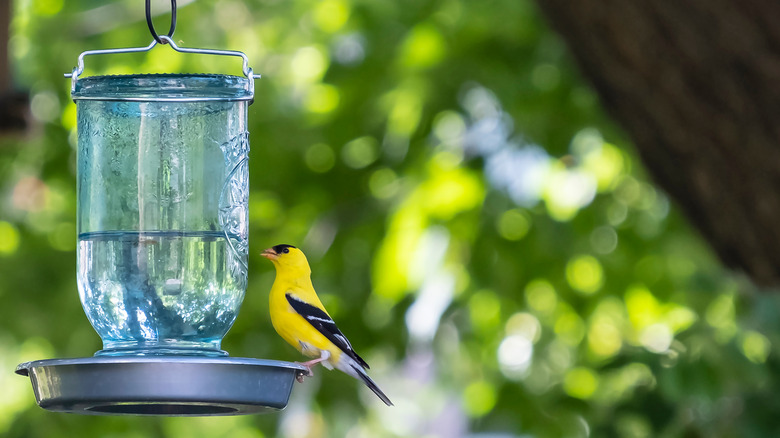
Mason jars also work great for giving birds water
You'll need a larger Mason jar with a lid, a pie pan or thick plant drip tray, a hook, waterproof glue (try aquarium or Gorilla glue), and twine. Start by drilling a few holes into the lid. Next, add a few bigger beads of hot glue to the middle of your pie pan. The beads should be tall enough to create a small gap between the Mason lid and the pan. Turn the Mason lid upside down and gently press it onto the glue beads while they're still fresh, then let the glue dry. Try gently pulling at the lid to see if you'll need more glue to secure it into place; just remember that you'll need enough of a gap so that water can reach the pan. Next, fill the Mason jar with water and screw onto the base. Flip the project over and then wrap the twine around the Mason jar. Once your new waterer is ready, use a hook to hang it from your fence or a tree.
This project is a DIY version of the Perky Pet Bird Waterer but is a cheaper and more environmentally friendly option since you'll be repurposing old materials. With climate change causing record-level high temperatures this summer, birds will be looking for places to (literally) wet their beaks, and this is a great way to help your local bird population stay hydrated.
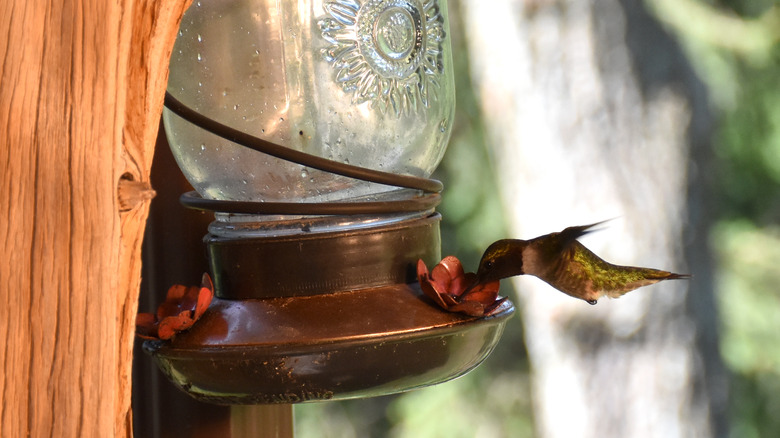
Create a hummingbird feeder with smaller glass jars
All you need to DIY your own hummingbird feeder is a smaller Mason jar, a plastic folder, a hole punch, a wire, and a chain. Remove the lid from the band and trace the inside of the lid to the plastic folder. Cut out the circle, punch four holes, and insert into the band. Pour hummingbird nectar into the jar and screw the lid band on tight. Wrap a wire ring around the neck of the lid and add the chain to hang anywhere you like. If you want to make it easy for hummingbirds to find, dab a little nail polish or use a marker to add some color since hummingbirds are attracted to red, pink, and orange hues.
This project is great for finding a use for uncommonly sized jars. One thing to keep in mind is that hummingbirds feed off of flower nectar instead of birdseed, so you'll need to use a special liquid food for this. Don't worry, though; you can save a trip to the pet store by making it yourself. To create hummingbird nectar, boil 2 cups of water and add a ½ cup of plain sugar. Stir until the sugar dissolves, and allow it to cool.
Stack some Mason jars to create a colorful glass birdbath
You'll need a few Mason jars of the same size, one jar that's bigger (or a big vase), a large glass serving tray or bowl, a plate (plates with a slight lip are best), and hot glue. This video includes adding decorative bowls between the Mason jars, but that part is optional. Start by turning the plate with the lip upside down and gluing the largest Mason jar (or a hefty glass vase) onto its back; this will be the base of the bath with the larger jar creating a stable bottom for the "stem." Then stack the jars as high as you like, securing them with glue. If you want to create even more stability, fill each jar with glass pebbles, marbles, or stones to increase the weight. Hot glue the top piece which will be used as the bath, and then place your completed bath somewhere outside that's relatively flat. Add water and you're good to go.
This DIY is great because you can use different-colored glass jars or go all out and create a ghostly transparent bird bath with the standard clear jars. Not only is it a creative way to put old jars and glass items to use, but it will also help birds cool off in the heat during the scorching summer months. Just make sure to clean your bird bath regularly to ensure the birds have a bath that's fresh and hygienic.