All The Ways You Can Reuse Those Plastic Water Bottles In Your Garden
We may receive a commission on purchases made from links.
Millions of plastic water bottles are cracked open every day. Some will end up at recycling facilities, while many others will land in landfills. You can save empty bottles from either fate by upcycling them. Reusing is a better option than recycling (after all, you can still recycle plastic bottles after giving them a second life). We've already covered some creative ways to reuse plastic water bottles around the house. In this guide, we'll show you some ways you can reuse them around the garden.
Empty plastic water bottles are well-suited for use in the garden. They're waterproof, similar in diameter as some small pots, and have flexible walls that you can easily cut and punch holes into. Just keep in mind that while they can take centuries to decompose, they're not necessarily built for longterm outdoor use. Specifically, they can degrade with exposure to lots of sunlight. If you're using them in the yard, check the bottles occasionally for damage like cracking and replace them if needed. Since these DIYs are so simple, this will be easy to do. We've rounded up some practical and decorative ideas for reusing plastic water bottles in your yard. From turning them into garden stakes to hanging planters to propping up drooping plants, there is something for everyone.
Prop up drooping plants
A plastic water bottle can make an excellent plant stake to hold up drooping branches and leaves. However, this isn't your traditional garden stake that you stab into the ground and tie the branches to. Instead, it fits more like a collar around the plant. To make this project, chop off the water bottle top and bottom. Then, cut it to size: You want to be able to wrap it around small to medium plants to make them stand up straighter. A slit from top to bottom allows you to wrap the plastic support around the plant.
This project is height adjustable and is easy to cut down to size. If you need a taller option, use a larger two liter water bottle. It's best for smaller plants that won't need a lot of support. The thin material of the bottle won't provide as much support as stiffer garden stakes, so this DIY is ideal for those plants that you just need to give a little bit of a lift.
Repurpose as a growing tray
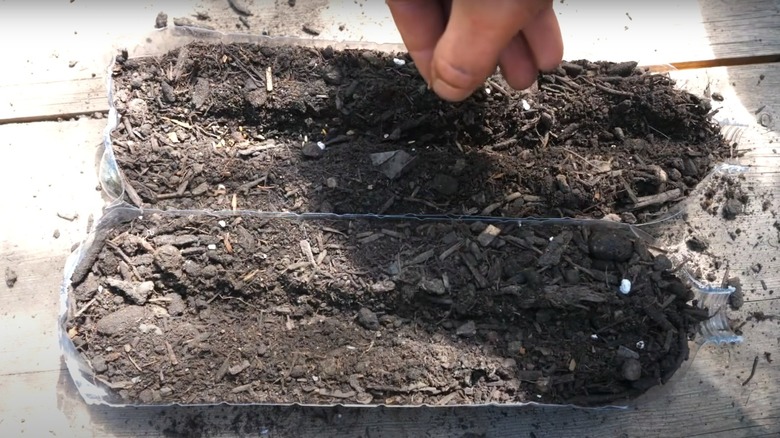
Seed starter trays are often made of thin plastic. To the eco-conscious, this begs one question: Why buy more plastic when you already have something that can do the job? You can repurpose an old water bottle into a tray that works nearly as well for starting your seedlings, without spending more money or creating more plastic waste. Just like a seed starting tray from the garden center, a DIY water bottle version is reusable as well.
Depending on your needs, you can cut the bottle horizontally or vertically. The bottle will fit more plants when cut horizontally. However, if you cut vertically, you can separate more seedlings. You can also use the top of the bottle, popping it on top of the bottom to use it as a cover to make a mini greenhouse. Either way, just make sure to poke some drainage holes in the bottom side of the bottle to give your seeds a good start. Use a nail or the tip of some sharp scissors for this job.
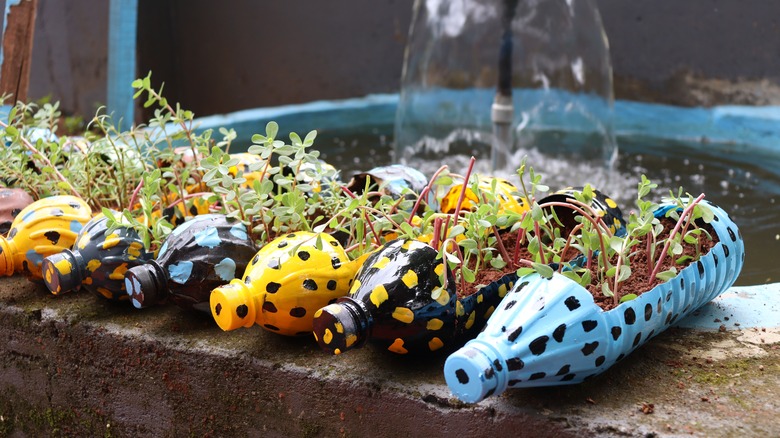
Craft your own custom colorful plant pots
Water bottles are the perfect size and shape to make into an adorable animal-inspired planter. Start by using a dry erase marker to sketch out your outline. You can get creative: Try triangular ears for a cat planter, round ears for a panda, teddy bear, or mouse planter, or long ears for a bunny planter. After cutting, it's easy to wipe the dry erase marker away with a paper towel.
For longevity, before painting it's best to prepare the surface using a paint primer formulated for plastic (like the Rust-Oleum Painter's Touch Primer, which costs $6.48 from The Home Depot). A primer will help the paint better stick to the surface, avoiding a common problem when painting plastics. After the primer is dry, paint the pot your color of choice. Once the paint is dry, you can add details with a Sharpie and display it in the garden. Both the crafting process and finished planter will be a hit with kids.
Build a hanging vertical garden
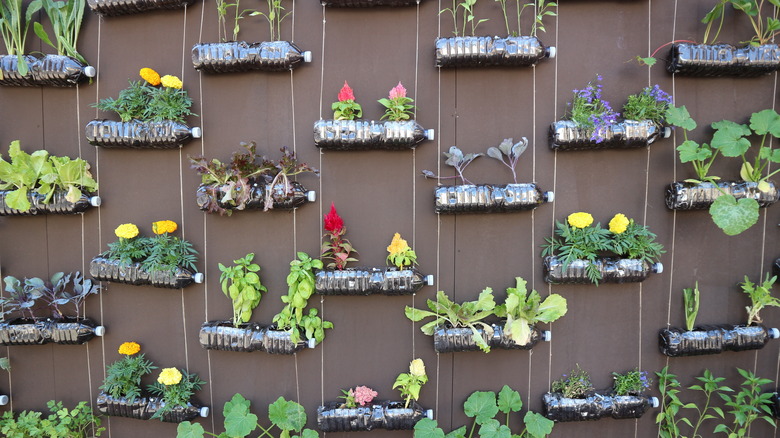
A vertical garden makes an outdoor space feel more cozy and lush, and can even attract adorable hummingbirds. There are many ways to build a vertical garden, but one extremely easy and cheap way to do so is with old plastic bottles. This project uses plastic bottles, turned on their side, to make larger planters. To make this project, cut a hole into the top part of the bottle when it's horizontal. Poke some drainage holes along the bottom.
Attach the bottles to each other using cable or string to make this hanging vertical garden then plant your chosen blooms. The water bottle planters are shallow, so you'll want to use plants with shallow root systems, like plants that work well in vertical gardens. Besides being easy and inexpensive, you can make this project renter-friendly as well. You can use over-the-door or fence hooks (like the Dingee Vinyl Fence Hooks for $7.99 on Amazon) to hang it from a fence.
Construct small self-watering pots
You can make some adorable self-watering pots with a few materials and a little bit of effort. Like many of the projects on this list, this one cuts a water bottle in half to use it as a planter. However, instead of just adding some drainage holes and calling it a day, this DIY flips the top section of the bottle and inserts it into the bottom (no need to poke any drainage holes in the bottom of the bottle here!).
There is one hole you need to make. Before placing the top half of the bottle into the bottom half, you'll need to poke a medium-sized hole through the lid. It needs to be large enough to feed your length of string through. Once you have the hole, use the bottom section to store water then insert an arms-length of cotton string (the string must be porous) through a hole in the lid. The string will slowly draw up water to moisten the soil in the top of the planter, leaving you with a low-maintenance plant.
Make an underground self-watering system for thirsty plants
You can use a plastic water bottle to create a self-watering system for larger plants as well. Whether you use it in a pot or in a garden, an old bottle can deliver much-needed H2O. This bottle project functions like a watering stake. Start by poking a bunch of small holes in the water bottle. You can use a nail, scissors, or a fork, heated over a flame like in this video from @thatweirdplantguy (just make sure not to breathe in any fumes from the melting plastic if you use the latter method).
Make a hole in the dirt that's large enough to fit the bottle, up to its neck, and bury the bottle. Make sure the cap is accessible and easy to take off. You can then fill the bottle with water, and it will slowly drain into the soil. When it's time to top it up again, just unscrew the lid and refill the bottle.
Or an above-ground version
Similar to the previous project, this project creates a slow-watering system. However, this version is easier to make and monitor. The entire system stays above ground, which makes it much easier to check the water level in the bottle. There's no need to poke any holes either, you'll just need some scissors to cut the bottle.
Instead of relying on holes in the bottom of the bottom to let water seep into the soil, this project also makes use of the cotton string method. Cut the bottle around ¾ of the way up from the bottom, leaving a small bit attached so you can use the top of the bottom to hold the rope. Use absorbent cotton rope to provide a channel for the water to transfer from the bottle to the soil. This video from @judybaogarden shares a great hack, which is to use a cotton mop string. It's porous and since it's larger, it will allow a better transfer of water compared to a thin cotton string, so it's more suitable for watering a larger area.
Make a watering can for seedlings
The flow from a watering can is sometimes too fast or strong for delicate plants, especially seedlings. This DIY project is also an eco-friendly option if you don't have a watering can—make your own instead of buying one new. It's very easy to do with an old water bottle. Use a thumb tack, nail, or screw to poke small holes in the lid of the bottle. You can control the water flow depending on the holes: larger holes for a faster flow, and vice versa, as well as with how many holes you poke. If you need, you can keep a few different bottle lids with different sized holes to switch out for different plants.
Using this makeshift watering can is so simple. Fill the bottle with water and then flip it over to water delicate plants. Also, you can gently squeeze the bottle to push more water through. If you want to make a larger version with a handle, use a milk jug.
Use as a mini greenhouse
A bottle top works perfectly as a mini, portable greenhouse. You can use it on potted seedlings, but this idea is particularly useful for seedlings you've recently moved to a garden bed. It's a low-cost way to protect them from low temperatures and harsh winds. Making this project is easy too: just cut the bottle in half vertically and use the top half as a cloche for small plants.
Smaller bottles are ideal for single seedings, while large bottles can be used for protecting a couple of new plants. Either way, use a clear water bottle and take off any labels to allow the maximum amount of sunlight through. Push the bottle into the ground around the seedling. This keeps the bottle in place against wind, rain, and some birds and critters. Remember to take the lid off for airflow, unless you're in a really cold climate and the seedling needs the extra warmth.
Or build a greenhouse
If you go through a lot of water bottles, you might be looking for a bigger garden project to use them up. Collect a few large trash bags full of bottles before you start this project: enough bottles to build a greenhouse! Essentially, this project uses the plastic bottles to create the walls for a greenhouse. Since most small greenhouse walls are made of plastic, it's an affordable and eco-friendly way to get a similar warming result.
Since there's gaps between the bottles, just keep in mind that it won't keep plants as warm or protected as a properly sealed greenhouse. However, this is a great upcycle project for your used bottles and to shield plants that need just a bit of protection. You can also downsize this project to make a cold box. Make a frame in your preferred size then create walls by taking the cap off the plastic bottle, drilling a hole in the bottom, and passing a pole through (bamboo is a great option). This creates lengths that you can attach to the frame to create the greenhouse walls.
Construct a hanging planter
This video from @joesgarden shows an excellent way to make hanging planters out of water bottles. This project uses larger bottles, which gives you more flexibility in terms of plants, but you can also use small water bottles if that's what you have on hand. Just keep in mind that a smaller bottle means less space, so you'll need to choose plants with a shallow root system.
This project involves cutting the bottle in half, then poking a few drainage holes into the top part of the bottle. Flip this top half upside down and insert it into the bottom half of the bottle. This setup allows for drainage, but still keeps water contained so it doesn't drip all over your garden or patio. Poke four larger holes evenly spaced around the top of the planter (a hole punch can help) and string twine or string through to hang it overhead.
Make a slug trap
If you have a slug problem in your garden, you know just how much of a plague they can be. They're small and slow, but they can leave a lot of damage in their wake, and they aren't too picky about what they eat either. If you've already tried ways to keep slugs out of your garden, you might have to move on to eradicating them instead. Let a slug trap do the work for you.
All you need is a water bottle, some scissors, and something to attract the slugs. This video from @greedy_gardens shows how to build a trap that you can leave out in your garden. Cut the bottle in half and cut some entrance arches in the top half. The bottom half will hold your liquid. This video recommends marmite dissolved in water, but if you can't find a similar spread, you can use a cheap beer instead. Burying the bottom half of the bottle in the ground is optional, but does make it look more hidden in your garden. Press the top half over, leaving enough space for slugs to enter through the holes, but without being able to easily find their way out.
Make a bird feeder
Love feathered visitors to your garden, but don't want to spend money on a bird feeder? You can make one with a plastic water bottle. As long as it's filled with seed, birds will be none the wiser! Before you start, make sure the bottle is clean and completely dry to prevent bacteria and mold growth.
Some sharp-tipped scissors will help you create the necessary perch and seed holes. This video from @natural_history_museum shows two perch and hole layers, but you can make more with a larger bottle. Make sure not to make the feeding holes too large or it will allow too much seed to fall through. This bird feeder is intended for smaller birds. A couple of drainage holes at the bottom will help with moisture from the rain, but to improve protection even more, place the feeder under a covered area. Another alternative is to glue a small plastic plate on the top of the bottle (upside down) to act as a roof
Make flower lights for the garden
These adorable lights are so pretty, it's hard to believe they're made out of plastic water bottles. By cutting strategically-placed slits, you can make the top of a water bottle look like a blooming flower. Start by cutting off the top 2/3rds of the water bottle. Then, cut evenly spaced slits around its perimeter, snipping up to the start of the mouth section. This video from @DaniellesPlace1 cuts each bottle into eight petals, but you can experiment with cutting fewer or more to get different flower shapes.
Spray paint adds a layer of color to make them eye-catching. Again, you can prime the plastic first by using a plastic-friendly primer (like the Rust-Oleum Painter's Touch Primer, which costs $6.48 from The Home Depot) which will provide a better surface for the paint to stick onto. The flowers then attach to Christmas lights. When choosing the lights, make sure they're outdoor-friendly and weatherproof with LED bulbs that don't get too warm. Hot incandescent bulbs can melt the plastic, so cooler LED bulbs is a must.