Make A Rustic DIY Coffee Station With A Few Affordable Dollar Tree Items
It doesn't seem plausible that cutting out your daily coffee from the local café could earn you enough to buy a house, but there are plenty of reasons to abstain from spending money out when you can make that cup at home. Designing your own at-home coffee station can be budget-friendly, and might even boost productivity. A Dollar Tree hack can create the ultimate rustic storage for your caffeine accessories, and it will look as good as the café but probably cost less than a latte! All you need are a few wood crates, paint, and a slab of faux wood to create a label strip. If you've been looking for a way to introduce rustic home ideas to your aesthetic, this is a great addition to your Pinterest board.
The great part of any Dollar Tree DIY is that the supplies are super inexpensive, and for this project you only need three wooden crates which cost $1.25 each, plus the single plank of wood for the same price. The paint you need can be anything from acrylic to a stain, but since you're working with cheaper materials, small bottles of brown acrylic are fine. These can come from any home or craft stores, and individual bottles are usually under $5.
Build coffee storage out of Dollar Tree crates
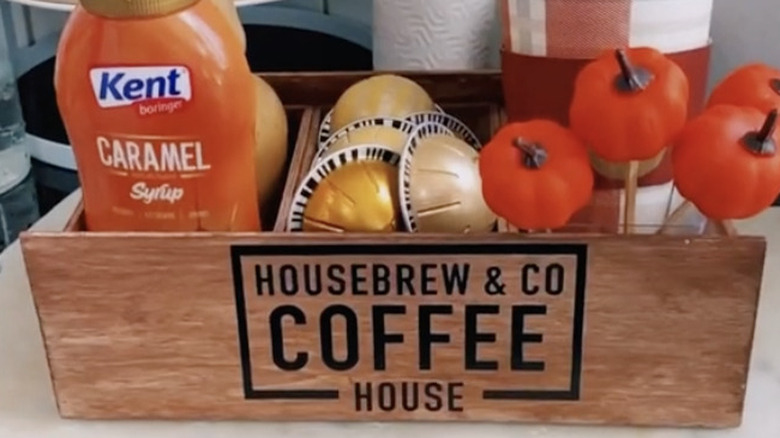
You can assemble your supplies on a flat surface where you will be able to piece everything together. Keep newspaper or a tarp handy to place your crates on when they dry. Your first step is to place three of the wood crates side by side and measure out your crafter's wood plank so that it stretches across all three of the boxes on the front. Cut this with a saw, then put it to the side. Paint each of your crates with the acrylic shade. For this, you'll want to also paint the single plank the same brown as the crates, allow it to dry, then glue it on the front so it acts as a "cover" disguising the attached box edges and making it look like one whole unit.
Allow these to dry, then use wood glue to attach the three crates horizontally so that their sides are stuck together. You can use a strong clip or pliers to hold these in place while they dry to ensure everything stays, and once your storage has dried, you can work on the front label. For this, you'll want to also paint the single plank the same brown as the crates, allow it to dry, then glue it on the front so it disguises the attached box edges and makes it look like one whole unit.
Paint, glue, and decal to create the rustic vibe
You can find word transfers on Amazon that already say COFFEE or feature similar phrasing to embellish and build on the rustic aesthetic. Look for black or white writing that matches the trend. Because you're not working with raw wood, you can use a credit card to apply the vinyl to the painted plank and it should stick easily. This will smooth the lettering down without compromising it.
Your coffee storage is complete, so now all that's left to do is fill it. Use each crate for pods, creamers, syrups, or even stirrers and utensils. This is small enough that it can be kept on your counter or near your coffee bar, and the finish will elevate your home café so you won't even want to go out for coffee anymore (at least most days). Once you've nailed this DIY, you can make more as great gifts for your caffeine loving friends! Add framed vintage art, embroidered wall hangings, or a framed mirror on the wall behind to incorporate even more rustic home decor that matches your project.

