DIY A Stunning Makeup Vanity With A Few Simple Dollar Tree Items
Between all the different lipsticks, concealers, eyeshadow pallets, foundations, and skin care products, it can be difficult to keep your makeup organized and within reach. Luckily, this Dollar Tree hack will help you DIY a showstopping, affordable vanity mirror that also has storage shelves attached on the sides. This makeup storage solution will help you get ready with ease, keep your beauty supplies neat and organized, and make your space look gorgeous. With a foam board, square shadow box frames or kid's money boxes, some adhesive lights, several small mirrors, and a few packs of adhesive diamond wrap, you can craft a stylish vanity that can be placed wherever you need it. Since the shelves, mirror, and lights will all be connected to the foam board, this vanity could be set on your bathroom counter and then later moved to your bedroom if desired.
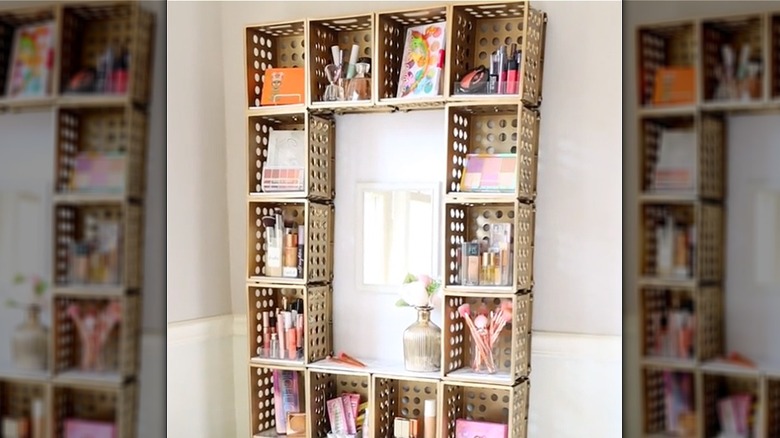
For those with tons of makeup, you can also add extra storage to your vanity by spray painting some mini storage crates and attaching them together to make larger shelves. However you decide to do it, Dollar Tree has almost everything you need to craft your own makeup space on a budget. Each of the items from this retailer will only cost $1.25. By the time you're done, you wouldn't guess this glamorous vanity was a DIY.
DIYing your Dollar Tree vanity
To start, you'll need 12 Dollar Tree shadow box frames or money boxes (depending on what your store has in stock). These will be used to create the structure of your shelves. While some may already have a sparkly pattern, you could attach adhesive glitter paper to the sides to make your vanity shine. Glue a small mirror to the face of each of your shelf pieces. Dollar Tree's square glass mirror candle holders can be a great choice, but the mirror candle holders with glittery accents might be better for a more glamorous look. Now, lay one box face up and glue another upright to one side of it with E6000 and hot glue. Do this so that the mirrors always face up or out. Repeat this process with four more of your shelf pieces, stacking and gluing them together as you go so that the last box is upright. This will create one set of shelves, but you'll need to do this again for the other side of your vanity.
With both shelf sets complete, lay them halfway over the short sides of a foam board and glue them in place. This should leave plenty of room for your mirror, lights, and some decoration. In the board's center, glue more mirrors side by side until it makes one larger mirror. Place your adhesive diamond wrap over any white space and then attach several self-adhesive push lights along the sides of your mirror.
More ways to customize your stunning makeup vanity
Now, you can stack your makeup on the little reflective shelves alongside your main mirror for a savvy way to organize your beauty room. However, this isn't a ton of space if you have a larger collection of cosmetics. If you want to make more storage to go around your vanity, you'll need several of the aforementioned mini storage crates. Before painting, attach your crates using zip ties, creating a U shape that will have enough space between the containers to set your vanity. Make sure that all of your crates are facing the same way so that when you sit them up the openings are outward. Once they're secure, spray paint your crates silver to match your vanity or a different color that compliments it.
With another foam board, cut out pieces that are the same size as the base of your new shelves. These can be decorated with the adhesive glitter paper, or you could paint them if you'd like. Place your small foam squares into the crates to form the bottom of each shelf. This will ensure they are sturdier and nothing will fall through the holes. This storage solution can be set on the same surface as your vanity so that it goes over and around it. Now, you'll have a gorgeous, unique vanity that has extra storage to stash all your beauty supplies.

