DIY Kitschy Mushroom Frames That Match A Variety Of Trendy Home Aesthetics
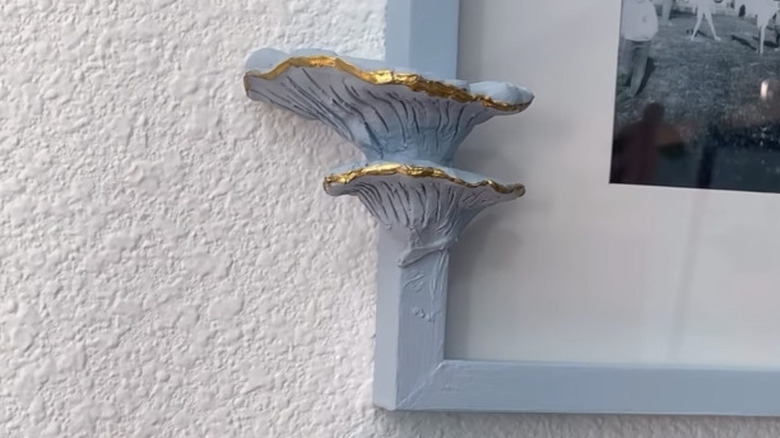
"Core" aesthetics are having their moment, and the good news is there are so many to choose from, you can't possibly pick the wrong one for your personal preferences. If you want to find ways to bring Regencycore, dark or light academia, or cottagecore to your home, there's one craft that will work for them all: picture frames that appear to have mushrooms growing from them. While painting your walls and swapping out fairy furniture for gothic touches might be tedious (and expensive), this mushroom frame trend can work with a variety of core styles, and the DIY aspect means you can curate it to suit your needs. In terms of supplies, it's budget-friendly too, and all you need is some air dry clay, a few frames, and paint colors of your choice.
Mushrooms seem to fit into a plethora of decor schemes and trends, so they are an easy choice when looking for additions to your home. They can be whimsical, and any guide to cottagecore will likely include some mushrooms, but they can also fit into the gothic or academia aesthetics, which is why making these DIY mushroom frames will allow you to keep them for whatever mood and interior design scheme you opt for or change to. Any pieces that can flow between themes is a good choice to have and keep around.
Build your clay mushrooms to fit your frame
To kick off your mushroom craft, purchase air dry clay, some plain frames of any size you prefer as long as they have a decent amount of material around the border (so avoid all glass or plastic frames for this one), and some acrylic paint. You can also repurpose old, unused or boring frames that need a little upgrade. Start by pulling out some clay and molding it with your hands into a mushroom shape. There are so many species you can choose to mimic or capture, but a few that will go well up against the frame include turkey tail or oyster mushrooms, both of which have more of a fan shape, while hypholoma lateritium, shiitake, and shaggy mane have a more traditional shape.
Once you've made the mushroom, use toothpicks, pencils, or other pointed objects to add texture. This can be lines for the fans and undersides of the mushrooms, or spots if you're going for the more well-known, cartoon designs. After you're happy with your creations, place them on the frame's edges to shape the bottoms to fit the width. You can bring the clay downwards to make it seem like they are actually growing out of the wood, metal, or plastic.
Decorate with texture and paint
Leave the mushrooms to dry on the frame on a flat surface, then, once they have completely dried out, you can lift them off to apply an adhesive that will keep them attached when you hang photos. Gorilla Glue, SuperGlue, or CrazyGlue all work to stick air dry clay onto hard materials, so you can use any of these. Hold the clay in place to allow it to stick, then you're ready to paint.
You do not have to paint your mushrooms, but by adding color, you can match them to your core aesthetic even more. Colors to decorate for a cottagecore aesthetic include light and bright palettes in rusts, sages, yellows, and pinks, while neutrals like cream, brown, beige, and gold work well for light academia, and deep purples, blacks, grays, dark green, navy, and burgundy work for dark academia. Research your core palettes, then paint the mushrooms in different shades along with the rest of the frame, and you've just created a multi-core piece that can work with any theme!

