DIY A Swing-Out Garage Tool Storage Solution If You're Running Low On Space

If you're a passionate DIYer, the garage is probably your sanctuary — a place where you spend precious moments breathing life into new objects and repairing old items that need a fix. But these DIY projects require all manner of tools and materials, and garages seldom offer enough permanent storage space for these — especially if you park your car inside. If you're trying to store lumber or composite wood boards alongside various equipment, you may find the constraints of a garage particularly frustrating. But there are some clever DIY projects that will maximize your garage storage space: This one involves building a swing-out shelving unit.
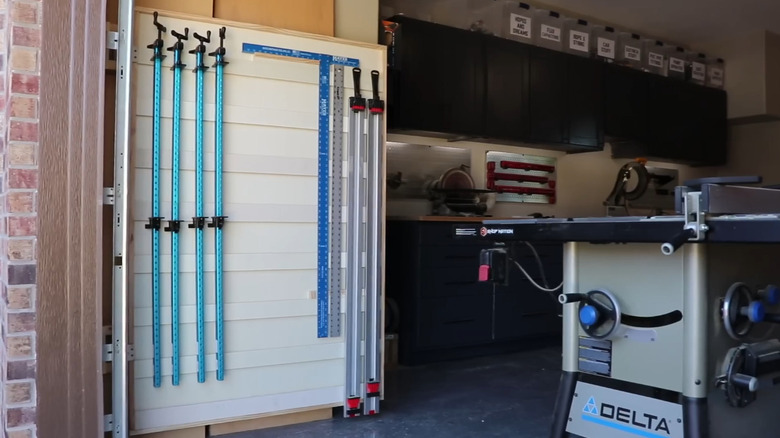
The swing-out shelf can run perpendicular to your garage walls. Using DIY-made, wooden hinges, you can configure this unit in a way that it sits several inches — or as much as a foot — proud of the garage wall. This way, in the closed position, the unit acts as a door for any larger wood pieces you want to store. Meanwhile, the surface of the door provides extra storage for smaller bits and bobs like drill bits, saw blades, and any other power tool accessories. The best part, as you'll see below, is that the design of this swing-out shelving unit is entirely customizable once you grasp its central concept. You can also position it right at the front of your garage, in that dead space along the wall just behind your garage door.
How to design the DIY swing-out tool wall
First things first, consider where you want the swing-out tool wall to go. If you're storing wood close to the garage door, you could mount the hinges onto the studs in the wall parallel to the garage door. This way, the unit will latch onto the longer wall when in the closed position. You'll want a perpendicular board on the latch side of the door, sized to span the gap between the hinges and the garage wall. This gap is where you will store wood, or other materials enclosed by the swing-out unit. In this configuration, your hinges do not need to be particularly long — just long enough that the unit can pivot back and forth when you open and close it.
Alternatively, you can attach the swing-out storage solution to the garage walls that are perpendicular to the door. You'll need longer wooden hinges — or stand-offs — to create space between the swinging tool wall and the garage wall beyond. Consider how much storage space you want between the two surfaces, and design the hinges, or stand-offs, with this measurement in mind. Do factor in clearances on the outside face of the tool wall, as you'll want to be able to park your car and open its doors without hitting the new storage unit. Apart from the hinge size and unit location, consider how high and wide you want the unit to be, and whether you want to equip it with caddies, cleats, pegs, or another type of small space storage solution.
How to build and install the swing-out wall in your garage

As far as materials go, ¾-inch plywood should work well for the tool wall. Once you've cut the plywood to size, reinforce it by nailing 1-by-3-inch planks along its perimeter on the back. Next, prepare the cleats or caddies. If you have a miter saw, cleats are easy to make — just rip 1-by-4-inch planks in the middle lengthwise at a 45-degree angle, then fasten them to the shelf surface with as much space as you want between. Caddies are essentially open-top boxes made of scrap plywood and nailed to the swing-out tool wall's surface. Once the caddies and/or cleats are nailed to the tool wall, use 1-by-3-inch strips to cover the edges of the swing-out shelf. Finally, attach a perpendicular piece of plywood that's as tall as the storage unit, and as deep as you want the space between the unit and the garage wall.
You have two options for hanging the storage wall. One is to make wooden hinges, with each hinge consisting of two blocks nailed to the studs in the wall, sitting parallel above each other, with space for a third block in between. This third block goes on the door. There's a hole drilled through all three blocks so that ½-inch bolt can go through them and act as the hinge pin. The alternative is to build stand-offs and hang them on the studs in the wall, then use heavy-duty fence hinges to attach the storage wall to them.