Add Storage To Your Patio With This Stunning Outdoor Refrigerator Cabinet DIY
Summer fun comes with lots of toys for kids, pets, and even adults. Bottles of bubble mix, lawn games, barbecue tools, balls, and bug spray are necessities for outdoor living. However, they can clutter up a space. Our gorgeous outdoor storage table is great, but if you need more space, try another simple DIY. For under $100, you can cobble together a refrigerator cabinet that serves as storage and counter space for your deck, patio, or balcony. With a few spare hours and some basic materials, you can construct a storage space for these seasonal staples.
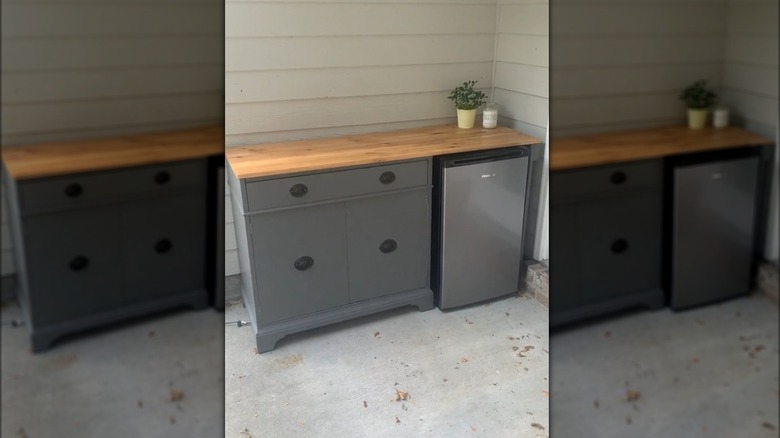
TikTok user @createitwithkatie came up with an ingenious storage unit that doubles as an outdoor kitchenette. She topped a used wooden cabinet with boards that extend over a mini-fridge sitting next to it. This combination of storage and countertop with convenient access to cold snacks and beverages is an easy, cheap, and stylish way to meet a wealth of summertime needs. To pull off a similar build, start with a mini fridge and a small cabinet that are about the same height. Source some tools and hardware, paint or stain, and lengths of wood that are as long as, or slightly longer than, the combined widths of the cabinet and the fridge. These wood boards will cover the cupboard and fridge to give you a generous stretch of counter space — perfect for serving food, potting plants, creating a hostess station, or anything else you can think of.
Gather and prepare your materials
For this DIY, start by taking careful measurements of the combined length of the cabinet and the mini-fridge. If you bought your wooden boards pre-cut, you may leave a few inches between the cabinet and the fridge or allow a bit of overhang at each end to lengthen the counter; it will still look nice and function well. The depth of your storage cabinet has less wiggle room, and your counter width should closely match the depth of the fridge. For a 28- to 30-inch-wide counter, Katie Wisenbaker used three 5-foot-long boards, likely a 1x8 and two 1x10s. You'll also need sandpaper, wood glue, ¾-inch wood screws, four to six two-hole metal brackets (about $4 a piece at Home Depot), small metal corner braces (about $12 for a 20-pack at Home Depot), and a mechanical screwdriver or drill with a screwdriver bit. For finishing, also purchase paint and/or wood stain.
If you'd like your cabinet to be a different color than your countertop, sand and paint the piece before installing the wooden boards for the counter. Sand your counter boards as well, but don't stain or paint them until you've screwed them to the top of the cabinet. Get perfectly smooth surfaces with our woodworking hack that leaves even sanding on any project. If you want one color for the entire storage piece, it's simpler to paint all the surfaces once you've completed the build.
Build your outdoor storage refrigerator cabinet
Begin the construction process by removing your cabinet's original top. This will make adjusting its height to match the size of the mini-fridge easier, if necessary, and installing the new countertop more streamlined. Katie Wisenbaker joined her countertop boards with wood glue and pocket screws. But you can simplify things by connecting the boards with metal brackets on the underside of the counter.
Glue the board edges together to create one surface and secure the piece with two-hole metal brackets spaced at several points along each glued edge of what will be the underside of the counter. Once the glue has dried, set the countertop on top of the cabinet, bracket-side down. The extension covering the top of the fridge can reach either to the left or the right of the cabinet, depending on your taste.
Secure the counter to the cabinet by applying metal corner brackets to the underside–where the counter extends over the mini-fridge. For stability, you should also attach the counter with corner brackets to the inside of the cabinet and glue contact points that aren't connected with brackets. Top your build with stain or paint, and protect it further with our how-to on weatherproofing your outdoor furniture. Place it where you'd like, and enjoy your new storage solution!

