5 Creative Patio Hacks You Didn't Know You Need
We may receive a commission on purchases made from links.
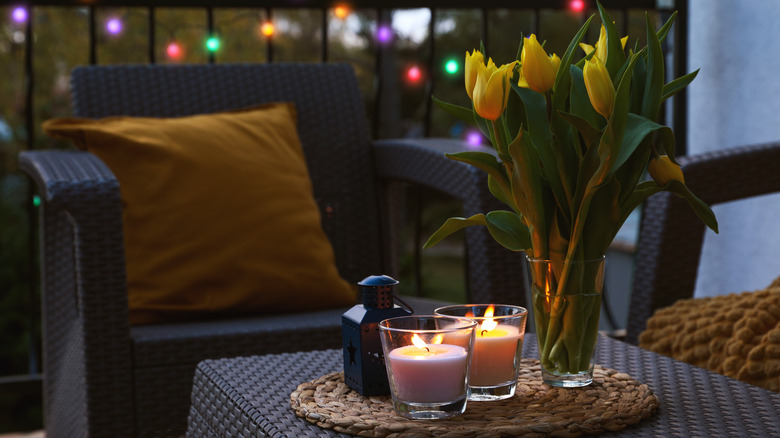
A patio — whether it happens to be large or small — is an extension of your home's living space. While it can be easy to let these valuable bonus areas go to waste, spending some time designing your perfect patio can lead to all sorts of benefits, including more time spent socializing with loved ones or simply increased exposure to fresh air and sunlight. However, creating a magazine-ready patio without spending an unattainable amount of time and money just isn't an option for many in a post-pandemic economy.
Enter patio hacks. These easy and cost-effective tips and tricks will have you lounging on the patio of your dreams without breaking the bank or monopolizing your limited energy stores. Get ready to invite all your friends and family members over for summer barbeques and cocktail parties because you're about to own the most popular patio in town.
DIY tabletop firepit bowl
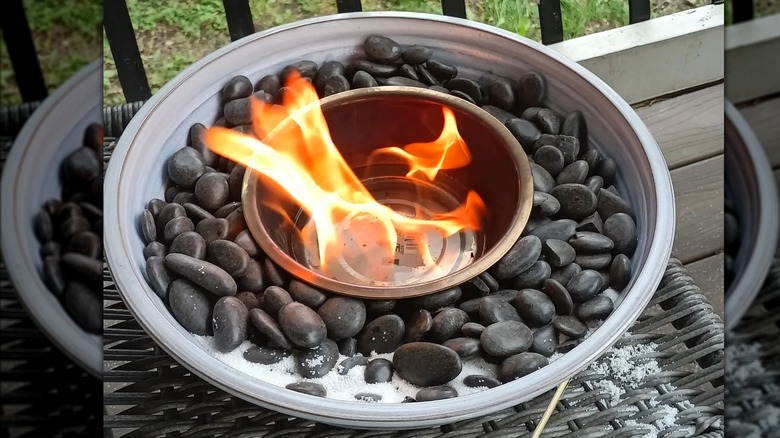
If your patio is your main outdoor living space, you might find yourself feeling envious of those with backyards big enough for a bonfire or an outdoor fire feature to set the mood. Luckily, there is no reason a patio can't (responsibly) offer its own cozy fire element. If you can gather a shallow, bowl-shaped planter with drainage, some sand, small landscaping rocks, lava rocks, or glass pebbles, a torch fuel cannister, and some torch fuel, you can build your own customized tabletop fire pit bowl. Save money by skipping the name brands and opting for deals like Mainstays 12 fluid ounce Replacement Torch Fuel Canister for $1.98 at Walmart.
First, fill the cannister with torch fuel. Then, place some sand in the bottom of the planter to serve as elevation for the rocks and the torch. The drainage holes will ensure that your fire pit bowl doesn't fill up with water when it rains. You'll want the torch's wick to peek over the sides of the planter. Once you've placed enough sand to achieve this goal, arrange the torch in the middle, surrounded by the rocks. Just like that, your fire pit bowl is complete. For a similar effect with even less work, pour some sand into the bottom of your planter and then arrange a variety of candles around the bowl. Either way, place your planter on a patio table and give it a light for outdoor warm and cozy vibes all night long.
Recycled tire rope ottoman
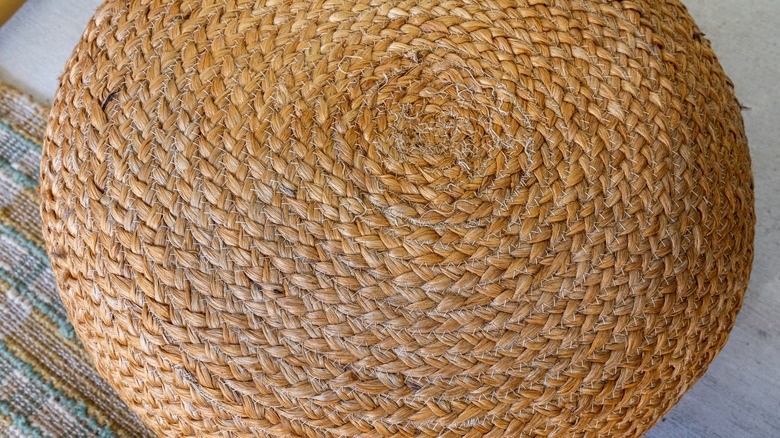
Looking to combine your goal of reducing, reusing, and recycling with your love of inexpensive patio decor? Time to grab those old tires you've been waiting to recycle (or head to the junkyard if you don't have any lying around). Once you're done using them on your car, those dirty old tires will be easy-breezy rope ottomans for resting your tired feet while relaxing on the patio at the end of long summer days in the sun. Or, just add a glass top and you've got yourself an outdoor coffee table.
To get started, you'll need one old tire, 100 feet of 1-inch sisal rope, and 50 feet of ⅜-inch nylon rope, plus a hot glue gun with glue sticks, a pair of scissors, and a can of spray sealant (try Aleene's Acrylic Sealer on Amazon for $6.07). Start by tightly wrapping the nylon rope vertically around the tire to create a webbed framework across the hole in the center. When you're done, tie the free ends together to hold the web in place. Then, wrap the sisal rope horizontally, starting at the bottom edge and hot gluing it to the nylon rope frame as you go. Continue to wrap up and over the tire's side and over the hole until you reach the center. Trim any excess rope and glue the final piece into place. Then, spray your new ottoman with sealant and allow it to dry. Stack two or more tires to create a taller footrest.
Repurposed ladder shelf
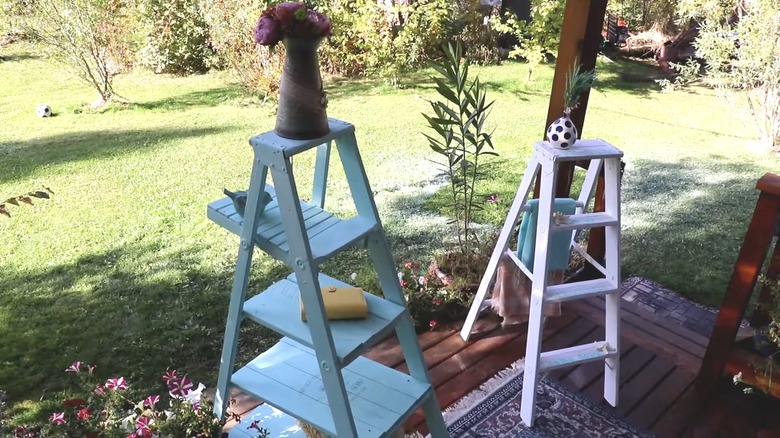
If you happen to have an old wooden ladder and you're also looking to spruce up your patio this summer, you're in luck. With just some paint, a few boards, and a handful of wood screws, you can create your own unique set of ladder shelves for displaying all the plants, candles, and other outdoor knick-knacks your little heart desires. For those who don't have one at home, check out your local thrift stores, Facebook Marketplace, and the yard sale circuit for a good deal.
Once you have a ladder, paint it with a waterproof outdoor paint in the color of your choice. Next, grab some wooden boards. Each piece should be a small fraction of an inch less than the width between the ladder's front legs. You can either purchase one large board and cut your shelves to size or request that your local lumber warehouse or hardware store do it for you. Paint or stain the boards, if you wish, and then use wood screws to attach them to the ladder legs using the steps as support. Decorate your ladder shelf by adding some of your favorite patio decor items. Sick of plain patio lighting? Try placing this fun mosaic solar lantern — available at Amazon — on one of your new shelves. Then throw in some metal or plastic bins for stylish storage of your grilling and gardening supplies.
Hanging rain gutter planters
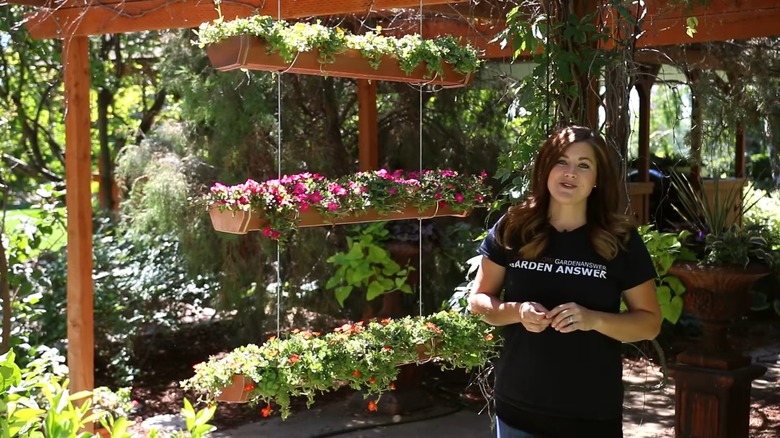
Old tires and tired wooden ladders aren't the only items that can be flipped into creative patio hacks. Here's a genius way to repurpose gutters into hanging planters and save some of the square footage you need for packing in more comfy, cozy patio furniture. Or, you can simply purchase an inexpensive vinyl gutter for this project, which will still save you a good chunk of change. You'll need a 10-foot gutter (grab one at Home Depot for $6.58), three pairs of end caps, about 20 feet of ¼-inch rope, six ¼-inch S-hooks, and two 3¾-inch screw-in plant hooks. Stick to vinyl gutters versus metal to avoid potential exposure to lead paint.
As for tools, you'll need sharp scissors or a utility knife, a drill with a ⅜-inch bit, a jigsaw, measuring tape, and a writing utensil for marking. Start by measuring, marking, and cutting your gutter and rope into uniform pieces. Then, paint your gutter sections. You should have three equal sections of gutter and two equal sections of rope. Drill holes 3 inches in from the short side and ½ inch from the long side on all four corners of each gutter section. Thread and loop your rope sections through each gutter section to connect them, using knots to secure the ends, and then apply the end caps. Hang the plant hooks on your patio wall and use the S hooks to hang the planter from them. Or, skip the hanging and simply attach the gutters to an exterior wall or fence.
Outdoor gallery wall

When it comes to making your patio your own, one aspect of decorating that is commonly overlooked is wall hangings. While interior gallery walls have exploded in popularity over the past few years, creating an outdoor equivalent feels almost rebellious. We are here to tell you, however, that there is absolutely nothing stopping you from hanging weather-resistant wall decor outside on your patio. Creating an outdoor gallery wall is very similar to building an interior one; it's all about combining different pieces that express your personality and creating a cohesive display of visual interest.
The main concern when choosing decorations for your patio's outdoor gallery wall is ensuring that they are water resistant. Stick to plastic, glass, rust-resistant metal, and treated wood so that your entire display doesn't wash away with the first rain. If you have a wooden sign or wall-hanging that isn't treated, you can waterproof it yourself by simply adding a coat or two of sealant. Hang your knick-knacks, metal art, or cute shabby-chic wooden signs on a durable outdoor trellis grid or suspend them directly from stainless or galvanized steel hooks mounted to a wall. Consider displaying candles or knick-knacks, hanging plants, and flowers with your wall art to keep it fresh and varied. If you'd rather not drill holes into your exterior walls for hanging décor, grab a 20-pack of waterproof adhesive hooks from Amazon for $4.50.