Reuse These Empty Food Containers As Perfect DIY Seed Starters
Whether you're an avid outdoor gardener, an indoor houseplant hoarder, or are just dipping your toes into the world of horticulture, you know all too well how expensive it is to be a plant parent. From special soil blends to high-quality gardening gear, it seems the list gets longer and pricier every year, nevermind the seeds! Plus, you have to come up with a place to start the fragile seeds and foster delicate seedlings.
Luckily there's a way you can save money while growing your plant collection — reusing food containers! Not only is it eco-friendly, but it's budget-friendly, too. But which containers work the best for growing seeds? There are so many options out there. That's why we took to YouTube and TikTok to find the perfect DIY seed starting containers you probably already have in your home. So dust off those gardening gloves, get your best potting soil or seed-starting mix ready, and let's dive in.
How to prepare used food containers for safe seed starting
First, it's absolutely necessary to thoroughly clean your seed starting containers and remove any remaining food debris before planting. While some food will break down, many containers will hold processed foods that contain preservatives and sugars. The residue from these can support bacteria or mold growth that can kill your seeds.
Different materials will require different cleaning methods, but here's a quick breakdown. Plastics and metals should be cleaned with warm, soapy water, wiped down with diluted white vinegar, and left to dry. If the metal containers have rust, they can be soaked in white vinegar overnight and thoroughly scrubbed. Cardboard or paper containers should be wiped clean with a damp cloth and any stickers or labels should be removed. And, don't forget to clean your gardening tools, too! The more precautions you take, the better off your seedlings will be.
Rotisserie chicken containers make the perfect DIY seed starter
Want to have a mini greenhouse for your seedlings? Then save that rotisserie chicken container from the trash can. Rotisserie chicken containers make awesome seed starters thanks to their clear domed lids that trap heat and moisture. Make sure to add a drainage hole to the bottom half so that your seedlings don't get waterlogged. If you're worried about losing soil, add a piece of mesh or screen over the hole before adding your potting soil. You can also set it on a repurposed cookie tray to protect your countertops from water leakage, too.
Try red Solo cups for cheap seed starting containers
Red solo cups are popular options for seed starting because they're cheap and typically come in bulk packs, letting you grow your plant hoard easily (maybe a little too easily). Not only that, but they're more portable than containers that have multiple cavities. This makes it easier to transplant individual seedlings when they're ready as well as remove any that develop pests or diseases. A good rule of thumb is to poke drainage holes in the bottom of the cups and set your batch on a baking tray. You can also add LECA balls to your potting soil. These help retain moisture and raise the humidity so that your plants grow quickly.
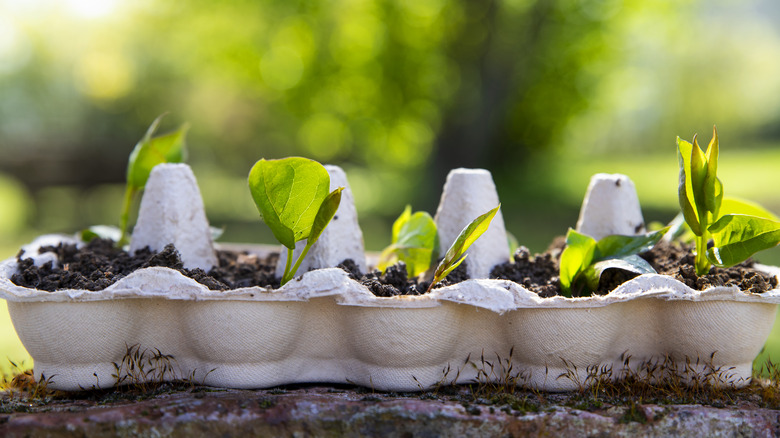
Egg cartons are an eco-friendly way to start seedlings
Cardboard egg cartons are the quintessential seed-starting darling. Since they're compostable, they will safely decay in soil. Plus, you can easily tear off cups from the main container when your seedlings have matured. However, don't think egg cartons are the only useful part of your breakfast! Eggshells make fantastic individual seed starters thanks to the nutrients built right in. Not only will you reduce your waste by repurposing broken shells, but you'll give your seedlings a strong start thanks to the powerful fertilizing properties.
Yogurt cups have a secret seed starting benefit
Yogurt cups are an excellent option for creating mini seedling starter containers, but not just for the reason you think. Yes, their small sizes make it easy to stretch your bag of soil across more planting projects, but it's what's inside the cup that gives you a two-for-one punch. Adding yogurt to soil can act as a gentle fertilizer that promotes plant growth! Give your yogurt cups a little scrape and blend the leftovers into your soil mix. Though you probably should avoid using blends that have heavy sugar added or that include fruits or granolas.
Milk jugs are versatile seed starting containers
Milk jugs are useful as seed starters because they're so versatile. Some gardeners will use the whole jug, slice an opening in the side for easy access, and screw the cap on or off as needed to regulate moisture. Others prefer to cut them half and use plastic wrap over the opening, giving the seeds more light. If you're not sure which method is best, check the growing requirements. If they're low-light or shade-loving, then you can use the whole jug as long as it's near bright, indirect light. If your new plants love a lot of sun, though, it's probably a good idea to halve the jug to create a more open container.
Takeout trays can easily be repurposed to grow seeds
Sushi trays and hot deli food trays come in a variety of sizes, making them excellent options for seed-starting plants that typically have shallow root systems, like lettuce (as a bonus, it's one of the best vegetables for beginning gardeners). And, since these containers typically come with separate lids, you can easily double the number of seed containers. Just cover the tops with plastic wrap to trap moisture. One heads up, though, trays made from polystyrene (AKA Styrofoam) are fine for growing seeds but you should add drainage holes to remove excess water. And, keep it away from heat since melted Styrofoam can cause the chemical styrene to seep into soil, potentially causing health risks.
Ice cube trays are great for smaller seedlings
Ice cube trays are versatile seed starters because their little cavities keep you from overwhelming your seedling with too much soil or water. Not only that, but you can find them in almost any thrift store or garage sale and easily give them a second life. However, you may want to drill drainage holes into each cavity since these can be easy to overwater if you're not careful. Also, consider using parchment paper or newspaper to line each chamber so that you can easily remove each seedling as it sprouts.
Plastic clamshells trap humidity and are great for tropical seed starting
The containers you'll typically find berries sold in are one of the best options for growing plants that require lots of humidity. Since they're clear, they allow lots of light inside, and their snap-tight lids ensure moisture stays trapped in the container where it's needed the most. If you want to utilize a clamshell to grow seedlings, remove the moisture-wicking pad that's typically on the bottom since that may be holding bacteria from the fruit it originally held. Then, try lining the bottom with newspaper, plastic wrap, or fine mesh to help prevent soil from spilling out the slat cutouts.
Muffin tins make seed starting easy
Before you do another kitchen cabinet purge (no judgment!) give those muffin tins a second chance. Muffin tins are perfect seed starters for multiple types of seeds and their shallow pits ensure you'll never waste soil. Use paper cupcake liners to soak up excess water and make it easier to pull your seedlings out when it's time to transplant. Also, consider using a strip of cute washi or masking tape across each row. That way, you can keep track of which seeds are where while giving them a little personality.
Chinese takeout containers are awesome to repurpose for seedlings
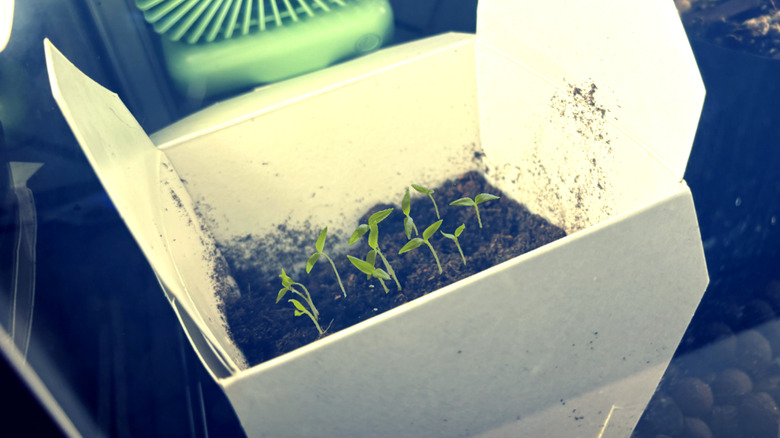
Paper takeout boxes are excellent seed starters since they're treated with a wax or plastic coating that prevents moisture loss and leaking. Just be sure to clean them thoroughly. To make them the perfect seed nursery, fold back or cut off the top flaps so your seeds get access to the light and water they need. Also, the waxy coating may be a little too good at retaining moisture so poke a drainage hole in the bottom to be safe. Finally, don't worry about filling the box to the top with garden soil. Most seeds will only need a few inches of soil to grow.
Reuse soda bottles for seedlings that need lots of humidity
Whether you call it pop or soda, the bottle you receive your fizzy beverage from makes a fantastic seed starter because they're clear and come in a variety of sizes. Like milk jugs, soda bottles can be used by creating an opening in the side or by completely cutting them in half. If you decide to halve the bottle, take a tip from this TikTok video and invert the top half into the bottom to create an easy DIY humidity drip system.
Recycle iced coffee cups to get your seedlings started
The dome-shaped top of iced coffee cups makes it easy to trap much-needed moisture for your seeds. Plus, the ability to snap the lid off makes it easy to pull your seedlings out when it's ready for transplanting. One thing to watch out for, though, is mold. Since these cups are so good at holding in moisture, it's really easy to have your seeds ruined. Your best bet for preventing this is by keeping an eye on moisture levels or adding a few springtails to your soil, as they love to munch on the fungi and decaying materials that attract mold.
Use soda cans for mini seed starters
Aluminum cans are useful seed-starting containers thanks to their ability to conduct heat, which helps promote plant growth. Many people will take the top off the cans or simply cut them in half. This makes it easier to access the seedlings when it's time to transplant them. If you decide to use soda cans, keep in mind that their cut edges could be sharp, especially if you've got a few tiny gardener-in-training hands helping you. Consider filing the edges down with a metal file first, just be mindful that the aluminum shavings are cleared off before adding soil.