The Tin Can DIY That Will Make Your Home Improvement Projects Even Easier
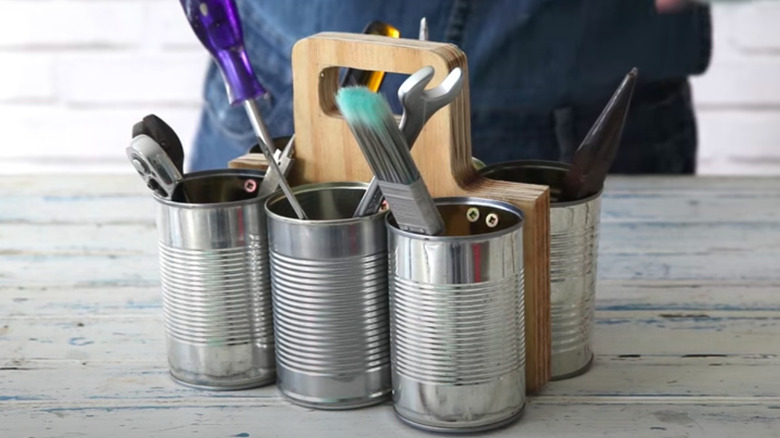
Scrolling through social media looking for home improvement projects to upgrade your home is easy. The problem is carrying out the process. It isn't your third-grade arts and crafts projects where you only need a felt paper, safety scissors, and a bottle of Elmer's glue. We are big kids now with big homes which means we need real tools to make our home decorations and renovations look as professional as possible. To make sure all of your tools are kept securely, you should have a trusty toolkit that can chauffeur them around and make the job easier. However, a fancy toolbox with different compartments can wait if you don't have the money to splurge right now. Instead, you can reuse leftover soup cans and a board of scrap wood to create a reliable DIY tool carrier.
This tool carrier is best for carrying around small tools that you wouldn't necessarily need an elaborate toolbox for like your hammer, wrenches, and screwdrivers. You can also drop some smaller power tools inside of it. If you think you can just haul around these items any old way, think again. One common mistake people make when fixing up around the house is storing tools incorrectly, for example, placing power tools on the ground where they can get damaged by water. Building this simple DIY toolkit will mitigate these problems and lend you a helping hand.
How to DIY your tin can tool carrier
You're probably pumping your fist in the air, excited that all those months of wolfing down canned chicken soup and ravioli have finally come in handy. Gather all those cleaned cans as well as the wood board. You're also going to need your electric multi-tool with a cutting tool and sander, power drill, screws, and a marker.
You want to start with the board which will become the centerpiece that will house the handle as well as the space to attach the cans. Mark out the size and shape and cut it out with the multi-tool. Sand it down until all the sides are smooth and then screw the cans onto either side of the centerpiece. Once all the sides are covered in a row of cans, you will finally have your tool carrier.
To smarten it up, you can add features for convenience. The cans are bound to corrode at some point, so apply some Rustoleum from Home Depot before attaching them to the wood to prevent the metal from rusting. Because used tin cans usually have rough openings, you also want to prevent yourself from getting cut when reaching into them for tools. Stick some Epoxy Plastic Weld putty you can get from Amazon over the rims of each can to shield yourself. If the handle is too hard on your hands, you may want to glue some twine from Amazon around it for a better grip.

