Make Your Bed Levitate With This Beginner-Friendly Floating Bed DIY
We may receive a commission on purchases made from links.
Making your bedroom look modern and futuristic can feel challenging, especially if you're unsure where to start. However, one easy way to implement such a theme is by adding a DIY floating bed frame — as shown by @thefallbackup on TikTok — which can give the impression that your bed is floating. Not only does this look seriously cool, but it's also quite easy to make. You don't have to be a DIY genius to craft this yourself, although you may need a helping hand. All you have to do is attach all your pieces and plop your mattress on top, and you should be left with a bed that will make everyone envious.
All you'll need is some long and short blocks of lumber and some wooden boards. To get a rough estimate for size, make sure you measure your mattress beforehand so you can select sufficiently long boards. The longer sections will act as the frame for your bed, so they will need to be the same size, while the other boards will need to be a bit shorter. Of course, you can always cut them to size, which definitely beats buying boards only to find out later that they're too small. Wood lumber panels are available from Home Depot for $8.17 and some thicker boards for $14.52. In addition, this project also requires some screws, a drill, and possibly paint and a paintbrush.
Create your DIY floating bed frame
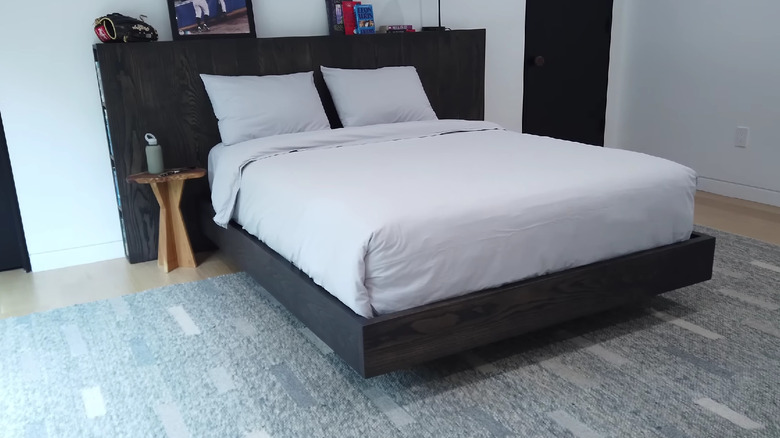
You'll need to create two separate frames. First, construct your base, which will be the smaller frame made of thicker wooden boards, which will provide the "floating" illusion. If you buy some large boards, you'll have to trim them to be slightly smaller than the section that will hold your mattress, but not so small that it will make the whole structure unstable. When they're the correct size, connect them together in a square using your drill and screws. As in the TikTok above, you're building a sturdy wooden box. After it's done, place it where you want your bed to go.
Next, make your other frame, connecting your wooden lumber together in the same way to form a square in the shape of your mattress, with wood running horizontally and vertically inside it. Of course, you should make sure this is the correct size for your bed, which will vary for each individual. If you want to paint your frames, you can, but it's optional. Now you just need to place the larger frame on top of the smaller one, which you can secure in place by adding some smaller bits of wood between the borders against the sides and connecting them with your drill and screws. Finally, slip your mattress on top and add your bedding, and you should be left with a breathtaking DIY bed frame.
How to customize your floating bed

While the DIY floating bed frame looks excellent, you could also add your own headboard or implement your own DIY drawers on the bottom base. This could act as a form of secret storage, as you won't be able to see it unless you look for it, which is a unique way to add a bit of fun while acting as a simple under-bed storage solution. If you want a subtle look for a headboard, you could use a small panel of wood and connect it to the frame. However, you can utilize any style you want. To tweak the overall look, add some LED lights on the underside of the top frame, which will act as ambient lighting and help the "floating" illusion stand out. You can grab some from Amazon for $14.99.
However, don't forget about the potential safety concerns. If the bottom part is too small or not sturdy enough, the weight of the top frame could tip it or break it, so you need to make sure your bottom part is solid before going forward.