How To DIY A Budget-Friendly Valentine's Day Garland To Fill Your Home With Love
Decorating for Valentine's Day can be expensive, but a garland of paper hearts is a fun way to celebrate the holiday without hurting your budget. This DIY project only requires a few supplies and some of your time. Since this craft is easy and inexpensive, it's a great activity to do with kids or just to relax, get crafty, and enjoy this season of love.
To start, gather construction paper, scissors, and staples or hot glue. Leftover card stock from previous crafts is also a great choice for paper, especially if you don't want to buy any more. Since this project is so simple, it can be really versatile. You could choose to have pink, red, or white hearts or a combination of colors. If you prefer more natural hues, you could also try brown craft paper.
There are several ways to style this Valentine's Day DIY. Your garland could consist of interlocking hearts, or you could glue them together side by side or end to end for a different aesthetic. For those that have string, yarn, or ribbon on hand, you could cut out solid hearts and attach them this way.
How to DIY a Valentine's Day garland
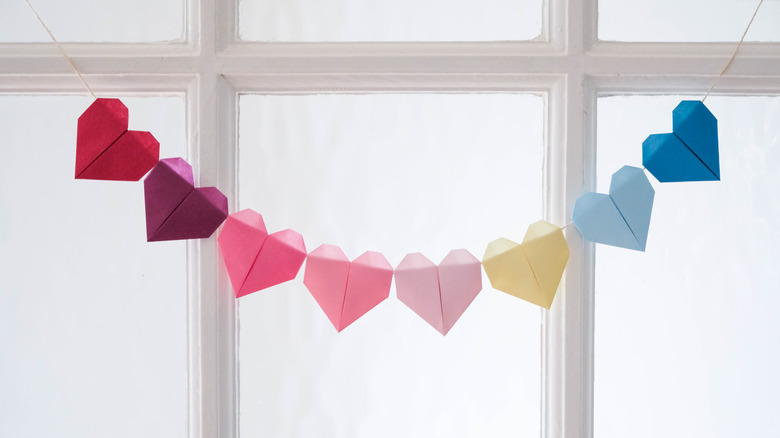
Before you start making your garland, you'll need to decide on a color scheme and style. If you'd like hearts that interlock or are more 3D, as shown by TikTok user Macy.Blackwell, you'll need to cut your paper into strips. Cut lengthwise down a regular size piece of construction paper, creating strips that are about an inch wide. You could make all your hearts the same size, or you could cut some strips from the wide end of the page to add smaller hearts.
For an interlocking garland, fold your strips in half to create a crease for the bottom of your heart. Now, bend the ends of paper inward to make the top of your heart and staple or hot glue them in place. When your first heart is finished, put your next strip through it before making the shape of your second heart. This will allow the paper hearts to hold each other together, creating an adorable, simple garland. If you want your hearts to be more symmetrically lined up, make all of them separately, making your crease and gluing the ends together to form your shape. You could also glue the ends to the crease in the bottom of the heart for a more pronounced look. When your hearts are finished, hot glue them together at the sides of the curves to make your garland.
More tips to DIY a Valentine's Day garland

For those who want a different look, try attaching your paper strip hearts together top to bottom. Make your first heart and before stapling, line up the crease of your next heart on top of the fold of your first. Staple to attach them and continue doing this as you make each heart. With this method, all the hearts in your garland will be facing one direction, with the pointed base of one heart nestled in the top crease of the next. You can also attach a piece of ribbon to the top of the last heart to help you hang your garland.
If you'd prefer solid hearts rather than open, cut your heart shapes directly out of the paper in whatever sizes you like. You can also use a heart punch, like this Recollections Heart Lever Punch from Michael's, though this option is less budget-friendly. After cutting out your first heart, you could use it to trace on your paper and make the rest of the hearts to ensure they're uniform without a paper punch. Cut two small slits horizontally in the center of each heart and thread your yarn, string, or twine through it. Knot the string on the ends to make sure your hearts don't fall off. This Valentine's Day DIY allows you to create your perfect garland to decorate your mantel or hang from your staircase without breaking the bank.