The Space Saving DIY You Should Know Before Planting Cabbage
We may receive a commission on purchases made from links.
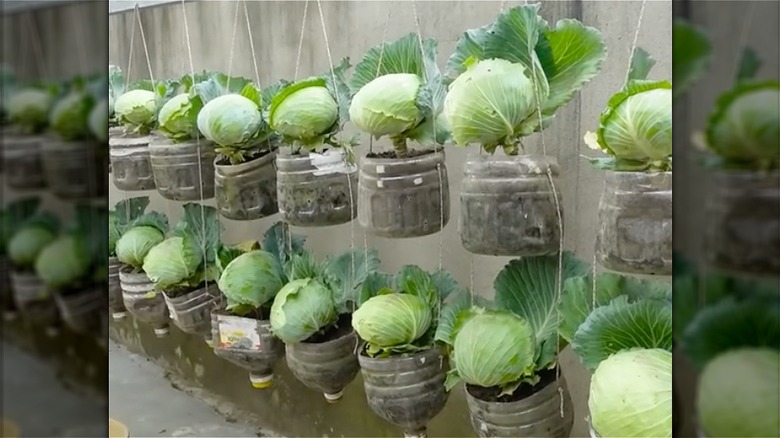
There's no greater satisfaction than producing food right in your yard, and one veggie you could grow is cabbage. With enough hard work and dedication, your efforts will pay off to your greatest delights, but you have to space out cabbage correctly to get the best results. They need to be planted at least 1 foot away from one another, and each row should have 2 to 3 feet of space. If you have limited land and want to grow lots of cabbage, you may feel like this is an impossible dream. Fortunately, TikTok DIY garden hack creator @gardenbyme dishes out an innovative way to grow cabbage. He places them in columns of hanging plastic bottles.
Plenty of crops can be grown in hanging planters such as tomatoes, and cabbage is no exception. Since they need space to do their thing, hanging them from stacked plastic bottle planters is great for both the harvest and your small yard. Plus, this will allow you to repurpose old plastic containers into hanging planters instead of discarding them. To create your own outdoor hanging cabbage garden, you'll need a post that you can hang the planters from. You'll also need some supplies that you may already have or could buy on Amazon. These include soil, a soldering iron kit, a blade, and strong plastic twine. The creator used ordinary nails to hang the planters, but S-shaped metal hooks would be a more aesthetic option.
Placing cabbage plants in hanging planters
Building your DIY hanging planters is very simple, even if your green thumbs haven't come in yet. Gather all the 1.5-gallon plastic bottles you've been planning to recycle and cut them in half. Now, grab your soldering iron and make two opposite holes on the top of each piece near the large opening, which is where you'll thread the hanging twine. You can then add a few holes to the bottom of each planter to act as drainage holes. Add as many planters to each column as you can before tying and looping the twine together at the top and hanging them on the hooks. Before you use your soil, make sure it has been properly nourished with fertilizer, then fill each of the planters up. If you already have cabbage seedlings, transplant them into the planters and give them a generous drink of water.
If you need larger planters, you can get bigger plastic bottles. Further, if you don't like the way the plastic planters look and want to make them more aesthetic, you can paint them before cutting to add a colorful addition to your garden. However, keeping the bottles clear will allow you to see what's happening with your plants' roots. You could also use thick rope instead of plastic twine for a more decorative, rustic look.
Caring for your hanging cabbage plants
Although you're growing cabbage in hanging planters, you should still abide by the normal needs of the plants. When preparing the soil, keep in mind that cabbage needs well-drained, moist soil. If the dirt in your yard isn't up to par, you may have to purchase quality soil. Composting is another great way to keep the dirt hydrated and nutrient-filled. You can also fertilize regularly, preferably weekly, with NPK and calcium nitrate for the first seven weeks after planting the seedlings. Make sure you run soil tests to check that the soil isn't acidic, as cabbage thrives in a pH level ranging from 5.5 to 6.5.
Cabbage needs at least six hours of full sunlight every day. Make sure that the post they're hanging off of is positioned directly in the sun and not in the shade. Your new seedlings should receive enough water directly to the soil after being planted, but don't overwater them. Since they'll be in planters and not the ground, there is an increased risk of root rot. Also keep in mind that since the planters are hung one over the other, the ones on top will drip excess moisture onto the ones below through the drainage holes, so the lower ones may need slightly-less water. Harvesting your mature cabbage heads is simple. A knife to the stem will do the trick, and remember to leave a few extra leaves around the heads for protection.


