Upgrade Your Old Door Frames On A Budget With This Clever Plinth Block Trick
It's not unusual for the base of a door casing to get a little deteriorated or beat up or to float above the floor like the pants of a kid who's outgrown them. Replacing the casing probably seems like an enormous expense to fix a relatively small flaw, but it turns out to be a quick fix using something called a plinth block. YouTube creator @EmyLuDesigns has a short video explaining how this little-known, inexpensive, and handy bit of trim that can change the look of your door casings.
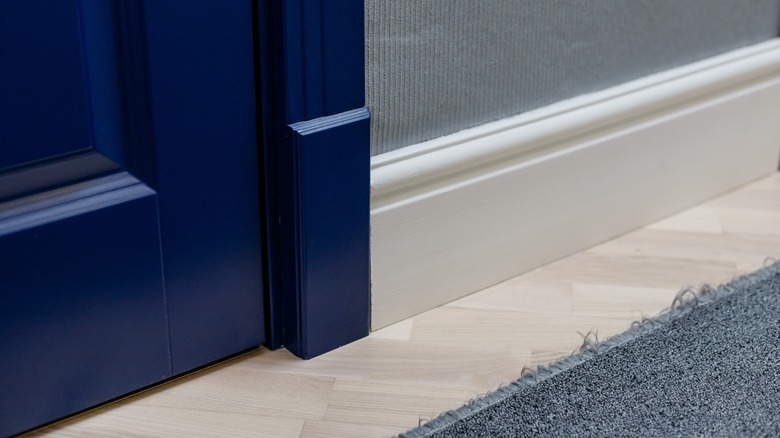
"Plinth" has come to mean a feature that suggests heavy anchoring or grounding of an object, and it is commonly applied to squarish trim with a grounding visual effect on door casings and column bases. Being simple, rectangular blocks of trim, it's usually a simple matter for a DIYer to add a plinth block to an existing doorway.
This solution has a lot of appeal, and it's not just a solution for damage. You might simply like the look, which has a classical vibe, but the versatile trim can be used to improve the appearance of any room. However, perhaps the most common reason is that the bottoms of door frames are often just plain "ugly," as @EmyLuDesigns puts it. This is usually because door casings often aren't flush with the floor, and their profile doesn't match the baseboard, which leads to an awkward transition that can be eliminated with a plinth block.
How to Install a Plinth Block
It's difficult to repair such deteriorated trim (and often impossible to find matching trim to replace the original). Still, the process of installing plinth blocks is about as simple as DIY projects get. Measure the plinth block you've chosen or, better yet, hold it in place and trace around it. The block shouldn't interfere with the operation of a door, but it can extend beyond the casing on the other side and can be as tall as you want. Cut away the part of the trim (and adjacent baseboard) to be replaced. An oscillating multi-tool is the best option for this, though you could manage it with just about any saw with a blade that cuts almost to the end of the saw ... you could use a hacksaw blade, for example, but not a hacksaw itself because the frame would get in the way. All that's left is to tack in a plinth block, caulk the baseboards and casing, and paint.
Note that there's no fussing about trying to find the right size of plinth block; anything that suits the style of your room and its trim, even very broadly, should work just fine. Thankfully, a plinth block doesn't have to match to look great. When you find a situation like that in interior design, you almost have to take advantage of it. It truly is that rarest of DIY projects that's easy, cheap, and usually turns out better than the original.