We Created A Cheap Soda Bottle Water Fountain That Had Surprising Results With Feathered Friends
We may receive a commission on purchases made from links.
We love attracting different types of birds to our backyard. With several kinds of food and feeders, along with a bird bath, our outdoor space has everything our feathered friends could want. We are particularly fond of hummingbirds. Not only do we have a hanging feeder, but we also have a window-mounted option to watch them from our living room. You could certainly say we are a little obsessed. When we saw this YouTube video showing how to make a cheap, portable water fountain for our birds, we thought, "We can do that." Famous last words, right?
We have had our share of crafting failures, but we don't talk about those. The step-by-step process provided in the video certainly made it seem like anyone could make it, even the slightly craft-challenged. However, we had a feeling that this was a project that would throw us a curveball or two before hummingbirds were happily splashing in our DIY fountain.
Gathering the budget-friendly supplies
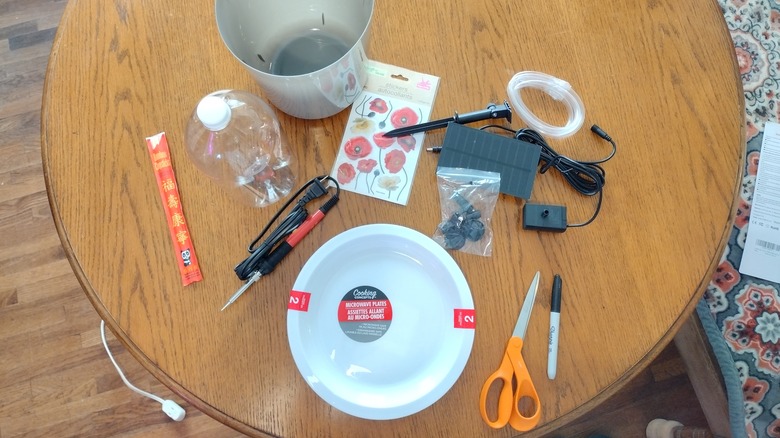
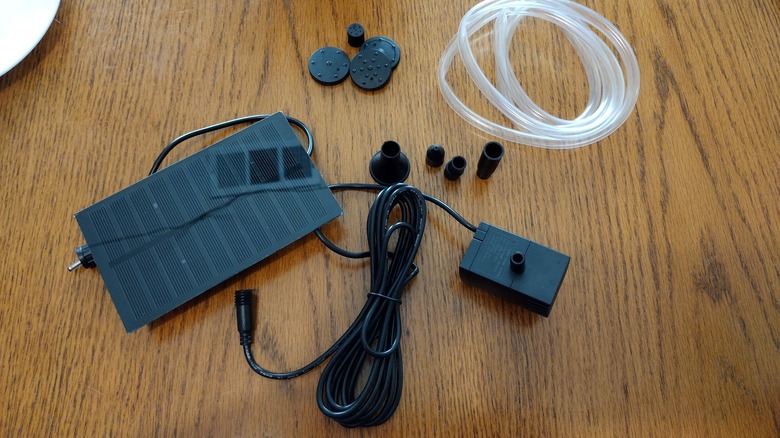
The supplies for this project were pretty inexpensive. Of course, we already had some of the basic items on hand: a permanent marker, scissors, and chopsticks from take-out. From Amazon, we purchased a soldering iron for about $10 and a fountain kit, which included the tubing, for about $12. We were able to get everything else we needed from the Dollar Tree for $1.25 each. On our list was a small plastic trash can, a plastic plate that fit on top, and a clear 2-liter bottle of sparkling water. We also purchased some stickers but decided we preferred the fountain without them.
If you already have a soda bottle from your recycling bin and a soldering iron, you could do this project for about $15. Although the video mentioned going to a specialty shop for fish aquarium supplies, we were able to skip that step and expense by selecting a fountain with the tube included. All we needed was a few minutes on Amazon and a quick trip to Dollar Tree to get everything we needed. We gathered the rest of the supplies and a bag for trash before we got started.
Prepping the utilitarian fountain container
Before discussing the process of burning plastic with a soldering iron, we cannot overstate the importance of ventilation. It is not mentioned in the video, but if you are working indoors, it is absolutely vital to have a way to remove the odor of burnt plastic from your space. We had to work at our dining room table, so we placed a box fan facing outward in an open window to draw away the stinky air. We plugged in our soldering iron and placed it on the included stand so it would not accidentally burn us or our table.
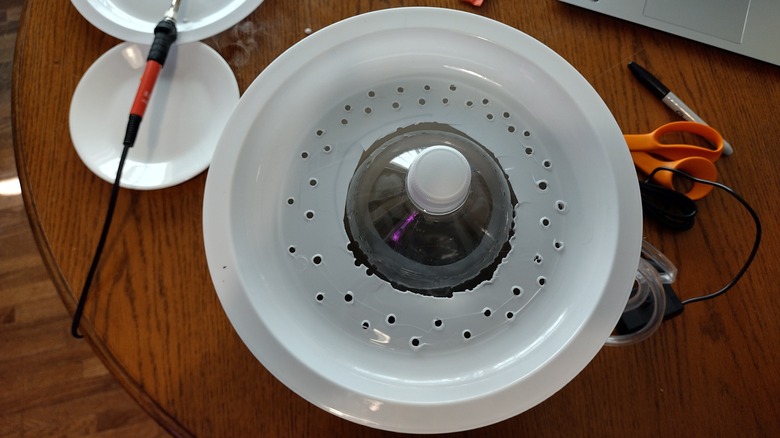
Following the instructions in the video, we started by placing our soda bottle on top of the plate and tracing around it. This would help us make a hole large enough for the top of the bottle to fit while the plate sits flush on the trash can. We then made many holes along the line with our soldering iron to make the center easier to cut out. We quickly discovered that those flimsy plates crack easily, and tiny plastic shards go everywhere. As such, while we managed to make the hole for the top of our soda bottle, it was not pretty. Then, we added many more holes to the plate so water could flow back into the trash can. We also added a small notch to the rim of the trash can for the cord that goes from the fountain to the solar panel.
Installing the fountain pump
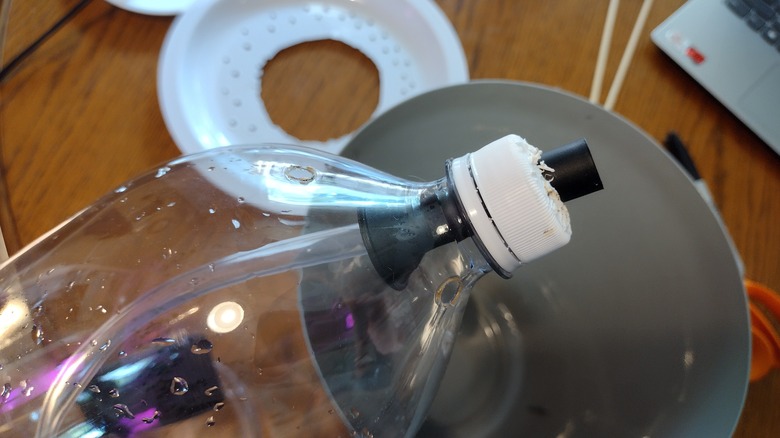
With the container prepped, we moved on to installing the fountain pump and cut out a square large enough to insert the motor. We also burned a hole in the lid for the fountain top to stick out of. Since our fountain came with several options for the top, it took some trial and error to find the right combination and make the hole the correct size. Since we were still working with our soldering iron, we added four holes near the top to insert our chopsticks, giving larger birds a place to perch.
After securing the fountain top, it was time to connect it to the motor using the included tubing. Since the tube was way too long, we cut it so that it would fit inside the soda bottle without kinking, which would stop the flow of water. We connected the motor to the fountain top and inserted it into the bottle with the power cord hanging out. Now it was finally time to place the soda bottle in the trash can and fill it about ¾ full with fresh water. The power cord was connected to the solar panel, which we placed in full sun. We put the plate on top, and we were finished. Kind of.
Not exactly sturdy, but easy to customize with sticks
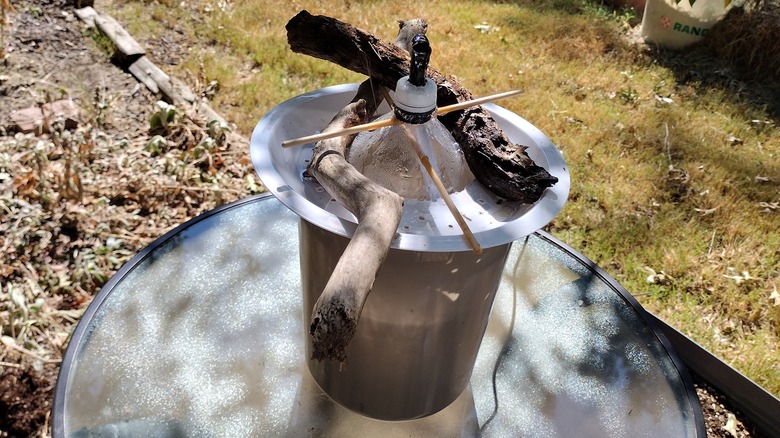
After putting the plate on top, we discovered a massive flaw in the original design. It was windy the day we placed our water fountain outside, causing the lightweight plate on top to nearly fly away. We needed to find a way to secure it immediately. Thankfully, our dog is a connoisseur of fine sticks, and there were a few around our back porch. We wedged them under the chopstick perches to keep the top on. Although it wasn't in the plan, we ended up liking the look of it. If we were to do this again, we would purchase small decorative rocks from the dollar store to keep the plate in place and hide the jagged cuts while still allowing water to filter through. We opted not to add the stickers because we do not think they will stand up well to the weather.
Because of the jagged edges in the center of the plate, the bird fountain isn't very pretty up close; however, when added to our small bird sanctuary, it's attractive enough. It also makes a pleasant trickling sound, adding the unexpected benefit of making the space extra relaxing. So far, we have not noticed any hummingbirds stopping in for a drink, but it has attracted mourning dove visitors who will hopefully spread the word about our new fountain.
